Sealed Sword Chapter 8x: The Blazing Sword
Walkthrough
Having rescued Lilina and the rest of Ostia from the rebellion, Roy and his troupe move towards a cave on the Lycian border that is said to house the great sword Durandal of the hero Roland from Lycia. Alas, brigands have gotten to our prize before we could, we'll have to defeat them to claim our legendary weapon.
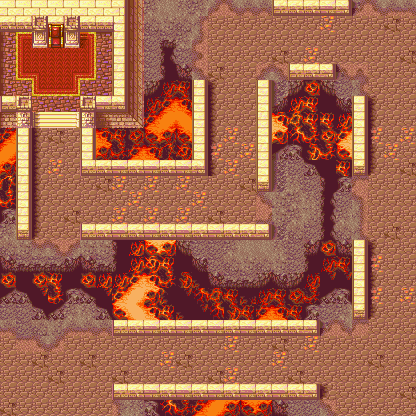
The cave we are in is one full of lava and extreme heat. There are lots of lava tiles around the map and at the end of each turn, random tiles will flare up and deal 10 damage to any units that are standing on them. Only stand on a tile if you have to, and make sure you can't be attacked before the end of the enemy turn.
The hardest part about this level is the boss, he is exceedingly strong and actually quite tough to beat. The rest of the chapter isn't too difficult, but before we start please realise that the myrmidon with the armorslayer on the north western side most certainly does move. Too many times I have been training Wendy and left her in range of him, forgetting that he moves.
There is only one path around the map, anti-clockwise around it. There are some enemies towards the west initially, they are just free exp for whoever you choose. This chapter is great for training sword users, Oujay, Roy or one of the newer cavaliers, take your pick because there are so many fighters littered around the map that you can easily gain a few levels.
Once the enemies towards the west have been taken care of, it's time to head towards the north. There's an easy tell to understand which enemies move and which ones don't, the ones with vulneraries most certainly don't move, so steal the vulneraries before you kill them.
Keep moving around the map, try and lure out some of the units if you're unsure whether they move or not. The hardest part of the map apart from the boss is the final little stretch that goes westwards towards the throne room. The four enemies along this path are quite strong and can be annoying to deal with. Watch out for the myrmidon, kill him first and then deal with the rest.
The enemies inside the throne room aren't much trouble, but the boss is. Let's do this.
| Boss |
| Henning |
 |
 |
Throne: +3 Defence, +30 Avoid |
| Description |
The leader of a group of bandits that roam around Ostia. |
| Hero |
Health |
Str |
Skl |
Spd |
Lck |
Def |
Res |
Con |
| Lv. |
33 |
10 |
19 |
16 |
5 |
11 |
2 |
10 |
| Items |
Steel Blade, Hand Axe |
  |
| Quotes |
Fight: "*sigh* What are you guys doing in a place like this? Oh well, but since you're already here... I can't let you guys go, can I?" |
Defeat: "Crap... I knew this would happen" |
| Defeat |
Do not melee attack him. The Steel Blade is way too strong, and he has a very small crit chance that I have had activate on me too many times. Attacking him from range with magic and long range weapons is your best bet. Your hit rates might be pitiful but just keep trying, you'll take him down eventually. If you have a trained Dieck in your team, make the boss use his Hand Axe and then go in with Dieck. The resuce, drop and heal method will be in use a lot here. |
| Map |
 |
| Items |
| Items |
Obtain |
| Durandal |
 |
End of Chapter |
| Door Key |
 |
Steal from fighter |
| Vulnerary x 8 |
 |
Steal from enemies |
| Enemies |
| Enemies |
Level |
Amount |
Items |
| Archer |
5 - 8 |
x 3 |
Steel Bow |
| Fighter |
5 - 6 |
x 5 |
Iron AxeHand Axe |
| Fighter |
6 - 10 |
x 7 |
Steel Axe |
| Fighter |
7 |
x 1 |
Steel AxeHand AxeDoor Key |
| Fighter |
10 |
x 1 |
Halberd |
| Mercenary |
3 |
x 1 |
Iron Sword |
| Mercenary |
3 |
x 1 |
Steel Sword |
| Mercenary |
6 |
x 1 |
Iron SwordVulnerary |
| Mercenary |
7 |
x 1 |
Steel Sword |
| Mercenary |
10 |
x 1 |
Steel SwordVulnerary |
| Mercenary |
10 |
x 1 |
Killing EdgeVulnerary |
| Myrmidon |
6 |
x 1 |
Steel SwordVulnerary |
| Myrmidon |
8 |
x 1 |
Armorslayer |
| Mage |
5 |
x 1 |
Fire |
| Mage |
6 |
x 1 |
ThunderVulnerary |
| Mage |
8 |
x 1 |
ElfireVulnerary |
| Mage |
12 |
x 1 |
Aircalibur |