Sealed Sword Chapter 11 A: Hero of the West
Walkthrough
This is one of my least favourite chapters in the entire game. So much can go wrong in the space of a second. There are so many variables it's just cruel. I'm always on edge when playing this chapter praying that something goes wrong. The entire dynamic of this chapter can switch at any moment.
We get a new character at the beginning of this chapter, a Dancer named Lalum. She has no fighting abilities herself, but she can dance which allows one of your other units to move again which can be very useful in this map. Also she is needed to recruit a character that appears later on in the chapter.
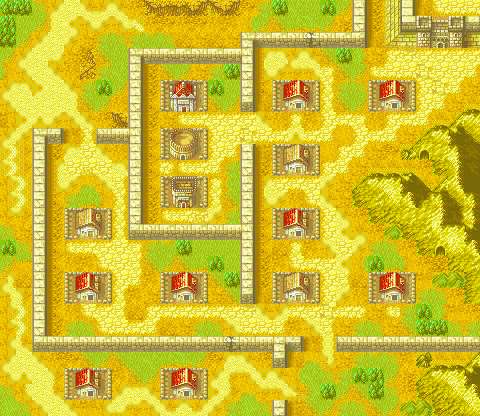
The layout of the map is horribly awkward, who designs their town like this?. There are two villages on the south side, two near your position and four on the far side of the wall, with two of those being very close to the mountains.
Characters I recommend in bringing for this chapters are those with high mobility, I bring three cavaliers with me, their mobility, speed and use of swords helps us to get across the map and deal with the abundance of axe users littered around the place.
You also need to bring Clarine as she is needed to recruit an enemy character that appears later on. Thany can also be useful with her ability to fly over walls.
In this next section, I am going to detail the variables we are going to be dealing with.
1. Klein and his Four Archers.
Klein appears as an enemy with four archers on turn 5, on the southwestern side of the map. If you talk to him with Clarine, he will join you and the archers by his side will become NPC's and will attempt to leave the map via the little alley beside the bosses throne. Many problems now arise from this, the first being there is a bug that sometimes just randomly happens, that Klein will not move. His four archer accomplices will, but he will not, and they will block your route to him so that the only way to get to him is by killing his archer buddies.
If all four of his allies survive we recieve an Orion Bolt which is always handy. The more prevalent problem is that these NPC archers are staring at a sea of enemies towards the northern part of the map. 5 fighters and 2 archers lie north of this position. This is why we need the Cavaliers, to get into position to try and deal with these enemies quickly.
2. Brigands in the east.
Our second variable appears on turn 6, two Brigands appear from the openings in the mountains to the east and they head straight for the closest villages. They won't destroy the villages if there is somebody in range for them to attack. But to save the northern village you have to defeat the sea of fighters that are blocking the way. Even leaving a unit at the very edge of the northern Brigands range is enough since he has a hand axe.
3.Tate and her Pegasus Knights.
Tate and her 4 Pegasus Knight allies appear on turn 7 from the north-western part of the map where we started, I pray that you left nobody up there. Again, the same bug persists with Tate as it did with Klein. Sometimes, she will just not move. If it happens, you can maybe work around it, but usually I just restart. Tate and her crew will fly towards your position, and reach you in around two turns. If all four of her allies survive, you recieve an Elysian Whip, so keeping all 4 of her allies alive is extremely important. The only way to recruit Tate is to talk to her with Klein, when you do this her 4 allies become neutral NPC's and head the same direction as the archers.
If you talk to her with Thany however, Tate herself becomes an NPC and her 4 allies become active NPC's, which means they do not head for the exit and instead roam around the map, looking for enemies to fight, and inevitably getting themselves killed. I do not advise this option, mainly because Tate herself just stops and needs to be rescued and brought to Klein while her allies play My Little Kamikaze. Look at movment indicators and make sure that none of them can attack your units, try and draw them in close so that Klein can talk to her.
4.The fourth variable is Echidna. She is an NPC Hero that appears on turn 8 from the house on the eastern side of the map. You can recruit her by talking to her with Lalum. The only problem is that she also appears with 3 enemy fighters who are trying to kill any units they can. You need to surround the house essentially with sword users, if you put units too close to the fron part of the house it will block where the fighters are supposed to spawn and will push them out to the east, right into the rest of your team. If you have a trained theif, this is the perfect time for them to get use.
The enemies are drawn to a thief like flies, no matter who else is in range, except for Lalum, they will attack your thief instead. So make use of this and kill the fighters on your turn before they can do any damage.
If all four of these events fall into place perfectly, you should have several saved villages, three new units at your disposal, a mound of dead enemies, and some one track-minded NPC's.
Sadly it's not over yet. On turn 10, seven Cavaliers appear from the starting position and begin making their way towards you. These can be good experience except that there is one that is extremely powerful. There is a level 19 Cavalier with a Killer Lance, he is a real threat. He has one shot my Echidna before.
Brigand reinforcements also appear from the mountains again after turn 10 but they are just fresh exp fodder for some of your weaker units.
Once that is done, you can send somebody down to the southern villages if you haven't done so already and it's time to head towards the boss.
| Boss |
| Oro |
 |
 |
Gate: +3 Defence+20 Avoid |
| Description |
A priest of the Elimine Church supervising Mt. Ebrakhm. |
| Bishop |
Health |
Mag |
Skl |
Spd |
Lck |
Def |
Res |
Con |
| Lv.8 |
34 |
15 |
11 |
10 |
10 |
9 |
17 |
7 |
| Items |
Divine |
 |
| Quotes |
Fight: "Going against me... is the same thing as going against God! Take your punishment from my hands!" |
Defeat: "You... You heathen... I represent God... Gah...!!" |
| Defeat |
The boss is damn strong, but he has low defence so strong physical attacks are our best bet, our magic users are useless. If you have any uses of the Killing Edge, Killer Bow or Fir's Wo Dao, make good use of them. Crits are your friend. Rescue and heal units who get too low. |
| Map |
 |
| Items |
| Items |
Obtain |
| Restore |
 |
Visit Village |
| Speeedwing |
 |
Visit Northern Village |
| Dragonshield |
 |
Visit Village |
| 5000 Gold |
 |
Visit Village |
| Orion Bolt |
 |
Visit Village |
| Sleep |
 |
Visit Village |
| Axereaver |
 |
Visit Village |
| Angelic Robe |
 |
Visit Village |
| Hero Crest |
 |
End of chapter if all villages survived |
| Orion Bolt |
|
End of chapter if all Klein's allies survive |
| Elysian Whip |
 |
End of chapter if all Tate's allies survive |
| Enemies |
| Enemies |
Level |
Amount |
Items |
| Archer |
13 / 14 / 15 |
x 3 |
Steel Bow |
| Archer |
14 |
x 2 |
Longbow |
| Archer |
14 |
x 1 |
Killer Bow |
| Fighter |
13 - 15 |
x 6 |
Steel Axe |
| Fighter |
13 - 15 |
x 2 |
Steel AxeHand Axe |
| Fighter |
16 |
x 1 |
Halbed |
| Fighter |
14 |
x 1 |
Iron Axe |
| Fighter |
14 |
x 2 |
Hand Axe |
| Shaman |
14 - 16 |
x 3 |
Flux |
| Reinforcements |
| Enemies |
Level |
Amount |
Items |
Location |
| Turn 5 |
| Klein |
| Archer |
14 - 15 |
x 4 |
Steel Bow |
South East |
| Turn 6 |
| Brigand |
15 |
x 1 |
Steel AxeHand Axe |
Mountains in the East |
| Brigand |
15 |
x 1 |
Steel Axe |
Mountains in the East |
| Turn 7 |
| Tate |
| Pegasus Knight |
6 |
x 1 |
Iron Lance |
North West |
| Pegasus Knight |
6 |
x 1 |
Steel Lance |
North West |
| Pegasus Knight |
6 |
x 2 |
Iron LanceJavelin |
North West |
| Turn 8 |
| Fighter |
15 - 17 |
x 3 |
Hand Axe |
House with Echidna |
| Turn 10 |
| Cavalier |
14 |
x 2 |
Iron Lance |
North West |
| Cavalier |
14 - 15 |
x 4 |
Iron LanceJavelin |
North West |
| Cavalier |
19 |
x 1 |
Killer Lance |
North West |
| Turn 11 - 14 |
| Brigand |
15 |
x 1 |
Steel AxeHand Axe |
Mountains in the East |
| Brigand |
15 |
x 1 |
Steel Axe |
Mountains in the East |
| New Characters |
| Lalum |
 |
 |
Dancer |
| Description |
A young dancer helping the rebel forces on the Western isles. |
| Base Stats |
Health |
Str |
Skl |
Spd |
Lck |
Def |
Res |
Con |
Affinity |
| Lv.1 |
14 |
1 |
2 |
11 |
9 |
3 |
7 |
6 |
 |
| Growth Rates |
70% |
10% |
5% |
70% |
80% |
20% |
30% |
-- |
-- |
| Starting Items |
None |
| Weapon Levels |
None |
| Recruitment |
Automatically Turn 1 |
|
| Klein |
 |
 |
Sniper |
| Description |
An Etrurian General leading one of the forces on the Western Isles. |
| Base Stats |
Health |
Str |
Skl |
Spd |
Lck |
Def |
Res |
Con |
Affinity |
| Lv.1 |
27 |
13 |
13 |
11 |
10 |
8 |
6 |
7 |
 |
| Growth Rates |
60% |
35% |
40% |
45% |
50% |
15% |
25% |
-- |
-- |
| Starting Items |
Silver Bow, White Gem |
  |
| Weapon Levels |
Bow A |
| Recruitment |
Talk with Clarine |
|
| Tate |
 |
 |
Pegasus Knight |
| Description |
The leader of the Pegasus Knight squad sent from Ilia to the Western Isles. |
| Base Stats |
Health |
Mag |
Skl |
Spd |
Lck |
Def |
Res |
Con |
Affinity |
| Lv.8 |
22 |
6 |
8 |
11 |
3 |
7 |
6 |
5 |
|
| Growth Rates |
60% |
40% |
45% |
55% |
40% |
15% |
20% |
-- |
-- |
| Starting Items |
Slim Lance, Javelin |
  |
| Weapon Levels |
Lance D |
| Recruitment |
Enemy. Talk with Thany to turn to NPC. |
|
| Echidna |
 |
 |
Hero |
| Description |
The Leader of the rebels on the Western Isles. |
| Base Stats |
Health |
Str |
Skl |
Spd |
Lck |
Def |
Res |
Con |
Affinity |
| Lv.1 |
35 |
13 |
19 |
18 |
6 |
8 |
7 |
9 |
|
| Growth Rates |
75% |
30% |
25% |
30% |
20% |
15% |
15% |
-- |
-- |
| Starting Items |
Steel Axe |
 |
| Weapon Levels |
Sword C Axe B |
| Recruitment |
Appears from village. Talk with Lalum. |
|