Sealed Sword Chapter 10 B: Caught in the Middle
Walkthrough
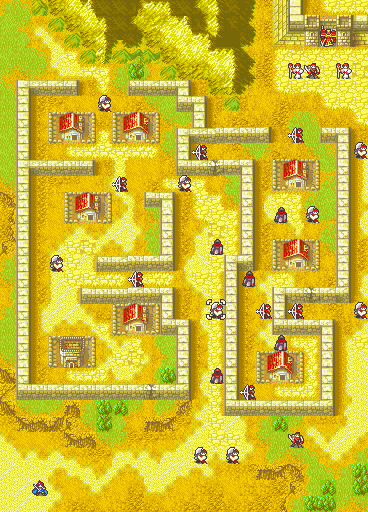
Having visited the right-hand side village in Ch.9, Roy and crew head south towards an area of the Western Isles where the rebel forces have apparently been crushed. As they try to learn more they are suddenly attacked by the Lord of the area...
This chapter isn't as difficult as it first seems, it's all about moving quickly. There are 7 villages to visit, each giving different sorts of valuable items. The most important villages are the two in north-west corner. These villages are special, if you visit them with any random character, you will recieve a Door Key and an Elixir, but if you visit them with either Ward or Lot, you will get different items. A Speedwing and a Swordreaver which are much more valuable.
There is an abundance of fighters littered around the map, along with some shamans, mercenaries and archers that all carry Steel Bows. Strong ranged units are useful in this chapter because of all of the walls to shoot over. The enemies do not try to break the break-able sections of wall, the ones inside the walled enclosure will try to reach you by going in a clock-wise direction around the map via the passageway on the eastern side.
Make sure you bring Lilina, Clarine and Thany in this chapter. They can all recruit people in this chapter, or if they can't they make it easier to recruit people.
Nothing at all happens for the first five turns of this chapter, you can move around at your leisure. Send your units north through the passageway up towards the northern part of the map. You want to have Lot/Ward in a position to visit the villages in the north-west.
Four brigands appear in the north-west corner on turn 6 and they begin to head south towards the villages. If you have visited both of the villages in the north-west before they can get close to them, they will head east over the mountains for the villages inside the walled enclosure. So don't visit the villages until after you have lured the bandits in.
One of the brigands is Gonzales, a very ugly bandit with a kind heart. If you talk to him with Lilina, he will join you. Brigands spawn every 2nd turn for the next 4 turns after turn six. Leave a sword user you want to train up close to this corner to gain some good exp.
After turn six it begins to get tricky. On turn 8, Klein and four archers appear from the south-east corner. They immediately start moving westwards to head up the passageway. Leave Roy or Clarine in rage of the brush tile right beside the southern part of the wall. Klein moves to right beside this tile. Talk to him on your turn to get him to join. His 4 archers become NPC's that then try and leave the map via the northern part of the map, right beside the gate.
This part isn't too evil. On turn 10 though, Tate and 4 pegasus knights appear from the northern part of the map and immediately start moving. As well, 5 cavaliers appear from the south-west, or our starting position.
The cavaliers rush straight for the poor NPC archers who are just trying to leave the map. What I do to defeat this section is to take the Horseslayer you recieved in Ch.7 and leave a strong Lance user with it equipped in the south-east area. Bors, one of the cavaliers or even a trained Thany can make light work of those cavaliers. If you don't have a trained lance user, use an axe user or somebody with high dodge. If not, those poor NPC archers won't be lasting much longer.
Tate and her crew are a problem. She appears two turns after we have recruited Klein. That's barely enough time to get him to rush up the map and be in range to talk to her. Set it up so that from his position, he will move into range to be rescued by a mounted unit, who will move into range of another who can then drop him close by. When Tate's group does appear, have the sword user you have in the north-west move southwards a bit so that the pegasi don't rush straight for them.
The other thing you can do is get Thany to talk to Tate. I don't advise this because, when Klein talks to Tate, Tate joins and the 4 pegasus knights become unresponsive NPC units. They just sidle towards the exit no questions asked. If Thany talks to her however, Tate becomes an unresponsive NPC, and her 4 pegasi become normal NPC's. This means the pegasi will try an attack the closest enemy, no matter what it is and end up dying.
Once Gonzales, Klein and Tate have been recruited, the cavaliers are dead in the south-west and the other enemies are slowly making their way towards you in single file, it's time to end the chapter. Visit the villages, defeat the remaining few enemies, break through the wall and head up for the boss.
| Boss |
| Zinc |
 |
 |
Throne: +3 Defence+20 Avoid |
| Description |
An Etrurian general in charge of a small fort on the Western Isles. |
| General |
Health |
Str |
Skl |
Spd |
Lck |
Def |
Res |
Con |
| Lv.5 |
37 |
11 |
8 |
6 |
4 |
15 |
6 |
15 |
| Items |
Silver Lance, Javelin |
  |
| Quotes |
Fight: "The people are suffering...? Fools. What is it to me? Their purpose is to die in my service. I couldn't care less about the wails of those worthless animals." |
Defeat: "This is my land... Mine only... No one... shall..." |
| Defeat |
He's not very difficult of a boss. A strong axe user, magic user or the trusty boss-killing Armorslayer all do very well against him. |
| Map |
 |
| Items |
| Items |
Obtain |
| Dragonshield |
 |
Visit Village |
| Swordreaver |
 |
Visit Village |
| Orion Bolt |
 |
Visit Village |
| Sleep |
 |
Visit Village |
| Door Key or Swordreaver |
 or or |
Visit Village |
| Elixir or Speedwing |
 or or  |
Visit Village |
| Wyrmslayer |
 |
End of Chapter |
| Hero Crest |
 |
End of Chapter if all Villages survived |
| Orion Bolt |
|
End of Chapter if Klein's allies survive |
| Elysian Whip |
 |
End of Chapter if Tate's allies survive |
| Armory |
| Items |
Price |
| Slim Lance |
 |
450G |
| Iron Lance |
 |
360G |
| Steel Lance |
 |
480G |
| Javelin |
|
400G |
| Iron Axe |
 |
270G |
| Steel Axe |
 |
360G |
| Hand Axe |
 |
300G |
| Hammer |
 |
800G |
| Iron Bow |
 |
540G |
| Steel Bow |
 |
720G |
| Enemies |
| Enemies |
Level |
Amount |
Items |
| Archer |
11 - 12 |
x 2 |
Iron Bow |
| Archer |
11 - 12 |
x 5 |
Steel Bow |
| Fighter |
10 |
x 6 |
Steel Axe |
| Fighter |
10 |
x 2 |
Hand Axe |
| Fighter |
12 |
x 1 |
Killer Axe |
| Mercenary |
9 |
x 1 |
Steel Sword |
| Mercenary |
12 |
x 1 |
Steel Blade |
| Shaman |
9 - 12 |
x 4 |
Flux |
| Shaman |
9 |
x 1 |
Nosferatu |
| Priest |
11 - 12 |
x 2 |
Physic |
| Reinforcements |
| Enemies |
Level |
Amount |
Items |
Location |
| Turn 6 |
| Gonzales |
| Brigand |
11 - 13 |
x 2 |
Iron Axe |
North West |
| Brigand |
13 |
x 1 |
Hand Axe |
North West |
| Turn 8 |
| Klein |
| Archer |
14 - 15 |
x 4 |
Steel Bow |
South East |
| Turn 9 - 13 |
| Brigand |
13 |
x 1 |
Iron Axe |
North West |
| Brigand |
13 |
x 1 |
Hand Axe |
North West |
| Turn 10 |
| Tate |
| Pegasus Knight |
6 |
x 1 |
Iron Lance |
North |
| Pegasus Knight |
6 |
x 1 |
Steel Lance |
North |
| Pegasus Knight |
6 |
x 2 |
Iron LanceJavelin |
North |
| Turn 10 |
| Cavalier |
12 - 13 |
x 2 |
Steel Lance |
South West |
| Cavalier |
13 |
x 1 |
Steel LanceIron Sword |
South West |
| Cavalier |
13 |
x 1 |
Steel LanceJavelin |
South West |
| Cavalier |
18 |
x 1 |
Steel LanceSteel Sword |
South West |
| New Characters |
| Klein |
 |
 |
Sniper |
| Description |
An Etrurian General leading one of the forces on the Western Isles. |
| Base Stats |
Health |
Str |
Skl |
Spd |
Lck |
Def |
Res |
Con |
Affinity |
| Lv.1 |
27 |
13 |
13 |
11 |
10 |
8 |
6 |
7 |
 |
| Growth Rates |
60% |
35% |
40% |
45% |
50% |
15% |
25% |
-- |
-- |
| Starting Items |
Silver Bow, White Gem |
  |
| Weapon Levels |
Bow D |
| Recruitment |
Enemy. Talk with Clarine. |
|
| Tate |
 |
 |
Pegasus Knight |
| Description |
The leader of the Pegasus Knight squad sent from Ilia to the Western Isles. |
| Base Stats |
Health |
Mag |
Skl |
Spd |
Lck |
Def |
Res |
Con |
Affinity |
| Lv.8 |
22 |
6 |
8 |
11 |
3 |
7 |
6 |
5 |
|
| Growth Rates |
60% |
40% |
45% |
55% |
40% |
15% |
20% |
-- |
-- |
| Starting Items |
Slim Lance, Javelin |
|
| Weapon Levels |
Lance D |
| Recruitment |
Enemy. Talk with Klein. |
|
| Gonzales |
 |
 |
Brigand |
| Description |
A Brigand from the Western Isles. |
| Base Stats |
Health |
Str |
Skl |
Spd |
Lck |
Def |
Res |
Con |
Affinity |
| Lv.12 |
36 |
12 |
5 |
9 |
5 |
6 |
0 |
15 |
 |
| Growth Rates |
90% |
60% |
15% |
50% |
35% |
25% |
5% |
-- |
-- |
| Starting Items |
Devil Axe |
 |
| Weapon Levels |
Axe D |
| Recruitment |
Enemy. Talk with Lilina |