FIRE EMBLEM:
ULTIMATE TUTORIAL
Welcome to my “ultimate” Fire Emblem hacking tutorial,
dedicated towards hacking the GBA Fire Emblem games. Don’t say I didn’t warn
you: this tutorial is massive and it
has tons of details. Although this
tutorial is a bit inclined towards Fire Emblem 7: Blazing Sword, the
information can usually apply to the other games. However, this tutorial will
help most for FE7 hackers as it IS FE7 oriented. I will try and add details on
the differences between modules and offsets for different games when I can (the
tutorial is already really long as it is).
Downloads:
HTML Version (Online)
Last
Significant Update: March 27th, 2013
Background
Info (Not necessary to read): Anyhow, I’m a 4-year or so Fire Emblem hacker who is most commonly known by Blazer. My original
username was Fire Blazer as in, one who starts a fire by setting something
ablaze, but that was kinda lame, so now I just go by ‘Blazer’. Anyway, I’ve
made several Fire Emblem hacks. My biggest ones are Prince of Durand (now dead)
and The Last Promise (now finished!) but I’ve also made other hacks like Fire
Emblem: Shining Armor, Fire Emblem: Sacred Contention, Fire Emblem DS: Evil
Version, Fire Emblem Wars, Fire Emblem Rebirth, Fire Emblem Prisoner of
Darkness, and some other minor ones. I was also the lead manager/hacker of the
Fire Emblem 12 Translation Project for part of the time with a team of other
dedicated people (who did more than I did, lol).
Contact
Info: Because I no longer do modding and I’ve been getting far too many e-mails,
people pestering me, etc., I have removed my contact info. Please do not
attempt to contact me anymore. If you need help with hacking, please go on
public forums where various hackers can help you as opposed to… no offense, but
pushing the burdens of your personal projects on me (I know I’m evil for trying
to conserve some of my free time).
Website: http://www.feshrine.net Forums: http://forums.feshrine.net
Youtube: http://www.youtube.com/FireShrine/
Disclaimer: I do not have any rights to Fire
Emblem, Intelligent Systems, or Nintendo, nor do I claim anything by writing
this tutorial, etc., I am just a humble video game player.
Please do not post this tutorial anywhere but the Fire Emblem
Shrine. If I want it to be on a website, I will post it there myself. Thank you
for your understanding.
Please read the
“Epilogue” at the end of this tutorial for more details on using and sharing
the Ultimate Tutorial.
Update Log:
July 8th, 2010 – I’ve remade the tutorial from
near scratch (but included parts of former tutorials as well).
August 19th, 2010 – Updates, added more chapters
(sorry, I forgot to record which things I updated).
February 19th, 2011 – More updates/chapters (see
above).
November 6th, 2011 – Chapter 26 has been slightly
updated. Chapter 45 and the Epilogue have been majorly updated. Added new JFP
patching chapter, and renumbered chapters past it accordingly. Started and
finished IPS, UPS, JFP, and XDelta patching chapters, as well as the Nightmare
Module Format chapter. Also revised chapters 72, 73, and the final chapter.
Only chapters 59-61 remain, which will most likely be finished in the next
update.
November 7th, 2011 – Finished chapters 60 on
weapon icons and 61 on map sprites in one fell swoop. Then, after several
hours, finished chapter 59 on custom spell animations. This means that the
tutorial is now complete—all chapters are finished. Any future updates will
likely only be revisions, adding small details, updates, and adding more
information to the archive chapter, chapter 72. Thanks for reading and waiting
so long for this tutorial’s completion. I hope it helps many people make
awesome hacks! – Blazer
June 7th, 2012 – Minor fixes here and there.
December 4th, 2012 – More fixes and updates and
whatnot.
March 27th, 2013 – Minor fixes, added a chapter on
ASM hacking to the end, making this tutorial well over 300 pages.
With that,
it’s time to start my tutorial!
Table of Contents:
Prologue:
Bare Basics
Chapter 1:
Key Terminology & Abbreviations
Chapter 2: Using
Nightmare Modules
Chapter 3:
File Management
Chapter 4:
Pointer Tables
Chapter 5:
Battle Animation Editor
Chapter 6:
Character Editor
Chapter 7: Class
Editor
Chapter 8:
Item Editor
Chapter 9:
Spell Association Editor
Chapter 10:
Stat Bonuses Editor
Chapter 11:
Promotion Editing
Chapter 12:
Map Sprite Editing in Nightmare
Chapter 13:
Movement Cost Editor
Chapter 14:
Terrain Stat Editor
Chapter 15:
Portrait Editor Module
Chapter 16:
Battle Palette Reference Editor
Chapter 17:
Arena Class Editor
Chapter 18:
Boss Music Editor
Chapter 19:
CG Editing – Custom Cutscene Graphics
Chapter 20:
Lyn’s Ending Editor
Chapter 21:
Tutorial Editing/Getting Rid of the Tutorial
Chapter 22:
Legendary Weapon Editing
Chapter 23-24:
Music Insertion Tutorial (ELF Method) & Documentation
Chapter 25:
Music Editing with Zahlman’s Song Editor (OUTDATED)
Chapter 26:
Exporting Music with GBA2MIDI
Chapter 27:
Battle Background Graphics
Chapter 28:
Music Array Module
Chapter 29:
Sound Room Editor
Chapter 30:
Chapter Unit Editing with Nightmare
Chapter 31:
Death Quotes
Chapter 32:
Event IDs
Chapter 33:
Battle Conversations
Chapter 34:
Triangle Attacks
Chapter
35-36: The Animation Modules & Repointing Tutorial
Chapter 37:
Support Editing
Chapter 38:
Miscellaneous Nightmare Modules
Chapter 39:
Loading FEditor Adv
Chapter 40:
Text Editing with FEditor Adv
Chapter 41:
Portrait Formatting & Preparation
Chapter 42:
Portrait Insertion with FEditor Adv
Chapter 43:
Locating Palettes
Chapter 44:
Editing Palettes
Chapter 45:
Working with GBAGE
Chapter 46:
Chapter Data Editor
Chapter 47:
Map Creation
Chapter 48:
Map Insertion
Chapter 49: Event
Assembler Basics
Chapter 50:
Events – The Layout
Chapter 51:
Events – The Event Codes
Chapter 52:
Event Construction
Chapter 53: Map
Tile Changes
Chapter 54:
Chapter Creation Finishing Touches
Chapter 55:
Importing Tilesets
Chapter 56:
Animation Importation
Chapter 57:
Custom Battle Animations – Frames
Chapter 58:
Custom Battle Animations – Scripts
Chapter 59:
Custom Spell Animations
Chapter 60:
Weapon Icons
Chapter 61:
Map Sprites
Chapter 62:
Proper Betatesting
Chapter 63:
VBA’s Tools
Chapter 64:
Other VBA Options
Chapter 65:
Recording Videos & Sound
Chapter 66:
Fixing the Desync with VirtualDubMod & Video Rendering
Chapter 67:
IPS Patching
Chapter 68:
UPS Patching
Chapter 69: JFP
Patching
Chapter 70:
XDelta Patching
Chapter 71:
Nightmare Module Format
Chapter 72:
Miscellaneous Information Archive
Chapter 73:
Useful Links & Websites
Chapter 74:
Bonus – Assembly Hacking
Final
Chapter: Credits, Thanks, and the Epilogue
Prologue: Bare Basics
Before you
start hacking, you need to know some basics. I’ll be as brief as I can.
Think of a
ROM as a game file. It contains the data for the game in it. When you play the
game and save, save files are created. They contain data about where you are in
the game, what stats there are, what weapons you have, etc.
An emulator
emulates—imitates—playing the game on the actual system. So instead of playing
your ROM on a Gameboy Advance, you’d play it on the computer through an
emulator, which acts like a Gameboy Advance, but with more features.
The system
has some limits to it. There is a limit to the number of colors you can use, a
limit to the # of layers, a limit to the # of tracks a song can have. This is
the hardware’s limits—if you don’t want to deal with these limits, then you are
better off hacking a greater system, like the Nintendo DS, or making your own
game through something like RPG Maker.
That’s about
it for the basics.
Chapter 1: Key Terminology &
Abbreviations
If you want
to follow along hacking discussions, tutorials, and understand what someone is
saying when they are answering one of your questions, you’re going to need to
know some terminology. They may also use some abbreviations as well. Here’s
everything I can think of:
Note: These are not literal or exact
definitions. I define them so that a person can understand them and their
purpose. Please do not contact me to correct me on the actual meaning of a
word. Thank you for your understanding.
-
ROM
– Read-Only Memory, the “game file”
-
RAM
– Random-Access Memory
-
Emulator
– plays a game, imitating playing on the actual system
-
GBA
– Gameboy Advance.
-
NDS
– Nintendo DS.
-
DS
– short for NDS… lol.
-
Hardware
– we’ll just say it’s the ‘system’ the GBA uses to interpret data found from a
cartridge or ROM.
-
Cartridge
– the actual game as it is bought from a store.
-
Save
file – contains save data for the game
-
Savestate
– contains save data for a specific point in the game. One can come back to
this moment in the game through a savestate.
-
ASM
– assembly, the programming for the game
-
TSA
– No one seems to knows for sure what it stands for. Use
your imagination. It’s also called map
data. Its purpose is to take a bunch of mixed-up disorderly graphics and
make some sense out of it so that when you see the graphics in-game, they look
nice. It’s a sort of “layout” for graphics. Hard to explain.
-
Debugger
– a program that helps debug or a game, or search for bugs, find the cause of
them, and fix them. It’s also used to find other things though.
-
Debugging
– the act of using a debugger for its said purpose.
-
Hacking
– editing a ROM.
-
Modding
– another term for hacking, less juvenile I suppose.
-
Formatting
– preparing something to be inserted or used
-
Patching
– applying changes to a game.
-
Patcher
– a program that does patching.
-
Utility
– a tool.
-
Text
– words, characters, script, all types of writing.
-
Graphics
– ‘pictures’, ‘images’, visual aspects of the game.
-
Frame
– a still picture, one part of an animation.
-
Animations
– ‘moving’ pictures—frames put together to give the appearance of something
moving.
-
Compression
– a way to scrunch up data as to save space.
-
LZ77
– A type of compression. Used with graphics, TSA, palettes, and other data.
-
Huffman
– A type of compression. Used in text.
-
RLE
– Run-length encoding. A type of compression that saves space by scrunching up
strings of data.
-
Strings
– hexadecimal bytes one after another.
-
Hexadecimal
– “Base 16”, a way to count, essentially. To denote hexadecimal, one can use
various prefixes, such as ‘0x’ and ‘$’. The basic counting is as follows: 0x00,
0x01, 0x02, 0x03, 0x04, 0x05, 0x06, 0x07, 0x08, 0x09, 0x0A, 0x0B, 0x0C, 0x0D,
0x0E, 0x0F, 0x10. For simplicity purposes sometimes people are lazy and do not
put a ‘0x’ before 0-9, since the decimal and hexadecimal values are the same.
-
Decimal
– “Base 10”, another way to count. Most people are familiar with this.
-
Binary
– “Base 2”, another way to count, sort of. Only uses 0s and 1s. Google for more
info on binary (I RARELY use it).
-
MS
– Microsoft
-
Converter
– something that converts one thing to another type of thing. For example, MS
Calculator can convert hexadecimal to decimal and vice-versa.
-
GBAGE
– GBA Graphics Editor, the best GBA graphics editor for uncompressed and LZ77
data, made by Nintenlord.
-
EA
– Event Assembler, used to edit and insert events. The best way to edit events.
-
NLZ-GBA
– an older program similar to GBAGE, but outdated.
-
unLZ-GBA – an obsolete graphics editor that I probably shouldn’t even
mention.
-
Text
Editing Suite – an obsolete way to edit text.
-
FEditor
Adv – the best way to edit text, animations, and portraits. A program by Xeld,
a veteran Fire Emblem hacker.
-
Song
Editor – A program by Zahlman that can rip and insert songs that use the Sappy
engine.
-
Sappy
engine – a way that Fire Emblem and other GBA games can interpret music data.
-
Sappy
– it is also a program that is somewhat obsolete that was used to insert music.
-
MIDI2GBA
– a program used to convert MIDIs to GBA data.
-
tr.exe
– a program used to convert MIDIs to GBA data and then put it inside a ROM such
that one could listen to the song by emulating said ROM.
-
MIDI
– music file that pretty much says what instrument to use to play what notes of
what kind. A simple music file that tells what to play as opposed to a
recording (WAV).
-
WAV
– a recording of sound waves.
-
MP3
– a compressed WAV.
-
Sprite
– a graphical object (can’t think of a better way to say this). Usually refers
to portraits or battle graphics (the characters that you see move in
animations) but can also refer to other graphics.
-
Backgrounds
– background graphics that don’t really move.
-
Map
sprites – refers to the overworld sprites that a player moves on the map.
-
Hex
editor – a program that edits data in hex (and often includes an ASCII editor
to the side).
-
ASCII
text editor – a text editor that edits text in ASCII ‘format’—google for more
information. Standard for many things. Fire Emblem uses this, but it compresses
the text with Huffman (not that you needed to know that).
-
Offset
– a place in the ROM denoted by a number. For example, the song table is
located at 0x69D6E0.
-
Hex
– short for hexadecimal.
-
Byte
– one ‘unit’ of editing. Corresponds to a number. Bytes can go from 0x00-0xFF
(0-255 in decimal).
-
Bits
– smaller than bytes. Google.
-
Word
– 4 bytes put together. Common input. Also the size of a pointer.
-
Half-word
– two bytes, half a word.
-
Pointer
– a word that points to some data. In ROMs, it has a prefix of 0x08 to it
because the hardware accesses all ROM data at 0x08000000.
-
Little
endian (byte reversal)- Reverses bytes. 0x12345678
becomes 0x78563412. Practice makes perfect. The easiest way to do this is to
split up words into bytes.
-
Big
endian- google it, not really too important for you to know.
-
Word-alignment
– Aligning data by the word. Is recommended all the time, but in some rare
cases, isn’t necessary. That means that data should start at an offset that
ends in 0x0, 0x4, 0x8, or 0xC. 0x57120C is word aligned. 0x571205 is not. Think
even/odd, except only the values mentioned above are even, and everything else
is odd. XD
-
Table
or Array – look up what an array is. XP. I really can’t explain this—you’ll
have to figure out yourself along the way.
-
Nightmare
– a program that edits data tables.
-
Modules
– files with information on what data nightmare should edit. Also called
“Nightmare Modules”.
-
NMM
– stands for Nightmare Modules.
-
Nightmare
2.0 – a new version of Nightmare recreated from scratch by Xeld. Has more
features than the original Nightmare along with some fixes.
-
ZIP
archive – a way of compressing files. It takes a bunch of files and puts them
into one archive. The files can later be extracted (taken out) from it. It is a
very common format. This is something on your computer, not used in-game. It’s
used to share lots of files without having to download each one individually.
-
RAR
Archive – Same as above, but better. Also less common. Requires winRAR to use.
-
7zip
Archive – Supposedly the best file archiver there is, but not used as much, and
thus less convenient. Requires 7zip or winRAR to use.
-
Java
– google it. Is required for FEditor Adv to work (as well as some other
programs like Nightmare 2.0).
-
Net
framework – required for Nintenlord’s various awesome programs to work. The
alternative for non-Windows users is Mono.
-
Tilesets
– sets of tiles (lol). It’s what is used to make a map.
-
Mappy
Map Editor – the main program used to make maps.
-
MAR
Array File – a file that can be exported from Mappy. It’s used in conjunction
with the MAR Array Inserter to insert maps.
-
MAR
Array Inserter – inserts maps.
-
Repointing
– making a pointer point to something else. Also involves moving data.
-
Expanding
– adding space/room for editing. Making something larger.
-
Kilobyte/Megabyte/Gigabyte/
- KB, MB, and GB, google these and make sure you know them. Just bigger ways to
count bytes.
-
Palette
– a range of colors. When one talks about a palette he’s talking about the
colors used in some sort of graphic or art. Most graphics only use 16 colors,
including the transparent color, but on occasion more colors are used (for
things like CGs).
-
VisualBoyAdvance
– most people’s emulator of choice, almost always referred to as “VBA” for
short.
That’s all I can think of for now.
Anything else I’ll mention later in the tutorial. I think it’s
enough definitions for now, anyway.
Chapter 2: Using Nightmare Modules
Nightmare is useful for editing a lot
of things. The first things a person thinks of are stats, growths, and classes,
but it can do more than that. Each game has different modules though. Fire
Emblem 7 has the most modules, for example. And FE8 might have some modules for
say, the Valni Tower, which FE7 won’t have. That being said I will go through
how to use as many Nightmare modules as I can.
First, you need to get your clean
Fire Emblem 7 (U) #1235 ROM. (U) is for U.S.A., #1235 is the ROM #. I nor
anyone else can help you with this, so you have to be self-sufficient here. If
you know how, you can always rip it straight from the cartridge. I don’t
suggest you download any ROMs unless you have the original game either. :\
To get Nightmare Modules as well as
everything else you’ll need to hack, I suggest you go here: http://www.feshrine.net/hacks.html
I upload anything that I think might
be useful to someone on that site. Just use the menus and search until you find
it.
Once you’ve downloaded them, you have
to extract the files. winRAR can extract ZIP, RAR, and
7ZIP files, so you might as well just download that and install it. Then
right-click and hit “extract here” or “extract to ‘X FOLDER’” on the Nightmare
Modules’ file and some folders will pop up.
Navigate to the folder with your
stuff. If Nightmare.exe (the actual nightmare PROGRAM) is not included, you can
also download that off of the website separately.
Double-click Nightmare to load it. Go
to File-> Open Rom… or Ctrl+O and then locate your game. Select it. Then do
Modules-> Load Modules and select some modules you would like to use.
Nightmare modules have the .nmm extension to them. If you want, you can just
load a ton of modules.
Once you’ve loaded your modules,
you’re ready to start editing, technically. However, I’m going to go through
some of Nightmare’s (the original Nightmare’s, NOT Nightmare 2.0’s) menu
options.
File-Open ROM opens the ROM, of
course. Do this BEFORE loading your modules.
File-Close ROM closes the ROM. I
actually suggest just closing Nightmare and then reloading Nightmare whenever
you want to open another ROM.
To save changes, you must first hit
“apply changes” (under the File menu) to whatever area you are changing. Easier
than that, just hit “enter”. To save all of your accumulated changes, do
File>Save ROM, or just do Ctrl+S.
To unload a module and take it off of
your list, do Modules->Unload Module.
“Link Rom to Modules” makes it so
that whenever you load that ROM, it’ll automatically load those modules.
However, if you move or rename the ROM or the modules, it won’t work, and will
instead give an error message.
The other options aren’t too useful,
so I wouldn’t bother with them.
Now, if Nightmare isn’t working for
you, there are several things to look out for:
-
Make
sure you are applying your changes correctly
-
Make
sure you open the right ROM
-
Make
sure if you’ve linked ROMs and modules together, you don’t move or rename the
files (it’ll mess it up)
-
Make
sure you open the right modules for the right game, and that they are
compatible
Here are some basic Nightmare issues.
After the issue are a list of numbers that tell which things to look at. If
there is another issue, it’s possible one of the mentioned things applies to
your problem as well.
1. Check if you have the right ROM #-
1235, the American version.
2. The ROM is unzipped, meaning, it's
a .gba file and not a .zip file. Right-click and extract.
3. Module is not extracted/unzipped.
Right-click and extract. Download WinRar if needed.
4. Check if files are updated to the
most recent ones.
5. ROM is a .gba file.
6. ROM may need to be expanded.
"The stats are absolutely crazy!
Lyn has -128 speed!"
1.
4.
"The Module and ROM are not
compatible."
1.
2.
3.
4.
5.
6.
"It's just not loading. It says
I'm trying to crash Nightmare."
2.
3.
5.
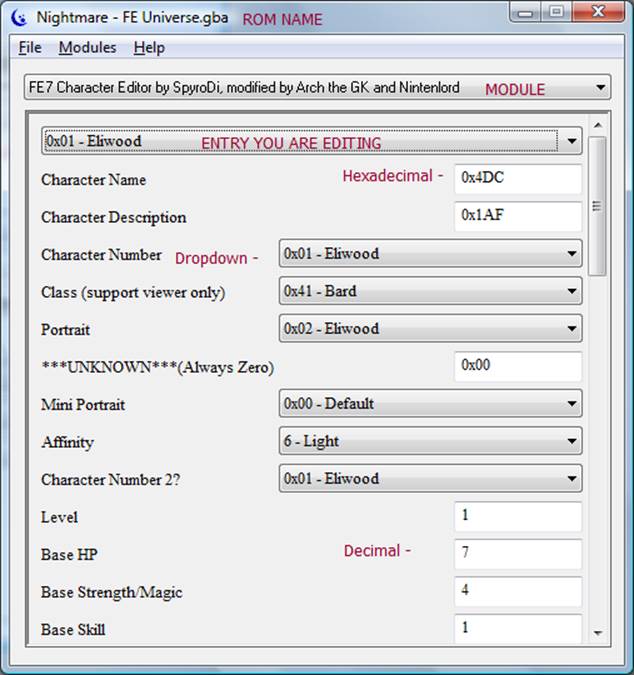
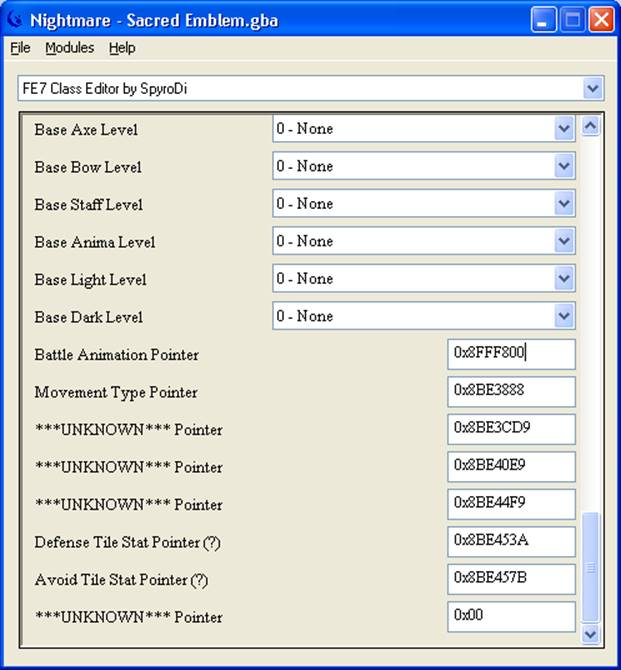
Now, about the different aspects:
At the very top is what module you
are using.
Below that is a list of the different
entries in the module you can edit. Usually the entries are labeled so that you
know what you are editing.
Below that is the actual data to
edit. There are different types of slots. Dropdowns allow you to choose from a
list (although sometimes those lists limit you to only certain values).
Othertimes you can edit data in decimal—for example, character stats are in
decimal. If it was in hexadecimal, I’m sure it’d confuse some of you a bit
more.
There are also signed and unsigned
bytes. Some values can go up to 255. Other ones become negative once they reach
127 or so. I really forgot the details of signed/unsigned bytes but because of
this and other reasons, stats can’t go to like 255.
Whenever you make a change to an
ENTRY, you have to press ‘enter’ to apply changes. When you switch entries (say
you were editing Eliwood and then you go to Lyn, it’s the same module but a
different entry) you have to press enter again for the new changes you make.
(You press enter AFTER the changes, btw.)
When you’re done with all your
changes, then you can press Ctrl+S.
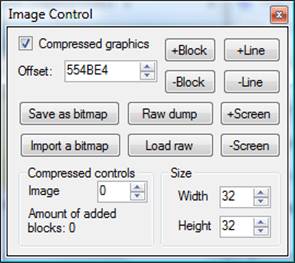
Here’s an image to help with the
Nightmare layout:
That’s pretty much all you need to
know about using Nightmare in general. Good luck with your Nightmare editing!
Chapter 3: File Management
In order to be a successful hacker
you need to have a lot of good management.
To start, try and use as few programs
at once as possible. What you can’t do is use one program to edit something,
use another program to edit it, and then go back to the 1st program
and edit it again. It’ll undo changes from the 2nd edit because the
1st program doesn’t know that the 2nd program edited it.
What I suggest doing is when you’re
done making edits with a program, save, and then exit out, and go to another
program. This helps avoid confusions between programs.
Note that HxD, a hex editor, reloads
a file from its source, so it DOES recognize edits made in between, this is
kind of an exception.
Also, when a ROM or some other file
is being edited, you can’t edit it with another program or the other program
will give an error. As said, finish up what you’re doing with one program
first.
Another key to file management is to
organize your folders and the such. Make a hacking
folder and divide that into a few more folders—one with programs, one with CLEAN
ROMs (unedited), one with hacks, one with other files, etc., it really helps.
Most importantly, BACK UP YOUR GAME.
After every major change, BACK UP YOUR GAME. Before you apply some patch to
some game, BACK UP YOUR GAME. Before and after you insert graphics, BACK UP
YOUR GAME. You never know when something crappy might happen. Have a folder
JUST for back-ups and label your back-ups with the date, and maybe even what
you did before or after that back-up. For example, if I was about to insert
some portraits, I would back-up my game, call it “PrePortraitsBUP-070410.gba”
and store it in a folder. Then I know what I did after (inserted portraits), I
know it’s a back-up, and when I took it.
If you have good file management then
you’re on your way to making a big successful hack. ^_^
Chapter 4: Pointer Tables
Note: This is a copy/paste from my
old hacking tutorial.
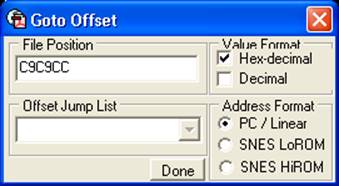
What is a pointer table? Start by opening your hex editor, and selecting
Go to, jump, or whatever sounds like that. I’d like you to go to c9c9cc for
this.
At 0xc9c9cc you’ll find pointers. It’ll look like a bunch of numbers and
08’s for that matter. If it doesn’t, then you are either at the wrong place or
in a wrong ROM. To make sure, it should look like this.

Now that you are there, you are probably confused with all these
“pointers”. I call this the Event Reference Table, although since it has more
than events, you can call it the Reference Table I suppose.
A pointer is reversed by little Endian, that formatting thing I talked
about. So the first pointer 4CC73408 is 0834C74C. The 08 is added onto every
address in the game. I’ll get into that later, but for now, just sort of ignore
it. You won’t need to worry about it too much until you get into ASM (assembly)
or expansion.
Now this is the great table that you will use to repoint things.
Repointing is changing the pointer to somewhere else. Now let’s say I repoint
to extra space, where this is tons of free space to do whatever. Then I could
put tons of information there, or rather much more information than the game
normally allows. For instance, you are limited to around 150 weapons by editing
the data that’s already there. But if you have more space, you can add more items.
Repointing data to this new space is expansion. Hopefully it’ll get clearer as
the guide continues.
I hope that was useful for you!
Chapter 5: Battle Animation Editor
Note: This is a copy/paste from an
old tutorial.
For some reason, this confuses some people. This isn’t fully custom
animations, this is the basic animation thing using Nightmare.
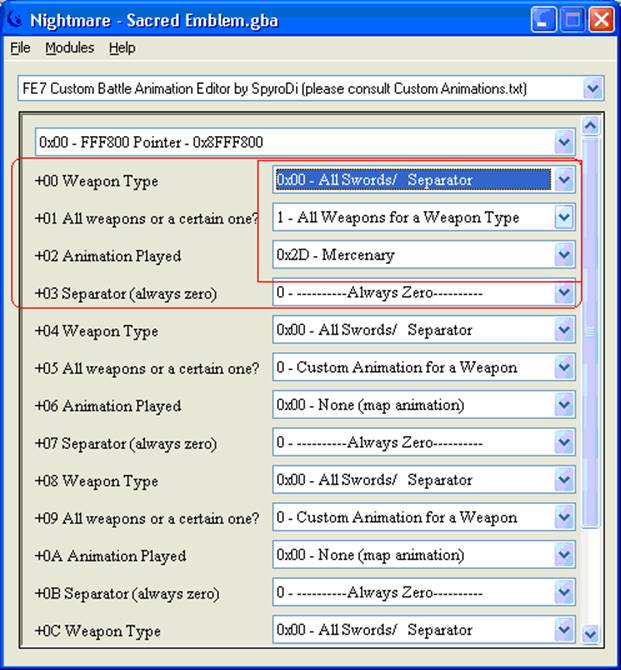
1. Load up Nightmare, the game, and the
Custom Battle Animation module and the Class Editor. It should look like this.

2. Now for each animation you need to select
the weapon type. Let’s say we are making a mercenary animation. Then select All
Swords (already selected).
3. For the second slot make it All
Weapons because it is for all swords, not just one sword. Otherwise use Custom
Animation for a Weapon.
4. Select the animation to use.
5. Don’t touch the separator. Then do
the same thing for the next 3 slots, and a separator, continuing to however
many you need. Then enter and ctrl+s and you are done with that part. It should
look like this.
Now the game needs to know about this animation.
6. Go to the class editor.
7. Go down to the Battle Animation
Pointer. 
Change that to 0x8POINTER. 0x8 is the beginning of any pointer (except
for expansion), and the pointer would be the number at the top of the custom
battle animation pointer. Which is this one.
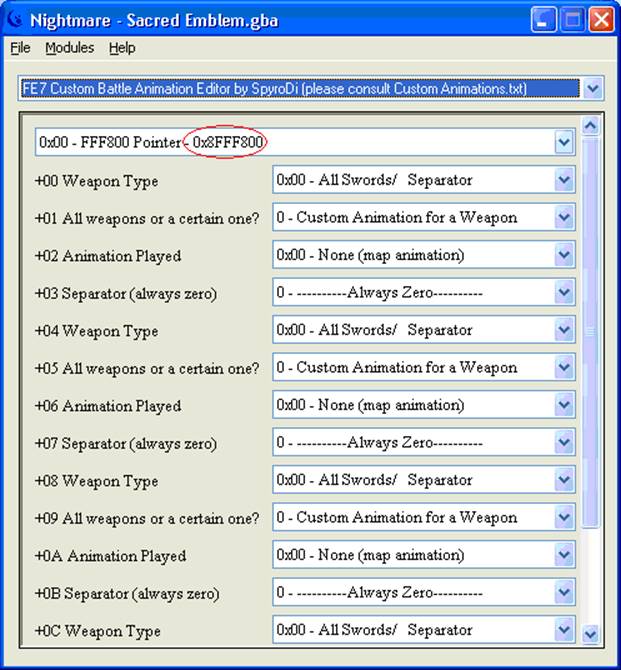
So that would be what you put in. 0x8FFF800. Now enter and ctrl+s again,
and play as Eliwood. Should look like this.
And what happens in-game?
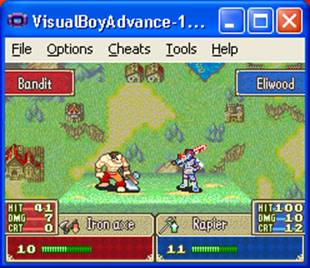
Ah! He’s messed up! That’s because of his palette, unfortunately. Remember,
that this changes the class animation and not the character animation. For a
custom character animation you either need a class just for them, or a custom
battle sprite which will also be explained later (this is another type of
custom battle sprite).
That’s all for today. =)
Chapter 6: Character Editor
I will do a run-down through this
module.
At the top is a list of characters to
edit. Generic units lack portraits, chibis, amongst other things. The tutorial
characters are used in Lyn’s mode, while the non-tutorial ones are used in
Eliwood’s/Hector’s mode. Lyn’s mode characters don’t have supports, but they
can have them—you just have to add the support pointer to them.
IIRC unit 0xFB is labeled “Enemy” and
is the generic enemy unit used in the arena, so I suggest that you don’t edit
it. I would also not edit “Wall” or “Snag” at the end, as well as any other
character that seems fishy or special (like the Fire Dragon, don’t edit him
into something else—he is a special character).
Now, onto the actual data:
-
Character
name – the index for the character name text. Type it into FEditor Adv.
-
Character
description – same, but for description text.
-
Character
number – used to reference the character. I suggest you don’t edit this.
-
Class
(support viewer only) – only affects the class shown in the support viewer.
-
Portrait
– the portrait used for the character.
-
Mini-portrait
– default uses the portrait’s chibi, everything else is for generic enemies.
-
Affinity
– self-explanatory.
-
Character
number 2? – don’t edit, just to be safe.
-
Level
– doesn’t affect the actual level. It affects autoleveling, I think. You’ll
find more about this when using the Chapter Unit Editor or Event Assembler when
you edit units.
-
Base
stats – these are added to the class stats to get the FINAL character stats.
Stats can be negative but might glitch if they are unless you use FEditor Adv’s
autopatch.
-
Con
bonus – same, it’s added to the class bonus. It can be negative as well.
-
Weapon
levels – the weapon levels the unit has. Unless you’re hax like Athos, you
can’t have more than 1 S level weapon—try and figure out how to do it like
Athos if you want. Also, if the class has a base weapon level, it is used
unless the character weapon level is higher.
-
Growths
– self-explanatory, aren’t added to class growths, they are as you see them.
For player characters, these are used; for enemy characters, class growths are
used. The max a growth can be is 255.
-
Palette
– which palette to use. Generic default colors are for generic enemies.
-
Custom
battle sprite – gives the option to use a custom battle sprite/animation, but
NOT use a custom class.
-
Character
abilities – they are all pretty self-explanatory. You can combine values to
have multiple skills from one list. For example, to have a character that could
use steal and thief key (but not have the class ability to use it), you would
do 0x04 + 0x08 = 0x0C.
-
Supports
Data pointer – a pointer to support data… self-explanatory I suppose. 0x00
means no supports.
Chapter 7: Class Editor
This module edits class data, NOT what character is what class.
Just wanted to make that clear.
There are 3 ‘unused classes’ at the
end that you might think you can use, but probably shouldn’t be used.
Apparently they actually are used for something, and what’s important is not
what it’s used for (because I’m not sure myself), but the fact that they aren’t
free to be edited and all. There are also some classes that are only used in
cutscenes as NPCs (like the Peer class, Elbert’s class) and some unused female
classes. Some classes don’t have animations. For example, there is no female
Myrmidon animation, and the Paladin (F) does not use Isadora’s animation by
default.
Rundown:
-
Class
name/description – text index to be used with FEditor Adv.
-
Class
number – class reference number. Better to not be edited.
-
This
class promotes to – obvious…
-
Standing
map sprite – the map sprite used when you aren’t selecting the character. For
the moving map sprite, you have to edit it using the map sprite pointer table
editor, another module (with a somewhat long name).
-
Walking
speed – obvious, slow or fast.
-
Default
portrait – for the class, if there is no real portrait, what portrait is used.
Typically the enemy class card. Supposedly if someone has a custom class you
can use this so that their unpromoted class uses one portrait and their
promoted class uses another portrait. It’s a cool idea, but I don’t know if it
actually works, since I haven’t tested it myself. XP
-
Base
stats – obvious.
-
Max
stats – the limit to what the cap can be. Without Xeld’s patch included in
FEditor Adv, the max is 31. To see how to get past that max without glitches,
see FEditor Adv’s documentation. Note that HP normally cannot go past 60 for
allies either. Enemies can go higher though.
-
Class
relative power – affects experience. A lower number means more experience. 0x03
is like the default.
-
Class
growths – IIRC affects enemies and how they grow. I forgot for sure.
-
Promotion
bonuses – stats added when a unit promotes. For the CON bonus, it’s the
difference between the promoted and unpromoted class.
-
Class
abilities – self-explanatory. They can be combined as well (see the character
module chapter for more info).
-
Base
weapon-levels – the “minimum” weapon levels that a character of this class must
have. Can’t go lower than this.
-
Battle
animation pointer – a pointer to the data that says what animation to use for
what weapon. You can edit this with the battle animation editor OR make your
own data with the custom battle animation editor.
-
Movement/Terrain
data pointers – you can edit these with the appropriate nightmare modules. It
affects what tiles a unit can move on and the terrain bonuses they get there.
Chapter 8: Item Editor
There are a few unused weapons/items
and ones that aren’t obtainable without some bonus requirements, so I suggest
you replace these, because expanding this stuff to allow for more item slots is
tedious (mainly because you also need more space for weapon icons).
Run-down:
-
Item
Name/Description pointers – by now you should know what this is- text index.
-
Item
number – reference number.
-
Weapon
type – obvious.
-
Weapon
abilities – you can combine bytes, just as you can with character/class
abilities.
-
Stat
bonuses pointer – points to stat bonuses, for example, Durandal gives +5
strength. You can use the stat bonus editor to make your own stat bonuses, or
go to the offset mentioned in a hex editor to edit the data there.
-
Effectiveness
– same as above, essentially. The pointer just points to a list of class
numbers that the weapon is effective against.
-
Durability
– uses
-
Power
– might
-
Hit%
- obvious
-
Weight
– obvious
-
Critical
– obvious
-
Range
– To get the range, the first bit is the starting range and the 2nd
is the end range. So 0x11 means only within 1, but 0x12 means 1-2 range, and
0x24 means 2-4 range, etc.
-
Cost
per use – uses x cost per use = actual cost (sell price is ½ of that)
-
Weapon
Rank – obvious
-
Item
icon – obvious
-
Staff/Use
Effect – from my experience this is tricky trying to get it working, so if you
play around with it and it’s not working right, there’s nothing you can do
about it unless you know ASM.
-
Weapon
effect – obvious
-
Weapon
experience – how much ‘experience’ the weapon gives towards getting to the next
weapon level. 1 is normal, 2 is high, 0 is nothing, and you can do 3 and on,
but it’d be a bit broken to have 3 WEXP.
Chapter 9: Spell Association Editor
This module controls what weapon has
what animation. It’s mainly for magic weapons, tomes, and staves. However other
weapons have “blank” entries where the “animation used” slot is set to 0xFFFF because
there is no spell animation used.
Note that ‘spell animation’ can also
refer to non-spell animations such as javelins and arrows. It just refers to
any separate animation associated with a weapon that isn’t actually apart of
the class battle sprites. I hope that made sense.
Run-down:
-
Weapon
– which weapon to use
-
#
of chars to display – 1 or 2, anything else will glitch (this one is obvious
too)
-
Animation
used – also obvious
-
Return
to original position (map) – I suggest putting this on.
-
Facing
position (map) – unless it’s a staff, this should be towards the target
-
Enemy’s
flashing color (map) – white is default for weapons, dark is for dark magic,
red is for fire magic, etc., just do what you think looks nice.
That’s all there is to it.
Chapter 10: Stat Bonuses Editor
All you have to do here is type the
bonuses you want, then take the pointer at the top and type it in the item
editor. For example, the first entry is 0xFFF2A0 so in the Item Editor under
“Stat Bonuses Pointer” you’d type 0x8FFF2A0. That’s all there is to it.
Chapter 11: Promotion Editing
If you want edited promotions for the
classes, use one of the custom pointer slots in the Promotion Item Editor (in
the dropdown where it says “Promotion Pointer”) and then go to that offset in a
hex editor and type the class numbers of the classes that can promote through
this item. Remember to save your changes in both nightmare and the hex editor
and not to overlap changes by having both programs open at once.
To change which class promotes to which
class, there is a dropdown slot in the class editor.
Chapter 12: Map Sprite Editing in Nightmare
Note: I don’t know how this works in
FE6 or FE8 for sure. This is for FE7.
The Map Sprite Pointer Table Editor
module controls the moving map sprites. Each class has its own pointers. The
‘animation pointer’ would better be called the graphics pointer as it is a
pointer to the actual map sprite graphics which you can edit in GBAGE. The
other pointer is from what I know more like an actual animation pointer—it
tells like, how to work the map sprite and its animation and crap. Sometimes
when you import map sprites from other games the animation will still not look
good because of the ‘Another Pointer’ in which case you have to import that
data too.
Anyway, if you want to reuse a map
sprite of one class on another class, simply copy the pointers and paste them
onto the new class’ slot in the module. That’s it.
Chapter 13: Movement Cost Editor
Note: The nightmare module is actually called ‘Movement Type Editor’ as
of writing this tutorial, but it’s better called what the name of this chapter
is called, really.
This controls how many ‘movement
points’ it costs to travel certain types of terrain. Think of the movement of a
class as a # of points they are allowed to use to travel. So if the value next
to a type of terrain is ‘1’ it just takes 1 movement. If it’s ‘2’ then it
requires 2 movement spaces, meaning a unit with 5 movement can only travel
through 2 forest tiles because forest tiles require 2 movement and 5/2 = 2.5,
rounded down to 2.
If the value next to a type of
terrain is ‘255’ then it is uncrossable because a unit won’t have 255 movement
points.
There are offsets at the beginning of
the name of each entry—use that offset to repoint movement data. The pointer to
movement data is located in the class editor.
Chapter 14: Terrain Stat Editor
Another very short chapter. It is
split up into ground and air units. How/what to edit is very obvious. Just know
that Pegasus Knights, Wyvern Riders, etc. use the air movement—as they are
flying they are unaffected by most terrain and do not really receive bonuses.
All other units receive the standard ground bonuses.
The pointers to this data are in the
class editor. That’s all you really need to know.
Chapter 15: Portrait Editor Module
There is a portrait module made by
Ace that was used to repoint graphics and edit miscellaneous stuff like frame
positions and eye control. However, because of Xeld and Zahlman, you can do
everything this module can do in FEditor Adv.
Just some quick notes for those who
are curious:
-
FE6
does not have blinking frames
-
Portraits
and chibis are LZ77 compressed
-
Mouth
and eye frames are uncompressed data
-
Sometimes
the game has separate portraits—one with the eyes already open, and one with
the eyes already closed. Just a heads-up.
That’s all I have to say about this
module.
Chapter 16: Battle Palette Reference Editor
This is a very useful module that
tells the offset of the palette of a certain character/class. In the character
editor is a byte that affects the palette-that byte references this table,
finds the offset of the palette, and then loads the palette.
The good thing about this table is
that it already has some empty slots near the end to use if you need the extra
palette space.
The actual offsets given are offsets
to the LZ77 compressed palette data. If you want to edit it real quickly, you
don’t have to decompress the data to edit it. However, if you are editing the
data and you want to edit all 4 palettes—1 for each allegiance (including the
P4 allegiance located in the arena) then you can do so by decompressing the
data using NLZ77 Compressor, editing it like any other palette, and then
recompressing it and re-inserting it.
One more quick
thing. If you want to make it so that your edited palette works for all
allegiances, you should edit a palette of the same class as your new character.
For example, let’s say you are making a guy named David and he is a knight. His
character data replaces Lute from Fire Emblem 8: Sacred Stones. Well, here’s
what you’d do. You’d “steal” the palette of Gilliam, who is a knight, by going
to the offset, copying the palette data there (palette data starts with a 10,
so with that clue you should be able to know when the palette data ends) and
pasting it somewhere else. Then repoint Lute’s/David’s palette to the
Gilliam-replica palette. Then edit Gilliam’s copied palette to whatever you
want through a battle palette editing technique. Save the edited battle palette
and you now have a knight palette for David that will work right on all 4
allegiances and not look glitch when David is an enemy or an NPC.
If you want to know how to actually
edit battle palettes’ colors, you can find that in a later chapter that I will
make.
Chapter 17: Arena Class Editor
This is pretty simple as it only has
one thing to edit (which class appears). The thing is, I don’t suggest editing
the ‘empty’ slots at all. This is because these empty slots are most likely
separators.
What do they separate? If I had to take
a guess, I’d say they separate different modes, meaning the first set of
classes is for Lyn’s, the 2nd is for Eliwood’s, and the 3rd
is for Hector’s.
My only other comment is that from
what I remember, character 0xFB in FE7 (labeled as “Enemy”) is the unit used in
the arena. FE6 and FE8 probably also have some unit reserved for the arena in
their character editor, I just don’t know which one. That’s all I have to say
about this module.
Chapter 18: Boss Music Editor
Very, very simple to use module, but
also very useful. I just want to note that you can’t have allies have their own
battle themes, to my knowledge. It only works if they are an enemy. However, if
you give one of your allied units a battle theme anyway, and then you fight them in the arena,
the ‘boss music’ may very well play. I haven’t actually tried this, so it’s
just an idea.
Chapter 19: CG Editing – Custom Cutscene Graphics
Note: Currently FE7 oriented.
You want to make your own CGs to
insert into a game? Well, here’s all you need to know about making them as well
as making use of them.
To start, let’s take a look at the CG
Editor module I made. It’s just a table editor, but it can be useful. The
graphics pointer points to either A) graphics or B) a set of pointers that has
more graphics. The TSA pointers points to the TSA that says how to use the CG
graphics and make it into a full-fledged background. The palette pointer is
kinda obvious—it’s the palette.
With that out of the way, let’s take
a look at the alternate graphics pointer. Lyn mode CGs point to a set of
graphics. Take the first entry in the CG editor-- 0x8CED6D0. We’ll go to the offset
0xCED6D0 in a hex editor.
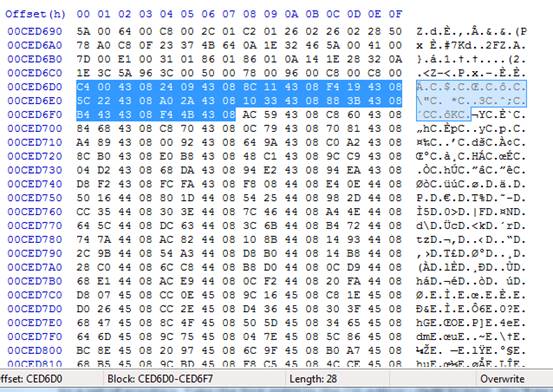
What’s highlighted is the set of
pointers. It’s 10 pointers, 0x24 bytes (or 40 bytes).
Each graphic is actually a 240x16 piece of the entire CG. If you take all 10
pieces together (vertically) you get a 240x(16x10) or
240x160 image. The size of the GBA screen is 240x160, so we have a full
background.
Why do Lyn mode CGs work this way? I
can’t say for sure, but I have a good feeling it’s because of the Lyn’s Mode
Ending, which uses the CGs as a background. In any case, you can go to one of
the pointers and see the graphics if you want. I must admit it is a bit
troublesome to use CGs in this manner, which is why you may not want to
actually replace these CGs unless you replace them with black graphics (which
is what I did in my hack Tactics Universe).
Now, there’s something the current
version of the CG Editor is missing (at the time that I am writing this—I may
update the module later). It’s a byte that is a flag as to whether the CG works
like a Lyn’s mode CG or a normal CG.
Go to 0xCED888 in a hex editor. The
byte you see there is 01. If it’s 01, it’s a Lyn mode CG. Else, it works like a
normal Eliwood/Hector mode CG. That’s all there is to it.
Some other quick notes:
-
Palettes
are uncompressed
-
Graphics
are compressed
-
TSA
is compressed
Alright. There’s something else I
want to tell you about editing CGs. If you want a simple 16 colored CG, there
is an easy way to do it.
Just make an image that is 240x160 in
size. Load it into Usenti, a bitmap editing program oriented for the GBA that
you can find on my site. Hit Palette-> Requantize and type “16” to make it
16 colors. If the image has too many colors to start with, it won’t look good,
which is why I suggest you use simple images.
You can also do something like a
sepia tone or a one-color image—something that is like grayscale, but tinted
with a color, so that it is all red, all blue, etc.
This is a graphics editing thing,
however, and I cannot help you with this. You’ll have to ask in a graphics area
how to do such an effect.
Anyway, once you get a 16 colored
image, change the size to 256x160 using Usenti. The 16x160 portion on the far
right that you just added should be the transparent part. Also, at the very top
left, there should be a pixel with the color that is going to be transparent.
Said pixel will turn up black in-game, but it can’t be helped (by me),
unfortunately.
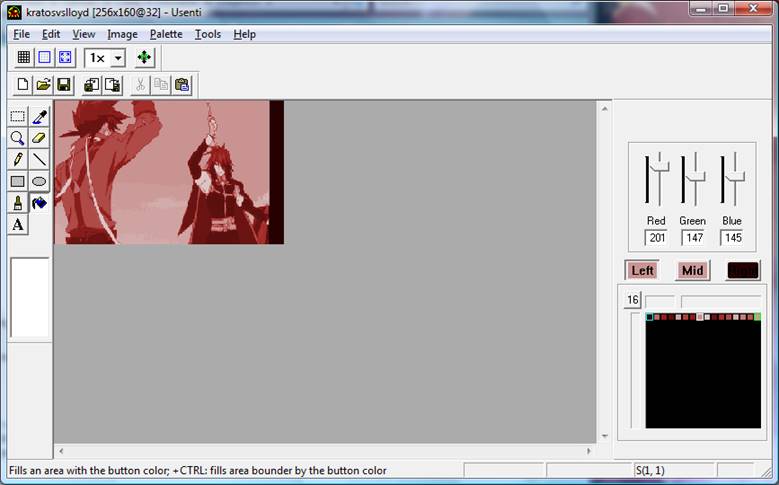
As you can see, I managed to save
some quality by making the entire image red, but it’s still kinda eh. On the
right in the color box you can see I only have 16 colors (1 row). Although you
most likely can’t see it, at the very top left of the CG is a dark red pixel
that is the SAME dark red on the right. When I insert this CG, it’ll turn up
black, of course.
Once that’s all done, save your
image. Load the CG stuff with GBAGE-everything you need to edit a CG is in the
CG Editor module. I suggest editing an Eliwood’s mode CG, of course. Type in
the graphics offset and the ROMPalette Offset as it is in the CG editor. You
don’t really need to load the TSA for the image.
Hit “Import Bitmap” and select your
graphic where it says “File”. Put in an offset for the CG to be inserted and check
the following stuff:

When that’s done hit “OK” and hit
“OK” again. Now save with GBAGE (File->Save) and then exit out.
There’s one last thing. We haven’t
touched the TSA, have we?
Well, there’s a ‘trick’ of sorts with
images that are 16 colors. The game already has some TSA made to use with a
256x160 image that only has 16 colors. It’s offset is
0x50BE54. Open up the CG Editor in Nightmare and type that under the TSA for
your image (remember that since it is a pointer, you type 0x850BE54). Then save.
Now all you have to do is test your
CG in game.
…Wait, how to do that?
Well, you need to load the CG using
events. The event assembler code to load a CG is-
Shows a CG picture
SHCG XX
XX = picture value
(Direct copy/paste from EA files)
To do it in hex, the code is D3 00 XX
00, not that anyone uses hex anymore… right?
I suggest putting fading codes before
and after the CG to smoothen the transition. It’s kinda necessary if you want
the CG to look right.
FADI
SHCG 0xNN
FADU
STAL 0xFF
The above is an event to fade into
the CG, load the CG “0xNN” (obviously put a real value there), and then wait
for time 0xFF (255) in who knows what units (frames?). You can put other codes
in between the fading codes, of course. I just showed the bare minimum.
There’s also a macro made by
Nintenlord to make it easier:
//Smooth changing to CG
#ifdef _FE7_
#define ChangeToCutScene(cutscene) "FADICG
0x10; SHCG cutscene; FADUCG 0x10"
#endif
All you have to do in your events is
put ChangeToCutScene(value) and it’ll change to the
cutscene specified. Makes it slightly easier, I suppose. That’s it for events…
BUT WAIT!
There’s a nifty program that can help
you insert CGs OVER 16 COLORS! AND THE METHOD IS KINDA EASIER!!!
FEditor Adv has it with it. The batch
file is called “Execute CG Maker”. Execute it and you’re your original 240x160
CG image. It’ll ask where to save an image showing what the converted CG looks
like after it’s GBA-ification. I’m using an arena
(shown below) so I’ll just call my new one “arena2.png”. Next you need to tell
it what to call the image data dump. “arenadmp”,
“arenaimg”, or “arenagraphics” works. Something to tell you what it is, that’s
all that matters. Then you need to save the map data (Xeld calls it map data,
but everyone else is so accustomed to saying “TSA” that I just say TSA as
well). Save it as something you’ll recognize. Same for the palette data. Then
you’re done.
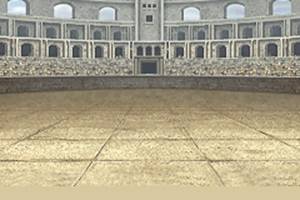
Below is what my image looks like
afterwards.
Pretty good, amirite? It uses more
than 16 colors and manipulates the TSA/map data in a complex way to do so.
Thank Xeld for his program.
Now all you have to do is copy the
data from each respective file into some freespace in your ROM, and mark down
each offset you insert it at. So for example, we’ll say I am inserting my
graphics at 0xD20000, my TSA at 0xD25000, and my palette at 0xD26000. I have
them all written down and labeled. I save my hex editor.
Then using the CG Editor module I
repoint everything, making sure to add an 0x08 to the
beginning of each pointers (0x8D20000, 0x8D25000, 0x8D26000). Then I save with
Nightmare and test my ROM (I already went over how to load CGs).
It’s a bit of work, but making CGs is
quite rewarding, and it’s easier than SOME stuff, that’s for sure! Good luck
with your CG making!
Chapter 20: Lyn’s Ending Editor
This module changes what text is used
in the Lyn’s ending module as well as what character’s data is used. You see,
the ending shows a record of battles fought, won, and lost, and it gets that
from the character #. Depending on whether the character “died” (got injured)
or not, there are two different text.
Actually, there’s an error in the
current Lyn’s Ending Editor (if you do not see this error in your version,
don’t worry about it). It says that there is an Injured Text for the Tactician,
but from my foggy memory, I think the latter text is actually for the female
tactician, while the former text is for the Male tactician. The game knows the
male/female thing based off of what you chose when you started the game and stuff.
The “Lyn Hilltop” text is just some
text near the end that has a CG of Lyn on a hilltop. For simplicity’s sake I
made the whole module one entry.
There’s one more thing I want to say
about this. When editing the text, there is a trick to it—after each line on
the text, you have to add a bunch of spaces. For whatever reason, this is how
the game knows to make a new line, and if you don’t add a bunch of spaces, the
text glitches.
So your ending should look something
like this, except you don’t need the words ‘space’ and you won’t SEE the
spaces, but the game will know they are there.
Gravyman, Saucy Boy (spaces)
(invisible linebreaks)
He served gravy to people (space
space space space space space)
in all the kitchens of the (spaces)
world, disgusting people with (spaces)
his inferior cuisine. (spaces)
I don’t know exactly how many spaces
you need after each line so I would just add as many as necessary, really.
Experiment, play around, and work it out.
One more chapter, down!
Chapter 21: Tutorial Editing/Getting Rid of the Tutorial
This is a frequently touched upon
subject. I want to make this quick.
To get rid of the very basic tutorial
events, you can A) use the Tutorial Editor nightmare
module B) use the Event Assembler or C) use some patch somewhere.
Method A:
Load the tutorial editor module for
FE7. Repoint each pointer to an empty space of 4 00s. If you don’t know of a
space, you can type in 0x80000B4 because at that very offset are 4
kinda-random-but-probably-important-for-something 00s.
Just do that for every pointer and
bam.
Method B:
At the very top of events, before
even the #include stuff, put DISABLE_TUTORIALS and the Event Assembler should
disable the tutorials when you insert your events.
Method C:
I don’t know where this patch is but
it does the same thing as the stuff above. It’s just a patch way. There is a
‘Tutorial Killer Patch’ I made but it gets rid of complex tutorial events as
well. However, it is reported as glitchy, but I have given up on trying to fix
it after such a long time.
Chapter 22: Legendary Weapon Editing
FE7:
There is a nightmare module thanks to
Xeld that can edit which weapons have the special stuff that goes with the
legendary weapons Armads, Durandal, Forblaze, and Aureola. It’s very
simplistic.
However, if you want to add more
weapons to this list, you have to do some different stuff (you can’t just
expand it like normal). See this topic for more information-- http://forums.feshrine.net/index.php?showtopic=3285
Chapter 23-24: Music Insertion Tutorial (ELF Method) & Documentation
This is a copy/paste from my music
hacking tutorial I released. It tells how to insert music using the “Elf
Method” (tr.exe, a hex editor, Nightmare, and a few other things). It also
tells how to make a song loop and includes documentation.
This tutorial does NOT cover how to
rip music from other games and import them, however.
This tutorial, created by me, Blazer, will guide you step-by-step on how to take a MIDI and insert it into either Fire Emblem 6 or Fire Emblem 7. I have not made an instrument patch for Fire Emblem 8 so you’ll have to either find some other way to hack music or bribe me into making one for FE8. :P
Tools Needed:
Required:
Music List.txt
Your MIDI, i.e. a song file ending in .mid
Midi2AGB/Midi2GBA*
Anvil Studio (or another good MIDI editing program, although Anvil is preferable)
HxD (or another good Hex Editing program)
A Fire Emblem ROM (or another GBA ROM—this tutorial is direct towards Fire Emblem hacking, however)
Blazer’s Instrument Patch (found in tutorial)
NUPS
Optionals:
Sappy 1.6
Sappy 2005
*(Same programs, I’ve seen them under both names, I will reference it as Midi2GBA)
YOU CAN FIND MOST PROGRAMS AT HTTP://WWW.FESHRINE.NET/
Part 1: Background Information
Before trying to insert custom music into Fire Emblem or any other GBA game, you should:
- Know how to manipulate a hex editor and its basic commands (go to, find, opening, saving, copying, pasting, and editing)
- Know how to make patches as well as apply patches
- Use Visual Boy Advance to play ROMs, savestate test, etc.
- Know how to back-up ROMs. Backing up is very important. I will not constantly warn you to back up your ROM, but I will on occasion—it’s up to you to do it.
Terms: (note: some definitions may have been simplified or otherwise defined as something else for the sake of making it easier to understand, please don’t talk to me about technicality terms, I’m a casual hacker and I don’t care for 100% accurate definitions.)
MIDI- a song file that contains all the tracks of a song.
Track- one part to a song, a track contains all the info about what a certain instrument should play. Each track has one instrument and the track has all the notes for it.
Instrument- Digital instruments, an instrument is a sound or set of sounds to play. Acoustic Grand is a type of instrument. The track would tell what sounds of the instrument to play, when, for how long, etc.
General Hex Editing Terms- This includes—offset, hex, byte, word, pointer, little-endian, header, etc.
Pitch- How high or low a sound is.
Octave- What set of pitches to use. A lower octave has lower, deeper sounds, while a higher octave will produce higher pitched sounds.
Volume- The loudness, in this case, the loudness of a track or song.
Part 2: Downloading the Programs
Everything you need (excluding illegal ROMs, which btw, a ROM isn’t really a program) can be found at http://www.feshrine.net/hacks.html, simply navigate that site and download what you need.
The music list can be found in the documentation section. Anvil Studio and Mid2GBA can be found on the Music Editors page, just as HxD can be found on the hex editors page. The instrument patch can be found in the Patches section and NUPS can be found on the patchers page.
Finding a MIDI is up to you. Use google and http://www.vgmusic.com to find a MIDI of a song you may like or something. Don’t ask for help with this.
Part 3: Preparing Your MIDI
Before you insert your MIDI, you need to make sure it is properly prepared. This includes quite a few things. Ease up your mind, it’s pretty straightforward and you use a easy program to help you with it.
Load up Anvil Studio, and then load up your MIDI file. In the middle you should see a bunch of tracks.
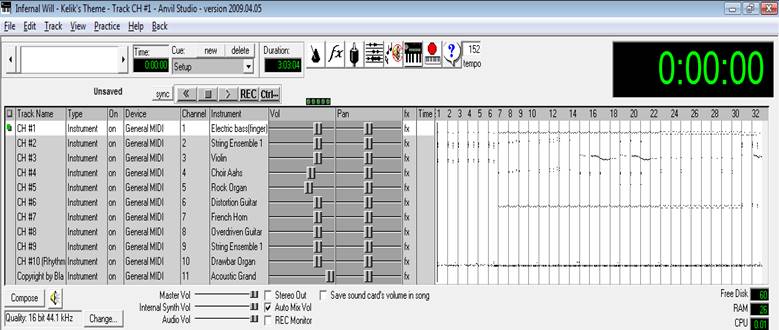
The middle part is where all your tracks and their information are. To the left is the track name, then the type it is, and the instrument used (example, Acoustic Grand, Violin, String Ensemble 1, etc.).
Step 1: Minimizing Tracks
Having more than 10 tracks in a song will probably screw things up somewhere down the line. I wouldn’t even try and do it—I remember a friend telling me he tried to and it failed.
One thing to do is delete any tracks without notes. It will say to the left of the play/pause buttons “no notes” if a track doesn’t have any notes. Sometimes there are redundant tracks labeled “Copyright” or something. If there are any, go to Track->Delete at the top of the menu.
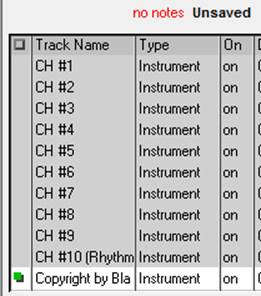
That shows a redundant track named “Copyright by Bla Bla Bla” and at the top it says “no notes”.
If you still have more than 10 tracks, you should find another MIDI. Sorry but, there are limits in life.
Step 2: Truncating Your Song
Some songs repeat within themselves. Like a song may be 6 minutes, but at 3 minutes it just repeats itself all over again. Well, in-game, this uses up some space and for maximum efficiency, you’d best get rid of the repeat. Do so by finding out exactly where the song repeats and then going File->Truncate Song-> Delete from Current Position to End.
Going to View-> Composer may help you find the place where it repeats—otherwise just listen to the song and stop once you hear it, then click around in the track area until you get to the point where it repeats. Then do as I say and TRUNCATE!
Step 3: Track Timings
In order for your MIDI to properly repeat in-game, all of the tracks need to be aligned. Otherwise one track might go ahead and play itself before another track has finished its rounds, and then once it repeats in-game, you’ll be like “WOAH THE SONG IS ALL MIXE D UP WHAT DO I DO?!!!!”.
I got this trick from someone else—I believe it was Charon the Ferryman, a member on my forums. Go to View-> Composer if your composer scroll isn’t loaded already. Select the first track, then click in the composer area. Hit “page down” on your keyboard (or if you don’t have that, do it slowly by holding the right arrow) until you reach the end of the track. Making sure you are at the end, look at the top.

Make sure the time and the duration are the exact same. If it isn’t, then add rests by clicking the “Insert a Rest” button until it is.
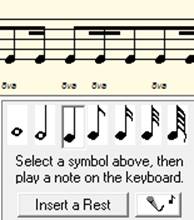
There’s the button if you can’t find it. Now if your song’s duration CHANGES, that’s also bad. Press the backspace button to delete rests. Usually one backspace will get it to the perfect timing. In my case, the duration went to 3:03:07 due to an extra rest, and then I pressed backspace once, and now it is back to 3:03:04.
Click on the next track (simply click on the row of the track underneath the column named “Track Name” if you’re stuck on how to do select a track, and then make sure the track is highlighted) and do that with EVERY SINGLE TRACK. Yeah, the repeating process makes you hate large #’s of tracks. D:
Once that’s done, best save your song. You’ve now prepared your song for insertion. That was arguably the hardest part of the entire process. :P
Part 4: Applying Blazer’s Beta Music Insertion/Instrument Patch
So, get my epic patch from my website at http://www.feshrine.net/hacking/patches.html
I probably sound narcissistic for calling it epic, but everyone needs to feel some good self-accomplishment. I’m just having some fun… XP
Right, back to hacking,
Here’s the Readme:
README
-------
This is a private patch supplied by Blazer. It is not for use without permission. Credit must be given.
It adds all instruments at offset 0x107d7d0. Data ends at 0x11b6530. The actual instrument map can be referenced by the offset 0x11ae42c when creating songs.
Back-up your ROM before using and be very careful with this. If you have not gotten this patch directly from Fire Blazer than the data will not be repointed properly and it WILL screw up your ROM if used in combination with a MIDI.
Thank you for your time.
As long as you don’t post this tutorial anywhere (you can link people to it, but link them to the WEBSITE, DO NOT REPOST IT SOMEWHERE ELSE), then you’re free to use it. Also give credit if you use it in your hack. Not only because I indirectly helped you with your hack but I’m curious to see if people actually make use of things like these, and curiosity is just so hard to control.
Now, with that said, if you read the README (that’s the point of it), it says some data is inserted at some scary offset. Well, if you happened to have data at that offset, we have a problem—the patch’s data has pointers inside of it. TONS of pointers. The pointers are relative of each other. Unless you want to repoint hundreds of pointers, the data has to go where the patch says it is going. In short, make sure there is nothing at that offset.
So you’ll need to move out any data you have there—go use a hex editor and check to see if there is any data between those offsets. If there is, it WILL be overwritten, beware. Also, if you have a clean ROM, this WILL expand your ROM, meaning you will now have to start using UPS patches if you haven’t already, and if you simply dislike expanding... well too bad. -_-
BEFORE you use NUPS (find it on
feshrine.net) to apply that patch, BACK UP YOUR ROM!
I make no guarantees that nothing will go wrong and everything works. It’s
worked for several people but that doesn’t mean it won’t screw up your ROM. You have been warned.
That being said, go ahead and apply the patch, because you’ll never get anywhere without it.
Part 5: Converting Your MIDI
With that done, time to convert your song to GBA format. Crack out MIDI2GBA. Open up that program called “tr.exe”. It has an icon with the text ‘ELF’. Put your MIDI file into the folder called ‘mid’. The ‘mid’ folder is inside of the MIDI2GBA folder. Make sure it is your ONLY and I mean ONLY Midi there. In fact, make sure it is your only file there. Otherwise things can get confusing later on and my methods won’t necessarily work if you try and insert/convert multiple MIDIs at a time.
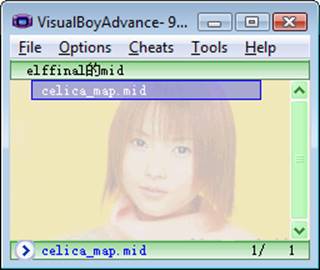
Once you’re sure it’s in, press the “??” button in tr.exe (the ELF program). A pop-up window will come up and your song will either be on the left or the right. If it’s on the right, the conversion failed. If it’s on the left, it’s a success.
Now if it’s on the right, don’t get all pissed at me. There are some reasons why this might happen.
- Errors in the MIDI. Try to repair it using Anvil Studio. In Anvil, go to File-> Repair and hit “No” to any pop-ups, then save and retry.
- The following may actually mess it up as well. Don’t try to repair the song and then insert, first try to insert and then repair.
- Awkward instruments or something. Perhaps your MIDI file has some instrument that the program “doesn’t like”. I doubt it, but who knows.
- Bad tracks, some unsupported type of track.
- MIDI file type. Try saving it as MIDI format 1 and midi format 0, although I’m not sure if this makes a difference, maybe it does. It has to be a MIDI by the way—MP3’s and WAV’s are totally different, don’t even try them.
- The file name has some weird symbols in it.
- You could just be unlucky and your song doesn’t want to work. This often times happens with Felover3, a hacker who seems to fail at a lot of things… Poor dude.
If you can’t get it fixed, I’m sorry, this is a flaw in this method. I can’t help you too much besides saying redo the process or try a different MIDI. To be honest, while writing this tutorial I did one myself, but the MIDI I tried to insert ended up being on the right. In fact, so did the 2nd one. Not until I got to the 3rd one did it work like it should.

Now, time to test out how your song should sound in-game.
Already?! We already get to test?!
YESZ!
In the MIDI2GBA folder is a ROM called song.gba – load said ROM using VBA and then press “Z” (the equivalent of the “A” button in-game), wait a second, and then listen to your song.
If it’s choppy, then that means conversion had some difficulty. If the sounds are a little different or something, then that’s due to instruments. Conversion isn’t perfect and the GBA hardware has its limitations, thus the song won’t sound perfect. If it sounds pretty good, that’s great let’s continue. If not, try repairing the song, manually fixing it using MIDI editing skills (if you have any), or try another MIDI.
My song, Celica’s Map Theme, sounds great, although not exactly like it should, so I am continuing. My other two choices (Awkward Justice from Tales of the Abyss and Rick Roll by Rick Astley) didn’t work… it was quite unfortunate really, but such is hacking. :P
Now time to get it to Fire Emblem.
Nub approach: can’t we just copy the song from song.gba, the game we just played, into our game?
My approach: Let’s just copy the song from the test game into our game!
Hey, something IS simple! Sorta. Let’s get down to it.
Part 6: Making Your MIDI Repeat and Transferring
it to Your ROM
Sigh, this tutorial is getting really long. And my hands are tired. Yeah. Not cool. Also, I’m making more and more redundant comments like these.
Get your hex editor out, open up your Fire Emblem ROM as well as song.gba. Back-up your ROM, btw.
Go to 0x1B3BB8 in song.gba – this is where your first track starts. Now copy everything from here to the end of the ROM. You’ve just copied all of the music data as well as the song’s header. That’s all you need to know for now. :P
Now I’m going to make use of a new method of doing the repeats in the game. What you have to do is paste all that data you just copied into a blank file. Using HxD, just press Ctrl+N or File->New and a new tab will come up. Go to that an press Ctrl+V to paste all of your song data. Bam.
Now here’s how this works. The command to end a track is B1. The repeat command is B2 *pointer*. For whatever reason, tr.exe doesn’t add a repeat to the tracks, so you have to do it yourself. My easy way is to just use a find and replace feature.
Press Ctrl+R in HxD, or if you’re using some other hex editor, find the option to do a find and replace. In the find menu, type in “B1” (hex) and in the replace area type in “B2 00000000 B1 000000”—without the spaces. It should look identical to this.
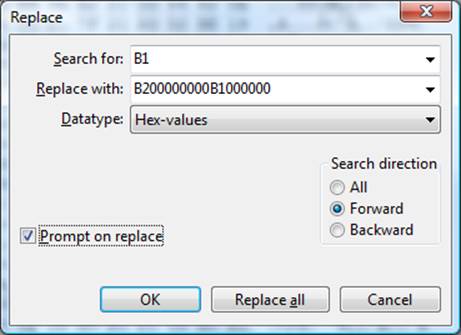
With that done, press “OK”. If you selected “Prompt on Replace” it will ask whether you want to replace each instance of B1. In most cases you want to replace every one, but SOMETIMES there will be a B1 byte that isn’t actually the B1 we want to replace. If that doesn’t make any sense, sometimes there will be a ninja B1, but we DON’T want to replace those, because they are ninja. The way to make sure that you don’t replace a wrong byte is look at the B1 thing and check to make sure that after the B1 is a “BC” byte. This’ll make more sense with a picture.
![]()
If the B1 and BC are next to each other then I can almost guarantee you want to replace it, so hit “replace” and do that with every instance and once you’re finished you’re good to go.
What you’ve just done is preformatted the song to have repeats. You added in the code, so now you have to insert the MIDI into your ROM and then fix up ALL the pointers. Fun.
As I just said, we need to put the MIDI in your Fire Emblem ROM. Copy all the MIDI data (the one that you just did a find-and-replace function on). We’ll need a bunch of free space for this song. I’m going to paste at some offset farther into the game that isn’t being used at all. Make sure wherever you paste your edited song/MIDI IS NOT BEING USED and there is plenty of free space around it, just to be safe.
For your info (in case you didn’t
know), it is best to insert at offsets that end in ‘00’. Like 0x1200000 is
easier to remember than 0x10849C4, although both will work. I just expanded my
ROM further and am inserting it at 0x11E4000. That’s an easy to remember
offset. Because offsets are always important, I am going to write it down. You should be writing down all these offsets in something
like a notepad file yourself—do it or you’ll suffer consequences later on.
Now, once you paste it, go to the end of wherever your pasted data is… my hex editor (HxD) automatically takes me there. By the way, you should paste write, not paste insert. Paste insert = Ctrl + V and it adds the data in the middle of the game, which messes up pointers. Ctrl + B overwrites the free space you have and doesn’t mess up pointers.
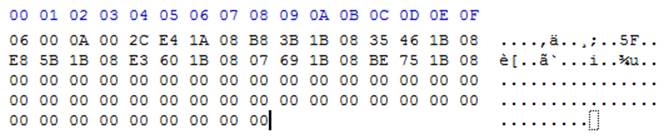
Once you’re at the end of your song data, you should see to the right (in the ASCII text part) the name of your file, something like “awesome.mid” with “awesome” being the name of your song… If you see that, you are in the right area. Congratulations.
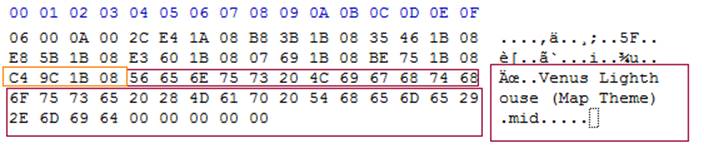
Boxed in dark red is the text. On the right you can see the name of my MIDI and on the left you can see the hex for that text. 4 bytes before the text is what I consider a garbage pointer. That’s all you need to know, it’s garbage. Like all garbage, you get rid of it. The name of the MIDI is garbage too, so just ‘00’ all that out. Your end product should be something as beautiful as this.
With that, on to the next part!
Part 7: Track Pointers & Repointing

This is the final part of your MIDI, which is ironically called the header. The part in the dark red box, the first 4 bytes, are 06 00 0A 00 in this example. 0x06 is the # of tracks I have in my song. My song DOES have 6 tracks.
After that is a pointer to the Instrument Maps, also known as Voice Groups, although instrument map is a much better term in my opinion. My patch inserts instrument maps at 0x11AE42C. In “pointer form”, that is 2C E4 1A 09. If you notice, the only difference between the current pointer and what the new pointer should be is the ‘09’, so change that. Once you do, you will have set up your instruments for the
song. Simple as that. Not only this, but any of the songs that are inserted with this method will use the exact same instrument map, so there’s no hassle. :D
After that, in the purple box, are the pointers to the tracks. Right now they still point to our old tracks, eww. A pointer is 4 bytes and if you notice there are 6 sets of 4 bytes up in that data I posted, or 6 pointers. 6 pointers for 6 tracks. Your song will probably be different. It might have 10 pointers or 3 pointers and the pointers won’t all be the same as mine.
Anyway, first we need to add in the repeat pointers. If you remember we added the B2 code to the song for every track earlier on. What we were doing was adding the repeat code, 0xB2, and space for us to put in a pointer. The pointer points back to the beginning of the track so that the track just plays over again… and over again, and over again. :P
Go to the offset where you put your data. For example I put my data at 0x11E4000. From now on, write down offsets, because it is very important to for you to repoint stuff. Do a search for the hex 0xB2 and you’ll get to the end of your track.

![]()
Now the beginning of this track is at 0x11E4000 for me. You just wrote this offset down, it’ll be something different for you, depending on where you put your song. In pointer form that is 00 40 1E 09.
About turning offsets into pointers:
Break up the offset into parts:
AB + CD + EF + GH = GH + EF + CD + (AB+8)
So 0x00123456 would turn into
56 34 12 08
And 01 1E 40 00 becomes 00 40 1E 01, but you add an ‘08’ to the last byte making it 00 40 1E 09. Bam.
Now type that in where the 00’s are between the B2 and B1. Like so.
![]()
Now that you’ve done that, there will be a “BC” byte soon after that. “BC” is the first byte of a track. I could load you with lots of more information, but this is confusing enough as it is, so if you’re looking for documentation on how track data is made up, look at the end of this tutorial.
Anyway, we want to know where the beginning of the next track is so that we can tell the game where to repeat to. So find out the offset of the next track—look for the magical BC.
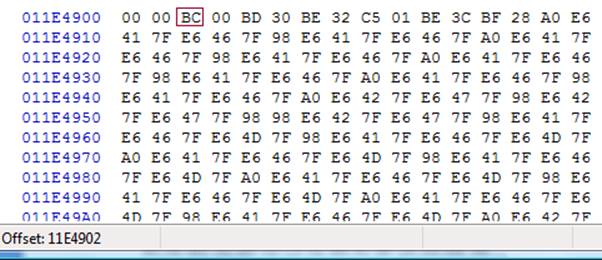
At the bottom left of HxD it tells you the offset of wherever you are. So that byte is at 11E4902. Yes, great. I’m going to write that down, then do a search for B2 again. Then I’m going to take that offset, put it into pointer form (02 49 1E 09) and then place it in the middle of the repeat code. Then I’m going to find the next BC and start the process ALL over again, writing down the offsets each time, until I get to the final repeat code.
And, stinks for you, but you’re going to have to do this too, and the more tracks you have, the more frustrating and tedious it gets.
Eventually you should see your track header again, you know, the 06 00 0A 00 bytes, where “06” is the number of tracks in your song. Once you see that, you know you’ve finished doing the repeating for all the tracks. Congratulations, now you have to repoint the entire track header.
Take all those offsets of the track headers and repoint the tracks.
Remember a pointer is 4 bytes. There are 24 bytes there so if each pointer is 4 bytes then that means there are 6 pointers, because my song has 6 tracks. If your song has 10 tracks, that means you have to replace 10 pointers with the 10 offsets of the beginning of each track. Great. Do that and save your game/ROM so you don’t lose all your work. Hahah.
Part 8: Finale- Assembling Your Song & Profit
This differs for each game.
Use the Music List for each game (comes with Nightmare Modules) to find out which song you want to be replace. You can also replace a “blank” song.
Now, take the hex of that song and note it down. I am going to replace song 0x7A in Fire Emblem 7, which is a “Nothing” song. But it’s OK. :D
For FE7 at least, there is an easy way of doing this: there is a Nightmare Module called the Music Array Editor which you can open up in… Nightmare. Choose the song you want to replace and repoint the offset of the current song to the offset of your new song—but make sure to add 0x08000000 to the offset or it won’t work. E.g. I would type “0x091EC900”, not “0x011EC900”. Then hit enter and save and go ahead and play the song in the game (an easy way to do this is to make the song play as the map music by editing the music in the Chapter Data Editor).
If you don’t have this module, you’ll have to use this outdated way of doing it. Do check to see if you have the latest Nightmare Modules in general, but otherwise… well, sorry I guess. XP
*Outdated Method*
Now you need to find out where in the pointer table that song is. You can optionally use Sappy 2005 to load up your game, find the song, and then look at Sappy to find the offset of it.
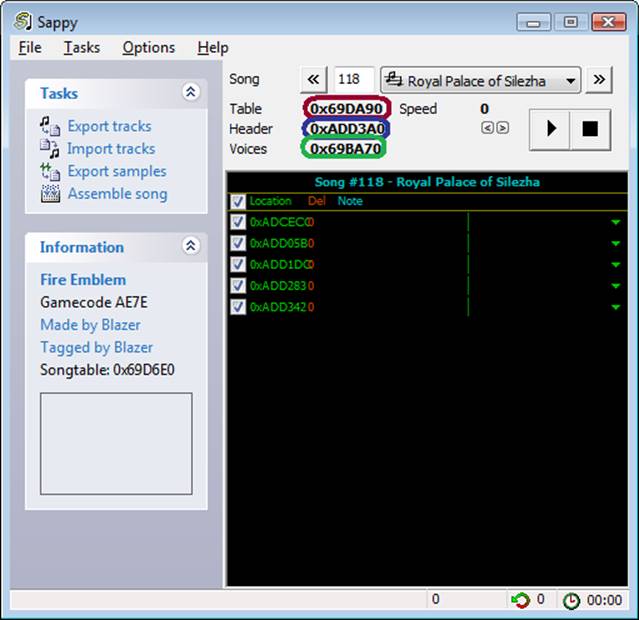
“Table” is where the pointer to the header is. That offset there, circled in red, is what we want.
“Header” (blue) is the offset of the song header. We just made that—it includes pointers to all the tracks, tells the game how many tracks, and where the instrument map is.
“Voices” (green) is the offset of the instrument map. My patch makes a universal version and the offset of it is 0x11AE42C. That’s also in the song header, and we’ve already repointed that too. Just a little bit more!
Go to the “Table” offset with Sappy. If you don’t have Sappy, follow the directions below
1. For FE7, go to 0x69D6E0. For FE6, go to 0x3994D8. For FE8, go to 0x224470. For any other game, you’ll need to use Sappy to find out where the Song Table is.
2. Take your song # (mine is 0x7A—yours is whatever you got from the Nightmare Module’s Music List) and multiply it by 8. Use Microsoft Calculator or something (make it Scientific and then select hex—it can multiply hex, that’s right). You could probably find some calculator online too. Then take that number and add it to the song table offset. So for me, 0x7A times 8 = 0x3D0. 0x3D0 + 0x69D6E0 = 0x69DAB0. That is the offset of my song.
Alternatively, for Fire Emblem 7, I made a Music Array Editor which can help you edit any of the songs up to a certain point, but it’s limited due to an incomplete music list and it’s only for FE7.

What’s highlighted is my song’s info. The final bit. The pointer is a pointer to the song’s header. Mine is at 0x11EC900. Good luck if you didn’t write it down like a good person.
0x11EC900 = 00 C9 1E 09, so I type that in. The next 4 bytes, which are currently just 00000000, have to do with priority.
00 = Top Priority, 01 = Map Song Priority, and I had others noted down but pretty much the higher the # gets the lower priority it has. Sound effects have a high priority of 6-8 generally, while backgrounds music generally has 0-1, misc. music has 2-3, and yeah… You should be able to figure things out. Most of the time you’ll just need to use 00 or 01 anyway.
01 00 01 00 is necessary for map songs to work correctly, or else when a unit goes into battle the map music will stop playing. Just letting you guys know about that.
My final result is:

As usual, red is the edited stuff. I save, and then I test. You can test using Sappy v1.6 or just go straight into Visual Boy Advance. Obviously you need to make your song play in game, which means you have to somehow load it, whatever that way is. If you’re replacing something like the title theme, then that’s really easy to test, because you just load up the game and bam. If you’re replacing a song that currently wasn’t used, it’s up to you to test that song out.
Part 9: Possible Errors & Wrap-UP
Hopefully your song works. If it doesn’t, error could be
- Number of tracks
- Song wasn’t converted properly (program’s fault)
- Faulty pointers (very very likely, double check pointers, check for 08/09 for the last byte)
- Messed up data
- Overwrote some important data
- Edited the wrong pointer (rather than messing it up)
- You inserted some data somewhere, thus shifting everything, making pointers go wrong
- Some sort of pointer error >_>
- The song simply doesn’t want to play?
- You aren’t playing the right song in-game, you think you’re playing the edited song but you really aren’t
- I dunno dude. Leave me alone. This tutorial is 4,900+ words and 19 pages. I’M FREAKIN TIRED.
Once you do a couple, you can make up your own tricks to make it go faster, and you’ll know how it all works, making things go a LOT faster. I can probably insert a 5 track song in 30 minutes, a 10 track song in like an hour and a half (yeah # of tracks can totally make things harder…). And I haven’t done a ton of insertions either. A little bit of practice and you’ll make every minute of music insertion worth it.
Update: I recently inserted like, a 6 track song in 10 minutes, so it just takes some practice and then things like repointing and knowing what to do will come REALLY easy. ^_^
Part 10: Documentation and Stuff
Commands:
BC PP
BD II
BE VV
These are commands that set stuff. There are other commands too but I won’t get into it. The first is BC PP where PP = octave. 0x00 is default while adding or subtracting 0x0C will get you lower and higher octaves, for example, 0x0C or 0xF4.
BD II sets the instrument. The conversion already does this for you but if you want to change it you can do so manually. The instrument is the one labeled in Anvil Studio—[you] take that # and then subtract one, then convert the number from decimal to hex. Wala, you have your instrument.
BE VV sets the volume, IIRC. VV is a # between 0-127, except in hex.
You shouldn’t need to change this but if you want to, it’s available to you, and it’s better than having to edit the MIDI with anvil studio and then reinsert everything, IMO, assuming you don’t have to make massive changes to the tracks.
B0 = Rest
B1 = End Son
B2 = Repeat
Some more commands for you to know*.
*(I am calling them commands, even if the name sometimes doesn’t make sense)
Atrius’ Notes:
The audio track data is a list of commands and arguments for
playing music/sound effects.
Anything below 0x80 is an argument, and anything 0x80 and above is a command.
0x80 - 0xB0 = Rest commands of varying lengths, to wait a certain amount of
time before playing each note.
0xB1 = Stop command, to signal the end of the audio track. From what I've
noticed even if a song loops it has one of these after the loop command.
0xB2 = Jump command, to jump the playback pointer to another location in
memory. Often used to loop songs by jumping back to the beginning of it.
0xB3 = Jump command where playback can jump back to after it again later. Used
when you want to repeat part of a song before continuing with the rest of it.
0xB4 = Return to last 0xB3 command.
0xB5-0xBA = Unidentified
0xBB = Set Tempo
0xBC = Set Pitch offset
0xBD = Set instrument
0xBE = Set Volume
0xBF = Set Panning
0xC0 - 0xCE = Unidentified
0xCF - 0xFF = Play notes of varying lengths.
So to break apart the track information I gave you:
BE FF BC 00 BB 01 BD 00-CF 3C 7F B0 B1
BE FF = A volume command with an argument of 0xFF (Volume is an odd exception
to the rule that arguments must be less than 0x80)
BC 00 = Set the pitch offset to zero
BB 01 = Very low tempo so that the note is drawn out long enough for voice
samples to play their full length.
BD 00 = Set the instrument to the first entry in the instrument map.
CF 3C 7F = Play a note with a pitch of 0x3C (Right in the middle of the
available range), and a volume of 0x7F (The maximum available)
B0 = Wait long enough for the note to finish playing
B1 = End the audio track
Charon’s Notes:
![]() Pitch
Pitch
Pitch is very easy to understand. As Atrius noted, it is follows the byte 0xBC
(which is usually the first byte in a given track anyhow). Pitch works like
this:
0x00 is the base, equivalent to Middle C.
0x0C is one octave higher; High C.
0xF4 is one octave lower; Low C.
If you haven't noticed, it goes by increments of 0x0C, so for higher
increments, they would be 0x18, 0x24, ect, while for lower increments they
would be 0xE8, 0xDC, ect.
Tracks can be transposed by any value, however, so if you wanted it to be in a
different key, you could change these values. If done, make sure to
add/subtract 0x0C when raising/lowering octaves.
![]() Tempo
Tempo
Tempo is simply the tempo transfered into Hex. So, if your original tempo was
80, you would put in 0x50. It follows a 0xBB byte.
![]() Instruments
Instruments
The instruments correspond with the instruments of the voicegroup. Although the
instruments can be anything you want, the typical way is to have the
instruments correspond directly. It follows a 0xBD The direct map:
PIANO
0x00 Acoustic Grand (often used as a drum kit)
0x01 Bright Acoustic
0x02 Electric Grand
0x03 Honky-Tonk
0x04 Electric Piano 1
0x05 Electric Piano 2
0x06 Harpsichord
0x07 Clav
CHROMATIC PERCUSSION
0x08 Celesta
0x09 Glockenspiel
0x0A Music Box
0x0B Vibraphone
0x0C Marimba
0x0D Xylophone
0x0E Tubular Bells
0x0F Dulcimer
ORGAN
0x10 Drawbar Organ
0x11 Percussive Organ
0x12 Rock Organ
0x13 Church Organ
0x14 Reed Organ
0x15 Accoridan
0x16 Harmonica
0x17 Tango Accordian
GUITAR
0x18 Acoustic Guitar(nylon)
0x19 Acoustic Guitar(steel)
0x1A Electric Guitar(jazz)
0x1B Electric Guitar(clean)
0x1C Electric Guitar(muted)
0x1D Overdriven Guitar
0x1E Distortion Guitar
0x1F Guitar Harmonics
BASS
0x20 Acoustic Bass
0x21 Electric Bass(finger)
0x22 Electric Bass(pick)
0x23 Fretless Bass
0x24 Slap Bass 1
0x25 Slap Bass 2
0x26 Synth Bass 1
0x27 Synth Bass 2
STRINGS
0x28 Violin
0x29 Viola
0x2A Cello
0x2B Contrabass
0x2C Tremolo Strings
0x2D Pizzicato Strings
0x2E Orchestral Strings
0x2F Timpani
ENSEMBLE
0x30 String Ensemble 1
0x31 String Ensemble 2
0x32 SynthStrings 1
0x33 SynthStrings 2
0x34 Choir Aahs
0x35 Voice Oohs
0x36 Synth Voice
0x37 Orchestra Hit
BRASS
0x38 Trumpet
0x39 Trombone
0x3A Tuba
0x3B Muted Trumpet
0x3C French Horn
0x3D Brass Section
0x3E SynthBrass 1
0x3F SynthBrass 2
REED
0x40 Soprano Sax
0x41 Alto Sax
0x42 Tenor Sax
0x43 Baritone Sax
0x44 Oboe
0x45 English Horn
0x46 Bassoon
0x47 Clarinet
PIPE
0x48 Piccolo
0x49 Flute
0x4A Recorder
0x4B Pan Flute
0x4C Blown Bottle
0x4D Shakuhachi
0x4E Whistle
0x4F Ocarina
SYNTH LEAD
0x50 Lead 1 (square)
0x51 Lead 2 (sawtooth)
0x52 Lead 3 (calliope)
0x53 Lead 4 (chiff)
0x54 Lead 5 (charang)
0x55 Lead 6 (voice)
0x56 Lead 7 (fifths)
0x57 Lead 8 (bass+lead)
SYNTH PAD
0x58 Pad 1 (new age)
0x59 Pad 2 (warm)
0x5A Pad 3 (polysynth)
0x5B Pad 4 (choir)
0x5C Pad 5 (bowed)
0x5D Pad 6 (metallic)
0x5E Pad 7 (halo)
0x5F Pad 8 (sweep)
SYNTH EFFECTS
0x60 FX 1 (rain)
0x61 FX 2 (soundtrack)
0x62 FX 3 (crystal)
0x63 FX 4 (atmosphere)
0x64 FX 5 (brightness)
0x65 FX 6 (goblins)
0x66 FX 7 (echoes)
0x67 FX 8 (sci-fi)
ETHNIC
0x68 Sitar
0x69 Banjo
0x6A Shamisen
0x6B Koto
0x6C Kalimba
0x6D Bagpipe
0x6E Fiddle
0x6F Shanai
PERCUSSIVE
0x70 Tinkle Bell
0x71 Agogo
0x72 Steel Drums
0x73 Woodblock
0x74 Taiko Drum
0x75 Melodic Tom
0x76 Synth Drum
0x77 Reverse Cymbal
SOUND EFFECTS
0x78 Guitar Fret Noise
0x79 Breath Noise
0x7A Seashore
0x7B Bird Tweet
0x7C Telephone Ring
0x7D Helicopter
0x7E Applause
0x7F Gunshot (also commonly used as a drum kit)
![]() Volume
Volume
Volume is a simple concept as well, but unlike most of the song arguments, it
must be a value less than 0x80, or else (for some whacked out reason) it acts
as a rest o.o
It follows 0xBE.
![]() Panning
Panning
I need to investigate panning a little more, but I do believe that 0x00 is the
neutral value. Either that, or it's 0x0C. I believe that pan's range is from
0x00 to 0x0F; Atrius, correct me if I'm wrong.
Also, about 0xB1 - if your track doesn't end in it, it will cause the game to
crash and make that horrible noise some of us know too well o-o
Part 11: The Music
Hacking Run-Down (Shorter Version of Tutorial & Walls of Text)
Let’s say you’ve already hacked music before but you forgot how it works. Perhaps you just want to know the general idea of how to hack music or the general layout of GBA game’s music, whether that game be Fire Emblem (which is the focus of this tutorial) or not. This is the section for you. It won’t go into huge detail but it’ll still give directions and whatnot.
First you have to download all the programs related to music hacking. Once you’ve unzipped them and everything, take your MIDI and load it in Anvil Studio.
What we’re going to do here is have the MIDI formatted so it can be properly inserted. To start, we don’t want the song to repeat inside of the MIDI, because we’re going to have the game repeat the song for us. If the MIDI repeats within itself then we’re just consuming space. Use Anvil Studio to truncate the song such that it only plays once.
Next we have to get rid of all unnecessary tracks to minimize tracks. I don’t recommend inserting a song with more than 14 tracks. I’ve done 14 tracks but on occasion I actually have problems with them. It’s best to limit a MIDI to 10 tracks or under if you can, just to be safe. Delete any tracks without any notes (Anvil Studio will have some red text at the top left letting you know) and delete any tracks that are already muted. If you still have too many tracks, look for some redundant tracks that only have a few notes or have minor instruments that you can live without.
After optimizing the number of tracks you will need to equalize your track’s lengths. Making sure that you go to View-> Composer, select a track, go all the way to the end of it, and make sure that the track length and the song length match exactly. If it doesn’t, insert rests until the track length matches the song length. Make sure you don’t add so many rests to the track that it makes the song longer. If you make the song longer it’ll mess up the other tracks and it’ll also be adding rests to the end of the song, so when your song repeats, it will have a pause in between the repeat, and thus sound bad. That being said, optimize the song to be repeated properly with equal track lengths—with all tracks.
You can now save your MIDI (I recommend to use the “Save as” option in Anvil Studio to make a separate copy with the new edited MIDI). Go to where you saved the MIDI and drag it into the ‘midi’ folder inside of MIDI2GBA, making sure that the MIDI you are going to insert is the ONLY file inside of that folder. Double-click tr.exe in the MIDI2GBA folder and hit the ?? button. Click “OK” and then look in the two columns. If your song is on the left side, the program and MIDI worked fine… well, they should have, anyway. If it’s on the right side, something is up with the MIDI, in which case please refer to part 5 of the tutorial.
If you have not already applied the instrument patch for FE6/FE7, please do so. If there is no instrument patch for your game, what you can do is just apply the patch to a clean FE6/FE7 game anyway and copy the new data in the expanded section of the game (0x1000000 to the end of the game) and copy it to whatever game you are hacking. If you don’t get what I mean by this, then oh well, this tutorial is optimized for Fire Emblem hacking, but as usual I just keep FE8 out of the mix.
Anyway, the patch aside, load the ROM “song.gba” (located in the MIDI2GBA folder) into Visual Boy Advance or your GBA emulator of choice (VBA is the best GBA emulator though…). Press “A” or your keyboard alternative which will make the ROM play your inserted song. Make sure it plays nicely and whatnot. Then close the ROM.
You’ve now heard your song play in a GBA ROM, so hopefully that’s motivation to continue this music insertion process. Load your ROM (for example, your hacked Fire Emblem 7 ROM) and song.gba in a hex editor. I most definitely recommend using HxD because it has all of the features needed and that’s what I use. Copy all the data from 0x1B3BB8 to the end of the game into a new, blank file. Use a find and replace function to find “B1” and replace it with “B2 00 00 00 00 B1 00 00 00”. Do that to all instances—you should find as many “B1” bytes as you have tracks. Once you’re done with the find and replace function go to the end of the ROM and delete the ASCII text that has the name of your MIDI. Also delete the 4 bytes before the text as they are part of a stupid pointer that you don’t need.
Now copy the data in this file you’ve just done some stuff with and paste write (for HxD, use Ctrl+B, NOT Ctrl+V, Ctrl+V will INSERT data and possibly mess up your ROM) your data into a lot of clear, open space in your FE7 ROM. Make sure there is plenty of space just to be safe. You will need enough space for all of the data you are pasting so just look at HxD to find out how much space that exactly is.
Now go to the beginning of where you pasted your data and write that offset down. In fact, write every relevant offset down from now on. You will need it. I recommend just opening a notepad and typing important offsets.
Do a search for 0xB2. You’ll find the data B2 00 00 00 00 B1 00 00 00. The first 4 00’s are where your pointer will go. They point to the beginning of the track. This data here is the repeat code and for the track to repeat you need to tell it to play itself over from the beginning of the song. So the pointer should go to the beginning of the song, which I told you to write down the offset. Put it into pointer form (little endian, noting that offsets have an ‘08’ at the beginning of them, such that the offset 005C3984 will become 08 5C 39 84 which will finally be 84 39 5C 08) and enter it into that space of 4 00’s. Now right after the “B1 00 00 00” should be a “BC” byte. This is the beginning of the NEXT track. Write down the offset that the BC byte/write the offset of the beginning of the track. Do another search for B2 and do the same thing you just did with the pointer. Repeat this for every track until you end up noticing that there is no “BC” byte for the next track because you’ve added the repeat code for every track. After the final “B1 00 00 00” part you’ll end up at the header (TT 00 0A 00 where “TT” is the number of tracks your song has, in hex). After the first 4 bytes is a pointer to the instrument map. My patch inserts it such that all you have to do is turn the ‘08’ in that pointer to a ‘09’. All the other pointers in the song’s header are pointers to the tracks.
Assuming you listened to me and wrote down all the offsets of the tracks, you can now take those offsets and type them in “pointer form”, one after another, until you’ve replaced all the old track pointers with the new track pointers.
Save your ROM and go to your song’s song table. You can use Sappy 2005 to find this or look at the full-length tutorial for specific offsets for Fire Emblem games. Alternatively there is also an FE7 Music Array Editor which lets you edit the pointers and priority of songs in the song table/array. You’ll now need to find which song you’re going to replace.
Let’s say you’re replacing song 0x4C, whatever that is. That’s great. Each entry is 0x08 bytes—at least it is in Fire Emblem games, I’m not sure about other games—so multiple 0x4C by 0x08. Add this to the offset of the music array (for example, FE7’s music array is at 0x69D6E0). Go to that offset and replace the pointer here with a pointer to your new song’s header. Change the priority accordingly noting that 00000000 is for background music, 000100001 is for map music, and lower numbers are for various things, see the full-length tutorial for more details. XP.
You’ve now done a lot of stuff. Let’s think it over… we’ve formatted the song, got it converted to GBA format, added repeats, made an appropriate song header, made sure that the song has appropriate instruments (it’ll use standard MIDI instruments) and told the game where the song is as well as what priority it has. All we have to do now is make the game use that song. That’s up to you—if you’re replacing something like the title theme then that’s not a problem because the song already plays in game. If you’re replacing some random song or an unused song then you’ll have to make the game use that song yourself which is up to you. For Fire Emblem I suggest using the Chapter Data Editor, Sound Room Editor, or Boss Music Editor to get your song to play in-game if it doesn’t already.
Hopefully it sounds nice and well. If you need more help or if the song had some issues, please see the full-length tutorial (parts 1-9). This is mainly to give the general idea without completely explaining anything, dividing into parts, etc.
Part 12: Credits
& Thanks
My last part, I would appreciate credits and thanks for this tutorial. I sacrificed a ton of time creating this and learning how music works and stuff. I’m not trying to complain butaAll I ask is that if you use it, you put my name (Blazer) and Charon the Ferryman somewhere obvious, like in the credits. Thanks for your understanding – I hope this guide helped you.
Special Thanks To:
Atrius – Lots of information about music editing, helped me insert WAV’s (which is NOT explained here)
Charon the Ferryman – her tutorial on music editing helped and inspired me to make my own tutorial. She also gave me some one-on-one help with how to hack music and I took her method and just expanded on it and stuff like that.
Chapter 25: Music Editing with Zahlman’s Song Editor
First of all, you need to download
Zahlman’s song editor to do this. I suggest going to this topic- http://www.feuniverse.net/forums/index.php?showtopic=7874&st=0
Next, download and install Python.
It’s necessary.
Once that’s done, extract the files
from the download. Read the README and transcript just to give some background.
Who knows if it’ll actually help, but it wouldn’t be included if it wasn’t
meant to be read, right? XP
Now, double-click cli.py, and some
stuff’ll happen. Mainly a screen will come up with a disclaimer and a comment
saying that if you need ‘help’ you should press ‘help’.
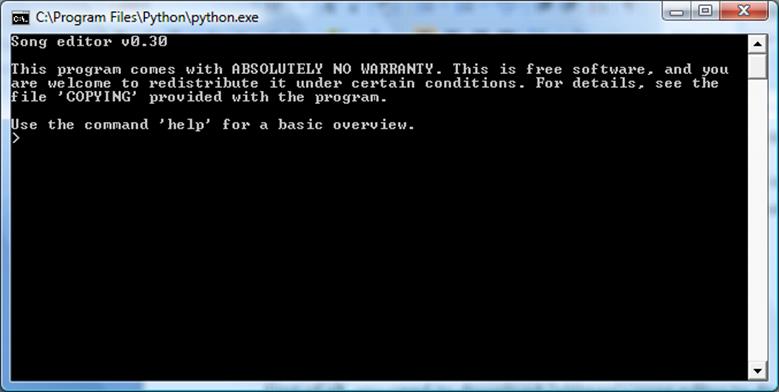
If you actually do type in help and
press ‘enter’ on your keyboard, it’ll give you a list of commands, and tell you
some stuff. Here’s the important stuff:
-
Commands
are not case sensitive. Filenames, probably yeah, just stick with doing proper
capitalization always, to limit the chance for problems.
-
Decimal
doesn’t have a prefix, while hexadecimal (AKA ‘hex’) has the 0x prefix. We know
this already (if you don’t, then this might be hard for you…).
-
Don’t
include extensions or quotes with filenames
-
You
can use relative paths or absolute paths. To make things easy, when the program
needs to access a file, make sure the
file is in the same folder as the program. That way you just type the file
name—no fuss, no mess.
-
(some
other stuff you can read if you want to—isn’t completely necessary to know when
using the program, but a good read anyway)
Now, onto actually using the program.
To start, you should know how to find more information on a command. Simply
type ‘help commandname’. So for example, to find out how the ‘open’ command
works, type ‘help open’.
The open command is the easiest. Just
type ‘open nameofrom’. So if my game is called ‘fireemblem8.gba’ I’d type ‘open
fireemblem8’. It’ll say “Loaded ROM from disk”.
Now, what to do with this ROM… Well,
let’s say I want to extract a song from this game and put it into Fire Emblem
7. First we need to know where the song is in Fire Emblem 8. This is where
Sappy can actually be useful. You can have it locate the song table for you and
grab the offset from it.
That being said, open Sappy 2005 and
then load the ROM you want to export from. It’ll (hopefully) find the song
table of the game you are trying to hack—if it doesn’t, then something tells me
the game doesn’t use the Sappy engine, so you can’t hack its music with these methods.
On the left it’ll say the offset of the song table.
For FE8, the song table is at
0x224470. Now, in the FE8 nightmare modules is a music list. This will actually
prove very useful because it tells us which song is which. One day I was
feeling nice and I uploaded this song list here, for your reference- http://www.feshrine.net/hacking/downloads/fe8_music_list.txt
Let’s rip Truth, Despair, and Hope
(TDH for short) because it’s an awesome song. It’s song 0x0D. Since each entry
in the song table is 8 bytes, we need to do (0x0D x 0x08) + 0x224470 to find
where the pointer to the song is. We can use Microsoft calculator or an online
hexadecimal calculator to do this.
If you don’t see options for hex in MS
Calculator, set your view to scientific (View-> Scientific). Then hit “hex”
at the top left.
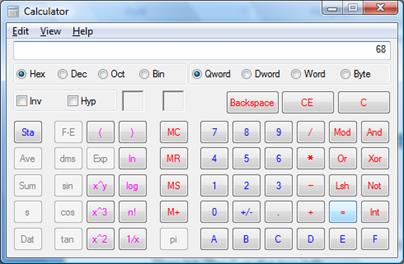
D x 8 = 68, according to MS Calc. +
224470 (the program knows it is hex because it is in hex mode, so no need to
put ‘0x’ in MS Calc) is 2244D8. So we’ll go to 0x2244D8 in a hex editor.

I see 5C 2A 55 08. That’s a pointer.
It has little endian, i.e. byte reversal, so let’s flip it and we get 08552A5C.
Take off the ‘08’ (only the game needs to know about the ‘08’) and we have
0x552A5C. Finally, we have the offset we need.
Back to Zahlman’s Song Editor. All
we’ve done so far is ‘open fireemblem8’ to open our FE8 game (or in your case,
whatever game you’re using). Next we’ll do rip 0x552A5C to rip the song we
want.

Great! All 7 tracks were ripped.
Let’s consider ourselves lucky that the program supports those kind of tracks.
Now we can do two things. We can A)
save the data in a binary file or B) burn the data to another ROM. Let’s save
it and then burn it, for teaching matters.
Type in ‘save songname’ to save the
data to a binary file. Since I just ripped TDH, this is what I did:
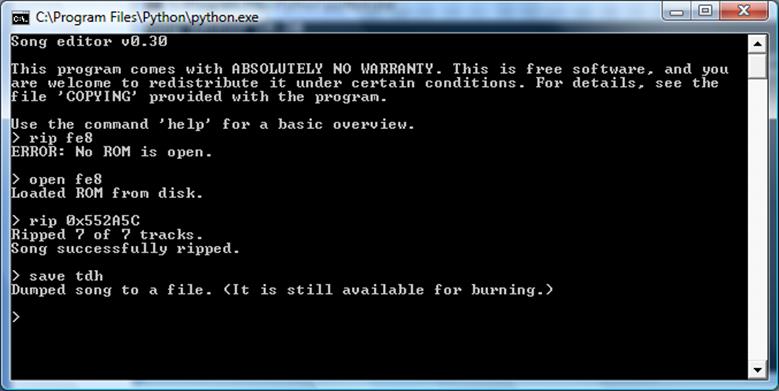
Now it says we can still burn it if
we want. So let’s do that. First, we’ll open up the ROM we want to burn it to.
Mine is called ‘sc.gba’ so I’ll do ‘open sc’. Then I’m going to burn the song.
I need two offsets—one offset where the pointer to the song will go, and
another offset for where the song is going to be inserted to. I know I have
some free space at 0xD40000, so that’s solved.
But how do I know which pointer to
replace? I have to go to FE7 and do the same thing I did with FE8 to find a
song. We’ll say I am trying to replace song 0x5A, which is the main theme. 0x5A
x 8 + 0x69D6E0 (offset for FE7’s song table) = 69D9B0. So that is where my pointer
is going to go.
So I have to type ‘burn 0x69D9B0
0xD40000’ to make it repoint the song at 0x69D9B0 to the new song I am
importing to the offset 0xD40000.
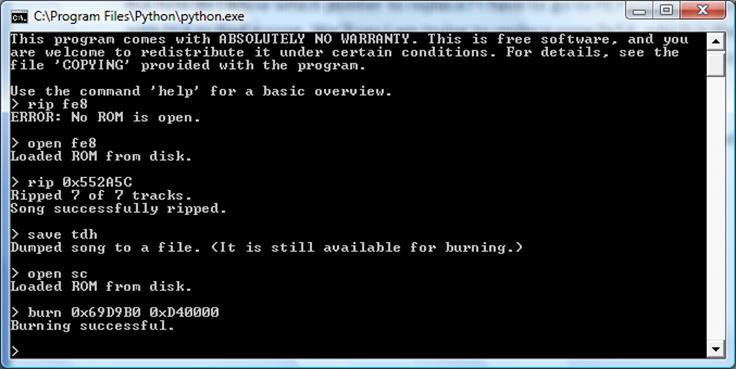
Burning successful! Now I just have
to save my game. WAIT, DON’T USE THE SAVE COMMAND. Remember, the save command
is to DUMP SONG DATA. We’re trying to save our ROM. Do “close romname”. In this
case, I just opened ‘sc.gba’, so I do ‘close sc’.

YESZ. Saved ROM to disk. Alright, I’m
going to go test my song out now.
(*Tests…*)
It worked! Great! I know how to
import a song!
But, wait, this song is cool and all,
but I want some new music in my hack! I want to insert a MIDI!
Well, here we go. Let’s start all
over again—let’s close and re-open Zahlman’s Song Editor just to refresh
ourselves.
Before we continue, we need to apply
a patch. This patch supplies us with basic MIDI instruments. You can find it
here- http://www.feshrine.net/hacking/patches.html
But wait, thing is, this inserts data
at a place, and it may very well overwrite some of your data. This is why I
suggest you don’t apply this patch unless you have an unexpanded ROM, and if
your ROM is expanded, that will be a problem, so this method will not work for
you (D: D: D:).
Assuming you can apply the patch (use
NUPS and make sure to hit ‘Notify’ on the left so that it bypasses the fact
that the patch will most likely not match your file) we now have instruments to
use so we can continue.
Let’s open our hack. ‘open romname’. Bam. Now, we need to convert a MIDI. ‘help convert’ tells us we need an offset for the instrument
map (my patch takes care of that) and the name of the MIDI. I am a very simple
person (lol), and have called my MIDI ‘cm’ for ‘custom music’.
I will give you the offset for the
instrument map (since it comes with my patch): 0x11AE42C. So we must now type
‘convert 0x11AE42C cm’. We can now save our data to a binary file and load it
later, or we can just burn straight to the ROM. I’m going to do the latter.
Like before, we need to know which
song to repoint. I am going to use the same song as before in FE7—song 0x5A,
the main theme. I’m using this because I can test the main theme right after I
load the game. I got the offset I needed already by doing 0x5A x 8 + 69D6E0 =
69D9B0. I have empty space at 0xD50000 so I will insert my song there. So I
type ‘burn 0x69D9B0 0xD50000’.
Now I save my ROM (‘close sc’) and
test.

I hope it works for you, because it
sure did work for me. It wasn’t perfect, but I didn’t expect it to be perfect,
since the program is still a work in progress, and the MIDI I used wasn’t great
either.
The tutorial on how to do it is a bit
long, but get the hang of it and it’s a 1-to-3 minute job. Enjoy your new song!
^_^
Chapter 26: Exporting Music with GBA2MIDI
There’s another way to import music from
other games besides Shadowofchaos’ very hard method and the ZSE (Zahlman Song
Editor) method.
You can use a program called GBA2MIDI
to convert a song to a MIDI and then use my Elf Method tutorial to insert that
MIDI. All I will do in this chapter is quickly teach you how to export a MIDI.
First, you need your game. It has to
use the Sappy engine or this won’t work. You know that if you try and load your
game and it doesn’t load/the program crashes, it is most likely because your
game does not use this music format. It’s unfortunate, but it happens.
Anyway, first download GBA2MIDI from
my site. Extract the files and open it up. You should see the following-

First, let’s load the ROM. Hit the
“…” at the top right to browse for the file and select it. Then, using the
browse button right underneath it, choose a generic file that the MIDI will be
exported to. No matter which song you choose, the MIDI will ALWAYS be called
this. Keep this in mind. Your screen should look something like this (but
perhaps with a different game).

Next, use the arrow keys next to
‘OFS:’ to choose which song to play. If you’re not sure which one to use, you
can try ‘convert’ (make sure you have ‘Play at once’ checked) and listen to the
song. To stop it, press the “Play/Stop” button. The same thing to play it
again.
The ‘list’ and ‘help’ buttons
probably won’t be too useful to you. The ‘list’ button can be used to supply
your own offset for a song table to the program, but the program has its own
way of locating the song table, so that shouldn’t be necessary. We already know
what every other button does except for the ‘close’ button which simply closes
the program.
Now for the checkboxes:
Play at once – plays the song right
after conversion.
Output Instruments – outputs the
instruments used in the song as WAVs in a subfolder. Useful if you wanted to
import the instruments, but it’s not very easy to do something like that
manually, so if you want to import instruments from another game, you’re going
to need ZSE (no way to get everything in one package, huh?).
Optimize for XG – sort of alters the
instruments used and stuff. Hard to explain what it changes, but you can hear
the difference. It often times affects drums.
Extract sequence data – I’m not too
sure what this is, actually, nor am I too curious about it.
Minimal conversion – same as above. I
don’t know everything, lol.
When you convert a song it’ll output
as whatever you told it to output. I suggest renaming the exported MIDI and
then you can use it for whatever you want—if you’re a hacker, then that most
likely means you will insert the MIDI into another game.
You’d only really use this method if
ZSE was not able to export the tracks because the tracks were unsupported.
Otherwise, ZSE > GBA2MIDI. That’s it for this chapter. =D
Chapter 27: Battle Background Graphics
Note: This chapter will only cover how to insert custom battle
background graphics. It may help with some other types of graphics, but it will
not cover other battle related graphics such as sprites or the battle template.
To start, what are battle backgrounds?
I gave this term to the backgrounds
that you see while you are fighting—not the platforms but the image behind it.
If you don’t like these, then you can change them. I’m not going to supply you
with the graphics to change to, but I will tell you how the whole shebang
works.
First, using Nightmare, load my
Battle BG Editor. Skip over to the Desert one (0x08). There are 3 pointers,
very much like the CG editor.
-
Graphics
are LZ77 compressed
-
TSA
is LZ77 compressed, unlike CGs
-
Palettes
are also compressed, unlike CGs
Oshi- everything is compressed. Well,
that’s actually not a problem. GBAGE can decompress said stuff.
However, there’s another trick to
this. Compressed and uncompressed TSA work differently. When you look at an
image with uncompressed TSA in GBAGE, you’ll notice that the whole image is
flipped, and every 240x16 line is also flipped. Compressed TSA ‘doesn’t have
this problem’ and works ‘normally’. With CGs, which use uncompressed TSA,
either the re-used TSA or FEditor Adv’s custom TSA takes care of the weird
image flipping. With battle backgrounds, you can just use my custom TSA and it
should handle all 16 colored images.
That being said, we’re going to need
a 240x160 image for the background. The WHOLE image doesn’t NEED to be apart of
the background—you can have just a background strip like the original games
do-but whatever, your choice. An important note about your image; battle
sprite’s feet are typically set to be 100 pixels down from the top of the
image. This means that if you are using a background and removing platforms
from the game (like I did with Tactics Universe, for those who have played) you
have to make sure there is a place to stand 100 pixels down.

You can stink that image into MS
Paint and see if you want, verily there is a place to stand 100 pixels down.
Also, to ‘format’ your image, you need a portion of the transparent color at
the very bottom (the size of said transparent area is 240x8) and a pixel of the
transparent color at the very top-left which will become black (there IS a way
to avoid having this pixel here, but it’s so insignificant that I am not going
to give you TSA to do it).
OK, we have a lot of things on our
mind with all the information I’ve given. What we’re going to do is take this
formatted image, make it 16 colors, save it, import it as a bitmap with GBAGE,
repoint the graphics, insert over the old palette, insert our own custom TSA to
use with any 16-colored image formatted like above, and then repoint the TSA.
Then good thing is, once you insert the TSA once, all you have to do is repoint
every custom battle background to use that TSA. That bad news is, you’re stuck
with 16 colors, because I don’t feel like inventing a method to not be stuck
with 16 colors. You can be mad at me, I don’t care.
https://dl.dropbox.com/u/8875056/hacking/downloads/BBG%20Standard%20TSA.map
There’s my TSA/map data. Download it.
Open it up in a hex editor like HxD.
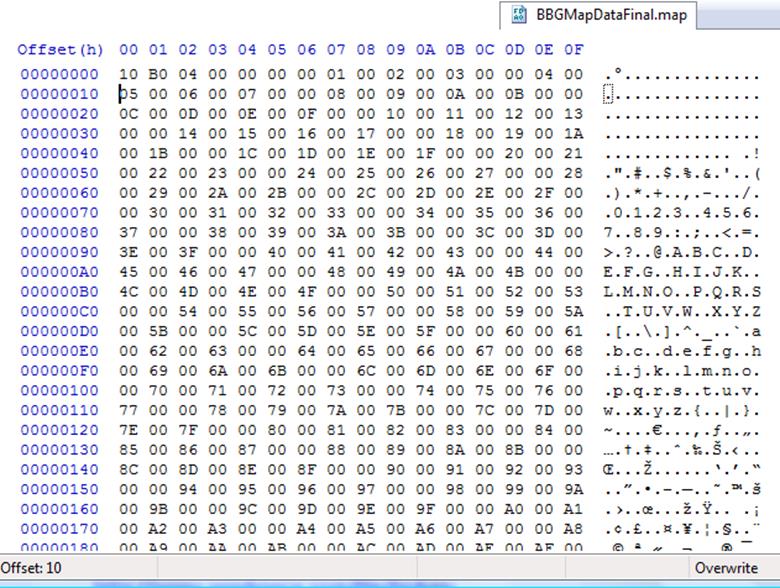
Alright, cool stuff. Looks like a
bunch of numbers going straight up from 00 and on, with some LZ77 compression
in the mix. It pretty much is.
Copy that and paste it into your ROM
into some free space. Note the offset that you insert it at. In fact, write down all significant offsets from
this point on. You’ll find it quite useful.
So I’ll say I inserted mine at
0x1376100. Now we need to insert the palette and the image. To GBAGE!
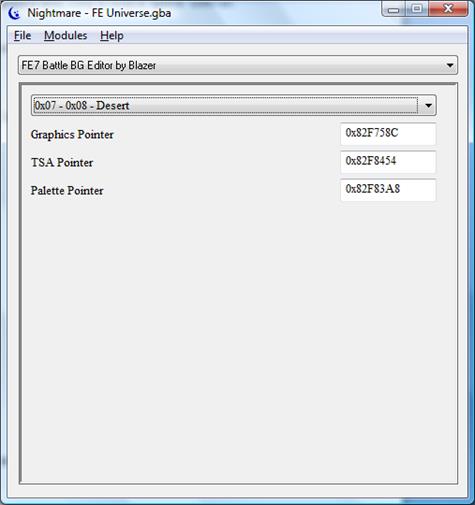
Now, using the offsets given in the
Battle BG nmm, let’s load a background. I am using the desert one so the
graphics are at 0x2F758C.
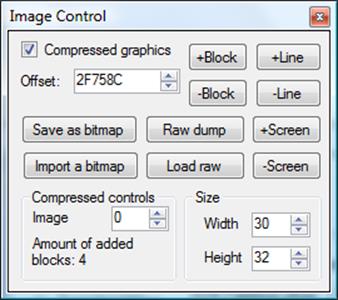
Don’t worry about what you see in the
graphics area. It’s not going to look right until we load the palette and TSA.
So do that—my palette is at 0x2F83A8. Make SURE you select ‘Compressed
ROMpalette’ or else it won’t work.
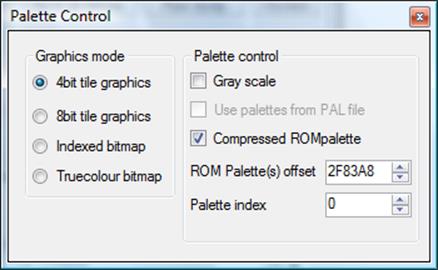
Now, to load the (original) TSA.
0x2F8454.

Make sure that ‘Use TSA’ and
‘Compressed’ are both checked. If that’s done, your image should look like
this, or look like whatever background you were trying to load:

If it doesn’t, I suggest
double-checking all your settings (everything should be compressed) and make
sure your width is set to 30 and your height is set to 32.
Once that’s done, it’s time to insert
your formatted graphic. Hit “Import a bitmap” in the Image Control window. Time
to put up some write options.
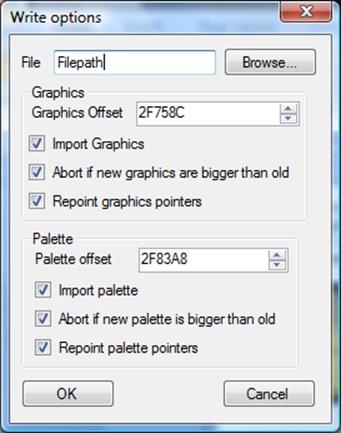
Hit “browse” to locate the formatted
graphic you want to insert. Make sure that it A) has a transparent pixel at the
very top-left, B) is 240x168, C) is 16 colors (use Usenti’s
palette->requantize option to do that very quickly if you haven’t already—if
the image has too many colors to start with, after you make it 16 colors it
won’t look good, see the CG tutorial for more info on this). Next to “Graphics
offset” put in an offset to insert the graphics at (duh). Make sure there is
plenty of freespace and always write
down your offsets.
Do the same thing for the
palette-although you CAN just insert over the old palette, it doesn’t hurt to
repoint stuff anyway, and there’s less room for error if you repoint data to
freespace. Check all the boxes like I have.
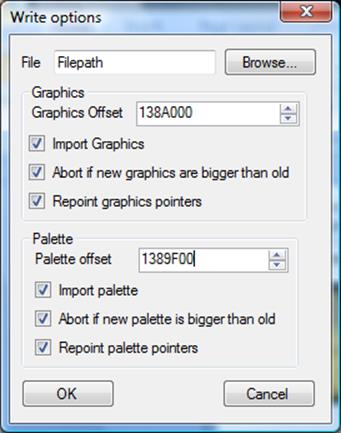
Note how my palette is exactly 0x100
bytes BEFORE my graphics. So I left some space in between, even though my
palette should only take up about 0x20 (32) bytes. (Each color is 2 bytes, and
since the image is 16 colors, 16x2=32 bytes, which is 0x20 in hex. However
there’s compression and stuff so it doesn’t actually take that many bytes…) If
you want to be REAL safe, you can leave 0x200 bytes between the graphics and
palette, because palette data should never taken up more than 0x200 bytes.
Anyway, hit “OK” and then hit “OK” to
anything else. It should insert and look real weird because we haven’t loaded
our TSA yet. Load your TSA (mine is at 0x1376100-I remember because I wrote
down my offset :P) so I will do that.
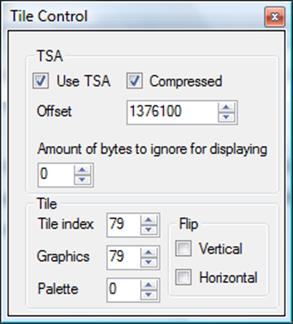
I’m going to save my changes so far
(File->Save) and then see how my image looks so far:
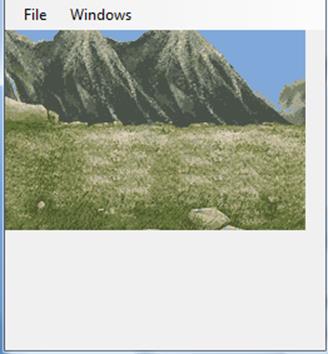
Looks exactly like I thought it would
look. No complaints from me!
Now the final step-repointing. Reload
Nightmare and the Battle BG editor (remember that we close programs after we
move to another program to avoid overlapping changes and causing confuzltion)
and go to whatever background you just inserted over. In my very case, the
desert background (even though I inserted mountains…). The graphics and palette
should already be repointed thanks to GBAGE, so we just have to type in the
TSA. Again, mine is at 0x1376100, so I type 0x9376100.
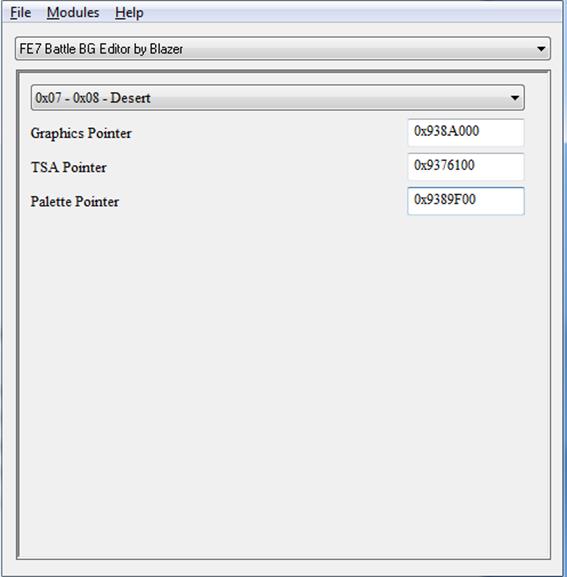
Enter/ctrl+s to save nightmare, exit
out, test in VBA… and it should work. Wooh! Now that we know how to do this, it
should get a lot quicker (like most things). Let’s keep it up =D.
Chapter 28: Music Array Module
The Music/Song Table/Array module helps
1) repoint music and 2) control the purpose of the music.
If you open up said module with
Nightmare, you’ll see a list of songs. Said list of songs gets cut-off after a
while because the Music List you commonly see skips some of the entries. Thus my solution was to simply leave
them unlabeled (unless somebody else wants to go back and label them).
Anyway, aside from being able to
repoint the song data with this module, you can change the priority. For most
songs used in cutscenes, during battle, etc. it’s the highest one (0x00). For
map music, you want to set it to 0x01000100 (the 2nd option) because
otherwise the song will stop playing after a battle. What’ll happen is it’ll
play to start, but after you go into an animated battle, it’ll stop playing,
and it won’t start playing again unless you reset the music in the game’s
options, suspend/resume, or wait until the next turn.
That’s all there is to it, really.
Chapter 29: Sound Room Editing
There is a nightmare module that can
edit the songs in the sound room. Open that up in Nightmare and we’ll get
started.
This is going to be a very quick
chapter. The song is which song plays in that entry. The song length is for
when you use random mode and there is a sort of music player. It has a time
limit of sorts to play the song, and it needs to know how long the song is. As
mentioned, 0x3B is about 1 second. 0x3B = 59 in decimal. What we have to do is
take how many seconds our song is (let’s say it’s 74 seconds) and multiply it
by 59. 74x59 = 4,366. In hex that is 110E (hint: I’m not a genius, I just use a
calc by Microsoft). If I’m right about how this works, then that’s what you put
for the time.
The ASM pointer is something used for
the songs toward the end—possibly something to do with unlocking the songs
without actually listening to them (IIRC they require some Mario bonus disk
thing). It’s nothing to worry about.
The text pointer is just the index
for the text. You can edit the song name in FEditor Adv by just typing in said
text ID/pointer/index/whatever you want to call it.
Chapter done!
Chapter 30: Chapter Unit Editing with Nightmare
There are two main ways to edit
units. The first way is to use Nightmare. The second is using the Event
Assembler. The latter is mainly for people who want to use custom events or
want to add more units. I’m going to cover the first way here in this chapter.
To start, in unit data, you will find
some empty slots. Don’t edit these—they are separators. The point of them is to
separate different groups of units. Allies and enemies of normal/hard mode are
separated, as are “event units”—units that only appear in events (NPCs and the
like)—and reinforcement units (units that show up mid-chapter as opposed to the
beginning).
The character and class are obvious.
The character’s leader just specifies who is the boss/leader
of that allegiance of units. Not really important.
The starting level is kinda obvious
too. Note that there are two options for each level/allegiance though—the 2nd
one is the autolevel feature which adds stats based off of ‘automatic
level-ups’. It’s mainly used for enemies so that a level 1 enemy doesn’t have
the same stats as a level 10 enemy, even if they use the same character data.
The loading coordinates is where they
start on the map. They will then move to the starting X-coordinates. Sometimes
this can just be the same, other times (during cutscenes) you may want to
actually have them move to wherever they are gonna be stationed. Note that
coordinates start from the top left (0,0) and X is to
the right while Y is to the left. If you are using a custom map, it is
sometimes useful to use Mappy to figure out which tile is what co-ordinate.
There are only 4 spots for items,
unfortunately. It’s kinda obvious what to do here as well.
AI is sort of tricky, if only a
little. AI stands for ‘Artificial Intelligence’ IIRC. There are 3 main AIs I
use. 00000000 – default attack anything. 00030900 – attack
anything within range. 03030920 – attack only if a
unit can be attacked without moving. The first is for main enemies, the second
is for guarding enemies, and the third is for bosses who guard a gate or throne
or something. There are also dropdown lists that have some other options
though, so you’re free to play around with those things.
Notes on How the Game Loads Units:
Once a unit is marked as an ally and
you play as them for a chapter, their data is in the save data, so all you need
to do to is load their character with their character #. Everything else is
insignificant (allies don’t use AI). However, if that unit is killed, that’s a
different thing—you have to reload their data again, from ‘scratch’.
Battle preps work similarly, however,
if a unit is killed OR their allegiance is changed, they will no longer be
considered an ally and will not show up in battle preps. How many units are
allowed in battle preps is dependent on how many characters you add. It doesn’t
matter which characters you add or where you add them because the player gets
to choose which characters he/she wants to use in the battle as well as
reposition them. However, if you put in 10 character slots,
that means the player can only choose 10 characters, and the characters
can only be at the spots that you designated with the starting co-ordinates.
Also, units will NOT show up in battle
preps unless they joined the chapter BEFORE. That means you can’t just add a
new unit to the unit data and expect them to show up in the battle preps. They
have to A) be secretly loaded the chapter before at the end cutscene, so the
game recognizes they are a part of the ally team, or B) loaded separately from
the battle preps through events. This is important-just adding a new unit to
the unit data when battle preps is on doesn’t do anything. As said, if battle
preps are off, that’s different.
Chapter unit editing in Nightmare can
get tedious and may sometimes be limiting or confusing, but that’s Nightmare
and hacking in general for you. If you don’t like it, learn how to use the
Event Assembler! :P
Chapter 31: Death Quotes
This will not teach how to edit death
quote text. Death quote text works the same as other text (even though I
haven’t actually taught how to edit text yet). This just edits the stuff in the
Nightmare modules.
We’ll start with death quote editor
part 1-2. If I’m right, this is Lyn’s mode death quotes and… something else.
Part 2 starts after the 0x00 entry near the middle. It *probably* should be 2
different modules, except the data is right next to each other, so it’s kind of
confusing.
Anyhow, character and chapter is
obvious-use 0x43 for most characters unless they have a special death quote in
a specific chapter (in which case specify the chapter, of course).
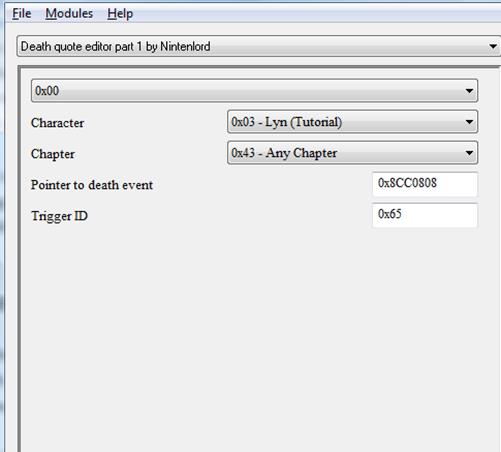
The pointer to the death event is a
pointer to a very short event that usually just contains a text event. For
example, if you go to CC0808 in a hex editor (for Lyn’s death quote, the first
entry) you’ll see “0D000000 A8070000 09000000 0A000000 00000000”.

The 0D part is the command for normal
text. A807 is the text pointer, but reversed due to little endian, so it’s
actually 7A8. This is what you go to in FEditor Adv to edit her death quote
text. The ‘09’ command clears the text and ‘0A’ ends the event. The 00s are
just insignificant nullifiers for the most part (but don’t edit them anyhow).
The main part to worry about is the A8070000 since that’s the text
pointer/ID/reference (from now on I’m calling it text ID for simplicity’s sake)
that you might want to change.
Now, later on, you may want to write your own custom death quote event using
the Event Assembler; if you don’t know about this, then don’t worry about it,
but if you want to know how, simply do something like this:
ORG 0xD20400
DeathQuoteEvent:
*insert events here*
ENDA
Then link to the event using the
death quote module by updating the pointer in the module (and be sure to add
0x08000000 to the offset or it won’t work).
On a side note, if you’re going to
repoint death quotes, note that part 1 and 2 BOTH need to be repointed… so
yeah.
[Back to the main topic] The trigger
ID is something that will take a bit of learning to understand. It’s like a
number that references an event. I call it an event ID. In this case, Lyn’s
death quote has event ID 0x65 attached to it. This is important because when
event 0x65 is triggered, the game over scene occurs. Yes—if you want a game
over scene after the death quote, just give the character a ‘Trigger ID’ of
0x65. As long as the game’s events are coded to react to this death quote, this
should work properly.
The Trigger ID can also be used in
conjunction with other events though. You could set it to say, 0x0B, and then
make an event that happens when 0x0B is triggered. So you could make it so that
if you kill a unit, the chapter ends right after… Just like a boss. Yes, bosses typically have a Trigger ID of 0x02
(although their data is in death quote editor part 2, for whatever reason).
Similarly Trigger IDs 0x01 and 0x03 are also reserved, so it’s better not to
touch 0x01-0x03 and 0x65. Managing them is kinda hard but it’s feasible. I’ll
cover more about this in the next chapter.
Anyway, let’s continue to part 2 of
the death quote editors. This one is a bit better. It’s the same except it
gives us the option to just put a text ID instead of ALWAYS having to have an
event. But still, there is an option for an event if you want (if not, it’s
00). The Trigger ID works the same (I will cover more about it in the next
chapter).
Chapter 32: Event IDs
Well, my order is a bit messed up.
Maybe I should be teaching things like how to edit text and portraits before
going onto teaching event IDs. Maybe I should. Oh well.
Before you read this part of the
tutorial, please read the previous chapter on death quotes because it contains
information on Trigger IDs, AKA Event IDs.
^With that out of the way… event IDs
come from various places. One place is scenic events-there are event IDs there
that have many purposes. When we get to events, you’ll start seeing spots to
put event IDs ALL over. There’s even codes that can trigger them on and off
‘manually’.
One thing is that the event IDs are
shared-meaning you shouldn’t use the same one in a chapter, unless it’s 0x00.
If an event has an event ID of 0x00, it can happen infinitely (unless something
ELSE is stopping it from happening-like if you visit a village and the village
gate is closed, you can’t visit the village, regardless of whether the event ID
is 0x00 or not). Thus events with 0x00 are like ‘generic events’ and don’t have
any special properties to them.
Event 0x01 is for something—I think
boss battle quotes. Event 0x02 is for death quotes, I believe. Event 0x03 is
for the seize event. Event 0x65 is the ‘game over event’-if this is triggered,
the game will go the game over screen. I would say almost anything after event
0x65 is a ‘perma-event’, meaning that the event ID remains in use after every chapter. Earlier event IDs,
like 0x01-0x64, are not permanent. After the chapter is done, they get reset to
not being triggered.
Actually, I have a confession. I’m
not sure which events are permaevents and which are not-I only have a VERY vague
idea. It shouldn’t be a problem though, hopefully. Oh well. :\
So, back to where event IDs come
from:
-
Scenic
events
-
Location
events (villages, seize)
-
Death
quotes
-
Battle
quotes
-
Triangle
attack battle quotes (yes, even this)
-
Events
in general
These are all shared. Meaning if say,
event 0x14 is triggered because of a battle quote, and an event with ID 0x14 is
supposed to happen in a scenic event, it won’t happen, because event 0x14 was
already triggered (and the game is trying to avoid having the same event happen
twice). Thus you have to manage which events you use and how you manipulate
them.
With this background, you’re ready to
step into events! Unfortunately, events are chapters ahead of us. D=
Also, here is a list of known event
ID’s (event ID’s known to be reserved for something), straight from the Event
Assembler.
--------------
//Event ID's with special meanings
#ifdef _FE6_
#define NoID 0
#define BossQuoteID 1
#define BossDeathQuoteID 2
#define SiezeID 3
#define GameOverID 0x65
#define CathConvo1 0x67
#define CathConvo2 0x68
#define CathConvo3 0x69
#define IliaSacaeRouteID 0x6B
#define CathRecruited 0x70
#endif
#ifdef _FE7_
#define NoID 0
#define BossQuoteID 1
#define BossDeathQuoteID 2
#define SiezeID 3
#define UseSecondaryMusicID 4
#define GameOverID 0x65
/*
66
67
68
69
*/
#define Ch13xBeatID 0x6A
#define Ch17xBeatID 0x6B
#define Ch19xBeatID 0x6C
#define Ch23xBeatID 0x6D
#define Ch28xBeatID 0x6E
/*
6F 31x/32x beat?
*/
#define LloydOrLinusID 0x70
#define DorcasDeadID 0x71
#define WilDeadID 0x72
#define LuciusDeadID 0x73
#define SerraDeadID 0x74
#define ErkDeadID 0x75
#define KentVisited 0x76
#define SainDeadID 0x77
#define RathDeadID 0x78
#define FlorinaDeadID 0x79
#define MatthewDeadID 0x7A
#define NilsDeadID 0x7B
#define WallaceDeadID 0x7C
#define PentDeadID 0x7D
/*
7E
7F
*/
#define AthosDeadID 0x80
#define HawkeyeDeadID 0x81
#define JaffarDeadID 0x82
#define LynModePassedID 0x83
/*
84
85
*/
#define Ch19xxBeatID 0x86
#define PentHeavenSealReceivedID 0x87
#define DartDeadID 0x88
#define VaidaDeadID 0x89
#define PentXLouiseC 0x8A
#define PentXLouiseB 0x8B
#define FioraTriAttackConvoID 0x8C
#define FarinaTriAttackConvoID 0x8D
#define FlorinaTriAttackConvoID 0x8E
/*
8F
90 Other triangle attack IDs?
91
*/
#define OswinDeadID 0x92
#define KarelDeadID 0x93
#define NinoDeadID 0x94
#define BartreDeadID 0x95
#define KarlaDeadID 0x96
#define AnnaVisited 0x97
/*
98
99
*/
#define HeavenSealPentID 0x9A
#define MerlinusJoined 0x9B
/*
9C
*/
#define SomeoneSemiImportantDiedID 0x9D //Only in internal use
#endif
#ifdef _FE8_
#define NoID 0
#define BossQuoteID 1
#define BossDeathQuoteID 2
#define SiezeID 3
#define DefeatAllID 6
#define GameOverID 0x65
#endif
------------------
Chapter 33: Battle Conversations
There are two types of battle conversations: specified and unspecified. Specified means it is between two specific characters, while an unspecified battle conversation can happen when one character fights with any character.
We’ll start with the unspecified battle conversation module by Icy Toast. The character and chapter are obvious. Now depending on your version of this NMM, you may have ‘Convo Text’ and ‘Convo Bank’, or just ‘Convo Text Pointer’. Regardless of where it’s broken up into two slots or not, it’s just the text pointer that is used.
For information on trigger IDs, see the other topic. If you wanted a battle conversation to occur everytime you fight a unit, you could use 00. The default value for boss battle convos (assuming there aren’t any special properties) is 01. If you wanted an event to happen after a battle conversation, you could set it to something else and make an AFEV event happen when said event ID is triggered. You’ll learn about after events (AFEV events) in the event chapters of this tutorial.
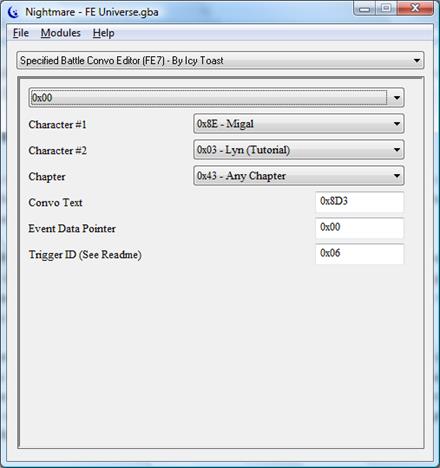
The specified battle conversation editor works similarly, except there are 2 characters, and the event ID is not 01. It’s some other value that the game uses. Remember that event IDs for a chapter are shared between battle conversations and scenic events/the main events, so don’t have two events with the same ID. L
The ‘event data pointer’ can be used in place of a text pointer. It’s really only used when there’s special properties for a battle conversation-for example, if there is a different battle conversation for Hector’s mode and Eliwood’s mode of a chapter. It’s just a pointer to an event-you have to either edit the event in hex or make an event with the EA, specify an exact location for that event, and then put the pointer to that event in the battle conversation ‘Event Data Pointer’ slot. It’s something you most likely won’t use in your hack, so I wouldn’t worry about it too much.
That’s all there is to it. Another chapter down, w00t!
Chapter 34: Triangle Attacks
Before I go on writing a tutorial, I’m going to post some notes I have on triangle attacks.
Notes on Triangle Attack:
Character Editor Nightmare Module:
Ability 3, 0x20 is Triangle Attack. This is for Pegasus Knights. There is
another triangle attack option, 0x40. I am almost certain this is leftover from
FE6 as the armor knight triangle 'skill' is 0x40 in FE6. However, this triangle
attack could probably be used for something else too.
0xC9F130 - Triangle Attack Convos
Character, chapter (0x43=any), Text ID, Trigger ID
(Info thanks to NL)
Should be able to expand to allow more triangle attack convos, for say,
alternate combinations of triangle attacks (like if there are 4 pegasus
knights) or usage of the currently unused triangle attack skill (just add more
convos, set the skills, and if the game already has the code there [just
unused], then it should work).
Triangle Attack Graphics- Start around image 495 (+ or - a few) in GBAGE
0x2E5CB8 - First Graphic
Order:
PegasusKnight (Lance)
FalcoKnight (Lance)
FalcoKnight (Sword)
PegasusKnight (Lance) (2nd sheet)
FalcoKnight (Lance) (2nd sheet)
FalcoKnight (Sword) (2nd sheet)
ArmorKnight (Standing)
General (Spear) (Standing)
General (Axe) (Standing)
General (Handaxe) (Standing)
ArmorKnight (Attack Motion)
General (Spear) (Attack Motion)
General (Axe) (Attack Motion)
General (Handaxe) (Attack Motion)
Pointer to ArmorKnight graphics at 0x6AAC8 in ASM
This means that they are probably already coded into the game and leftover from
FE6, but simply unused (most likely since there aren't 3 armor knights to do it
with). This also means that it's likely that one can use the Armor Knight
triangle if they just set it up.
Data continues right after the final graphics (i.e. there is more graphics
right after the General handaxe graphics) meaning
miscellaneous data (animation and whatever else) is probably both before and in
the first megabyte's span of data.
0x2E58BC - compressed data right before graphics. Slight resemblance to TSA at
first but then diverts from this and shows signs of graphical data (0xF0 0x01,
which is in essence blank graphics). Idk if it has to do with anything.
In any case the only way to tell how this works and what is relevant or not is
through ASM. One could edit the existing graphics, triangle convos, who has the
skills, and test the usage of the unused [once used as FE6's armor knight]
triangle attack.
For palettes, I believe that the palette of the surrounding characters is
used... that is, use the battle reference module to get the palette of the
Pegasus Knight sisters. I tested this and it loads
fine and looks great.
Farina's Palette- 0xFDA00C
Fiora's Palette- 0xFDA07C
Florina's Palette- 0xFDA0EC
Alright. Now that that is off my back, I can tell you how to make use of this information.
To start, there’s a module called the Triangle Attack Convo Editor or something like it. At least, there is such a module for Fire Emblem 7. I’d like you to open that up in Nightmare.
The character, chapter, and convo value/text pointer work as they always have. If you don’t know how these work, I suggest learning about death quotes and battle conversations first.
The ‘trigger ID’ also works as it usually does. There’s a whole chapter on these, so I won’t explain this either. Which means we’re almost done here.
By default there’s only room for 3 conversations. But what if you want more than 3 conversations? There could be many reasons for wanting more conversations—if there’s another Pegasus Knight, if there’s a special conversation for a chapter, or something else. Well, to do this, you have to expand the table. To expand it, you have to first move the data to empty space and then repoint it. The details? I’ll cover them in a later chapter.
Now, how does the game know which characters have the triangle attack ‘ability’? The keyword is ‘ability’. It’s in the character abilities. Load up Fiora in the character module and scroll down all the way to ‘character ability 3’. You should see 0x20 – Triangle Attack. Bam. There’s also another set of triangle attacks with the value 0x40. I think this was originally the armor knight triangle attack, but when I tested it out myself with 3 FalcoKnights, it showed FalcoKnights, not Armor Knights, so maybe the game checks to see if there are 3 armor knights first. I really don’t know, but the alternate triangle attack is there and ready to use.
As for palettes, the palettes of the FalcoKnights that cut-in are from the other characters palettes… err, that means that as long as the palettes of whoever is in the Triangle Attack are working palettes, they should work/look fine during a triangle attack.
If you’re really into graphic editing, you could try fiddling with the jumbled graphics that I noted in my notes (I gave offsets and some other information). However, it’s not very easy, nor is there a lot of freedom with it, so I wouldn’t exactly suggest it.
With this, have fun editing triangle attack conversations, making your own triangle attacks, etc.!
Chapter 35-36: The Animation Modules & Repointing Tutorial
In this chapter we’re going to quickly go over the modules in the ‘Animation’ folder-at least, the modules we haven’t gone over yet.
First, we’re going to start with the Animation Pointer Table Editor. It’s a table for both reference and repointing that has relevant offsets for each animation. The header is just some text that I probably wouldn’t edit. The ‘mode divider’ is also something I wouldn’t edit. Frame data can be edited but you have to know how and it’s not something that’s really suggested or needed very often. I might cover the basics of how to do it. I wouldn’t suggest editing anything there except maybe the palette. The palette is like, the generic class palette, for generic units. Yeah. :\
Next, the Item Animation Reference Pointer module. All it can possibly do for you is repoint two pointers to something else. Since it uses a dropdown, you are limited to only repointing it to one area.
Since we don’t want to be too limited in our hacking, I’m going to teach you how to repoint it in a hex editor. Skip this if you don’t care about expanding/repointing data, especially if you don’t care about this data at all. All it does is repoint Spell Associations so that you can add more weapons to the list.
Go to offset 0x052B24. If you’re wondering how I figured this offset out, all I did was edit the Nightmare module (.nmm file) in a text editor and looked under the line that says the name of the module.
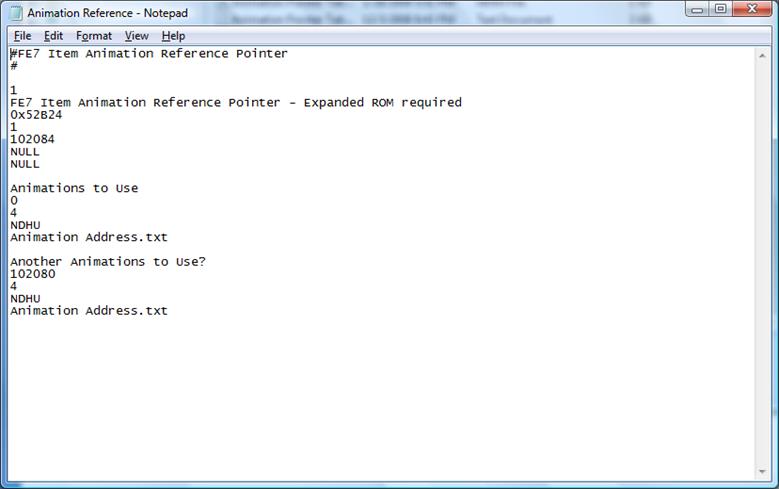
As said, this is sort of limiting. We can just go to that offset in a hex editor and repoint it to whatever we want.

If you don’t know, ‘pointer form’ in a hex editor is (0x08000000 + offset) – reversed. The default offset to animation lists or whatever is 0x00C999C0. I add 0x08000000 so it becomes 0x08C999C0. Then I reverse the order of the bytes (a byte is like two digits). 0x08 C9 99 C0 becomes C0 99 C9 08. At that offset I told you to go to, we see exactly those bytes. If we wanted to repoint it to some other blank space, we’d take the offset of the blank space and reverse it like I just did, then just type it in.
However, if you remember, the NMM has TWO pointers to repoint. Well, to find the other pointer, we’ll just search for its bytes. So we do a search (typically ctrl+F) in our hex editor of C0 99 C9 08.

(Make sure to set the input/datatype to hexadecimal, not decimal, text, or something else.)

Alright, we found another instance. That’s the only other instance there is. So we repoint this one too. After that, we’re almost done.
Now we’re going to copy the old data to the new area. Let’s say our new area is at 0xD70500, just for teaching purposes. We’re going to copy the data there where there is plenty of free space to be used. The point of free space is to add more things to a list or table.
The purpose of repointing is like moving books to another room. You can only put so many books into a room before you get to the walls and you can’t put anymore. So we just designate another room for all the books. This room has PLENTY of space though, so we can add even more books. However, we can’t have an infinite number of books, because the building has its limits as well.
The equivalent:
We can only put so many entries of data (in this case, item animation/spell animations) into one area before we run into other data. So we have to designate another area to use, and then move all of our old animations there. Then we can add our own item/spell animations there.
Hopefully this is all starting to make sense. We did the designating (repointing), so now we have to move our stuff. Go to 0xC999C0 and copy all the data from there to 0xC9A1B0 (but don’t include that last 0xFF byte).

Copy it (ctrl+C) and paste it into our new area. Per my example, I am putting it at 0xD70500. You know how to paste data, hopefully (make sure you are PASTING data, NOT inserting new data, if you insert new data it’ll shift over the offsets of other data and your ROM will get royally screwed).
Now save your ROM in your hex editor. We’re going to do one last thing. To make sure we don’t have to edit data in hex, we’ll edit our Nightmare Module to edit the data at our new offset.
The “repointing module” is the one we were using before I said “this has its limits, it’s lame”. The actual data we are repointing is the item animations, AKA spell associations. So go to the spell association editor and make a copy of that .NMM file. Make a copy for your repointed table of data.
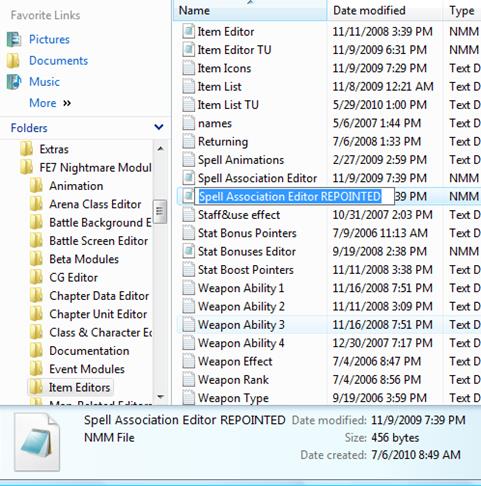
Call it something to remind you that it’s repointed. Now open it with a text editor (my NMMs are already set to open with a text editor-if yours don’t, just double-click them, hit “open with a specific program” or something like that, and choose Notepad or your preferred text editor from the list of programs).
It should look like this:
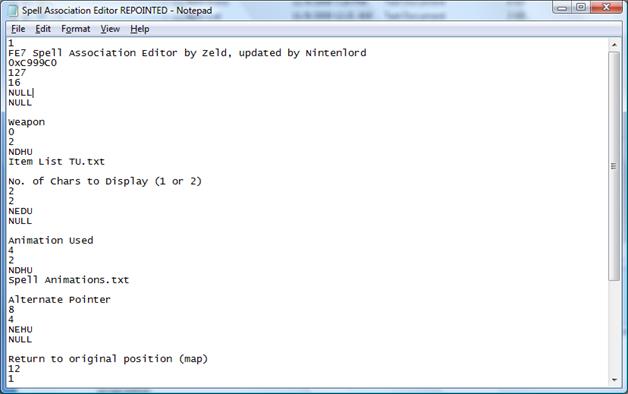
We’re going to A) rename the module to remind us that it is repointed, B) change the offset from 0xC999C0 to 0xD70500/your equivalent offset, and C) change the # of entries from 127 to however many entries you want (I suggest 150 because you probably won’t need anymore than that many, and if you do, good luck on actually making over 23 custom weapons and items). Here’s my changes to show you what I did (you should be able to figure out what to change based off of my image and what I said).

Save it and you’re ALMOST done, I’m serious this time. Now you just have to open up your new module and you’re ready to start editing. You’ve learned how to repoint and expand data, as well as customize your own Nightmare Module for it! Congrats!
Unfortunately, this chapter is not yet done. FE7 has one more animation module. A “custom item animation list” one. The module is just an outdated version of the Spell Association editor that was made to be at 0x9000000 instead of 0xC999C0. In other words, like the Item Animation Reference Pointer module, you probably won’t make use of it anymore. (Still, you have to admit Pukachi was nice to make all these nightmare modules to help us out with our hacking. After all, she started most of the thing, some years ago… before that, only a few people did FE hacking… myself not included… L)
Chapter 37: Support Editing
This is a tedious job, especially for a sole hacker to do, but sometimes it is worth it. Personally the Fire Emblem games that had legitimate supports (where the characters actually had personality and background) were some of the best.
Anyway, if you have outdated modules, you may have ‘Custom Support Pointer Editor’ and ‘Support Pointer Editor’ modules. The former is used for expansion but it’s limiting, and thus trash.
We’ll start with the Support Bonus Editor. It lists the affinity and the bonuses that said affinity gives. Attack and defense bonuses are stats while the others are percentage boosts.
The support compatibility editor is a list of what supports a character has. A character can have a max of 7 supports, and to my knowledge, can have no more than 4 “active” supports at a time (supports that actually have reached at least level C and can be seen on the menu).
The initial support count is the count towards getting the next level of supports. Some general values for supports are:
- 100 for C level
- 180 for B level
- 241 for A level
These aren’t exact/for sure. They are just general ranged if you want a set support. Otherwise, you can have it set at 0, or something higher. Two characters that already have some relationship with each other (like Eliwood and Hector) are more likely to support realistically, and thus have a higher initial support count.
The support gain per turn is how much the support level grows for every turn they are next to each other. A higher the number the quicker it grows (although you don’t see the effect of a support relationship growing until you have the next level’s support conversation).
To make use of these entries, there is a pointer in the character editor called the “Supports Data Pointer”. It points to a specific slot as opposed to a reference byte like 0x00 for Eliwood or 0x0A for Oswin. This actually makes it somewhat easier to make use of. :\
By the way, each entry is 0x18 bytes IIRC, meaning pointers will be 0x18 bytes apart. This information may or may not be useful to you.
The Support Convo Availability Editor just specifies which conversation values (text pointers) there are for the C, B, and A level support conversations between two characters. By now you should know enough about hacking that I don’t have to explain anything here.
Everything in the Endings Editor should be obvious so I’m not going to even cover that. Thus, we’re done with learning about supports and endings!
Chapter 38: Miscellaneous Nightmare Modules
In this chapter I’m going to quickly run through what some other nightmare modules do.
FE6:
Army Editor – same thing as chapter unit editor, pretty much.
Battle Screen Editor – edits the layout of the battle screen. I myself don’t really get how to use this, and thus am not covering it.
Critical Bonus Editor – edits the critical bonus. (Default: 15)
Event References – a module for the event table. It helps with knowing where event data is located as well as repointing.
Level Cap Editor – edits the level cap. (Default: 20)
Promotion Level Editor – edits the level at which a unit must be higher than to promote. (Default: 9, meaning level 10 or higher)
Shop Event Editors – edits the events for shops (location, shop pointer, shop type).
Vendor/Armory Editors – edits the contents of vendors and armories.
FE7:
Afa’s Drop Bonus Editor – edits the bonuses given by Afa’s drops.
AI Recruitment Editors – edits info about “AI recruitments”, where an NPC or enemy unit moves to and talks to a character in order to be recruited. Clarine of FE6 and Xane of FE12 are just a couple examples.
Battle Screen Editor – edits the layout of the battle screen. I myself don’t really get how to use this, and thus am not covering it.
Beta Modules – for editing the FE7 beta.
Chest Editors – edits the contents of chests.
Critical Bonus Editor - edits the critical bonus. (Default: 15)
Event Pointer Tables – can edit the individual event pointer tables of chapters. Not very useful anymore.
Event References - a module for the event table. It helps with knowing where event data is located as well as repointing.
Level Cap Editor - edits the level cap. (Default: 20)
Luck Cap Editors – edits the luck cap. Comes in two parts. (Default: 30)
Promotion Level Editor - edits the level at which a unit must be higher than to promote. (Default: 9, meaning level 10 or higher)
Shop Editors – edits the contents of shops.
Seize Throne Editors – edits the location of thrones that can be seized. Currently incomplete.
S-Rank Bonus Editor – edits the bonuses of S rank weapons.
Vulnerary Editor – edits the amount of HP restored by a vulnerary. (Default: 10)
World Map Event References – A list of pointers for world map events, the one you see before a chapter actually starts.
FE8:
Battle Screen Editor – edits the layout of the battle screen. I myself don’t really get how to use this, and thus am not covering it.
Chest Editors – edits the contents of chests.
Critical Bonus Editor - edits the critical bonus. (Default: 15)
Event Table Editor – same as the Event References editors for other games, just for FE8, and with a different name.
Level Cap Editor - edits the level cap. (Default: 20)
Palette Association Editors – edits which palettes go with which characters and classes.
Promotion Level Editor - edits the level at which a unit must be higher than to promote. (Default: 9, meaning level 10 or higher)
Recruitment Editors – edits recruitments.
Reinforcement Editors – edits unit reinforcements.
Shop Editors – edits the contents of shops.
Summon Editors – edits which classes can summon and what character/class is summoned.
Vulnerary Editor – edits the amount of HP restored by a vulnerary.
You may be wondering “hey, wait, we still haven’t done the Chapter Data Editor yet!”. That’s because I’m saving the “best for last”. Sort of. Something tells me the Chapter Data Editor is going to be a long chapter, so I am going to try and keep it as short as I can, but it has a lot of important information related to map and event editing and creation. All this, after something else. :P
Chapter 39: Loading FEditor Advance
What, I’m dedicating a whole chapter just to loading FEditor Advance?
Eh, it’s not that big a deal, I dedicated chapters to minor modules like the Arena Class Editor. Plus I’ve seen so many topics on getting FEditor Advance to work that I feel I must make this chapter.
Step-by-Step Tutorial:
1. Go to the Java website. http://www.java.com/en/download/manual.jsp
2. Download the program by clicking on it. If you are a Windows user, use the online download if you don’t know what to do. There are instructions on how to download and install Java. For example, a windows user would look to the right where it says “instructions” and click there, getting them to this page- http://www.java.com/en/download/help/windows_manual_download.xml.
3. Save the file to your desktop or run it automatically. If it is saved, double-click and install. Wait, why am I typing this, the website gives instructions.
4. Once Java is installed, restart your computer. Just to be safe. There is no harm in restarting your computer, and I want this to be fool-proof. So do it.
5. http://www.java.com/en/download/installed.jsp Test your java. It should work. If it doesn’t, re-install while following the directions.
6. Download FEditor Adv. You can find a link to the topic on my website, or you can just google “FEditor Adv” and it should show up on Fire Emblem Universe, a bunch of crappy forums.
7. Extract the files. To do this, use 7zip. To download 7zip, go here- http://www.7-zip.org/. Note that 7zip files can also be extracted with winRAR. Once it is installed, right-click and hit ‘extract here’ or something like that.
8. A folder should come up. I suggest you move this folder to wherever you keep your hacking stuff (as opposed to just lying about on the desktop; organization is key to a successful hack).
9. Open the FEditor Adv folder.
10. To run FEditor, you can either A) click the ‘run’ file or B) go to the dist folder and double-click FEditor Adv.jar…
11. It will ask you to open an FE ROM. Open up an English, U.S.A. release GBA Fire Emblem ROM of your choice. For FE6 (Sealed Sword/Binding Blade/Fuuin no Tsurigi) the ROM should be the Japanese ROM patched with the translation patch found on romhacking.net. Please do not ask me for ROMs, I will flame you. :D
12. If your ROM is edited, it will most likely give you an error message. Just hit “OK” or “Yes” or something.
Congratulations. You have hopefully followed my overly specific directions and successfully loaded FEditor Adv. If you have not, I would check the following:
- Program, make sure to have the latest version *ironically, I am using an older version because FEditor Adv is not compatible with some of my older hack, and yet I am telling you to use the latest version at all costs*
- ROM, it should be the (U) version. Check the ROM# as well, and for FE6, use the RHDN patch, as said.
- The ‘cleanness’—if you’ve made massive edits and most importantly edited something that the program uses to check which FE game it is, that could be a problem. Like the ROM header, for instance. IIRC FEditor Adv checks something in the header, so if you’ve edited that, it could very well be a problem.
- Your java. I can only hope you installed it right…
- Your file extraction. If by somehow you extracted it wrong, the files could get corrupt, although the chance of this happening is very low, I think…
If it’s still not working, then check yourself. No, really, I don’t know what else to do. I can’t write more than a page on how to load a program. It’d suck if you couldn’t get it loaded, but plenty of people can, so it’s not the program, at the very least. Sorry if that happens to you. :\
With FEditor Adv loaded, we can now use all of its features! Huzzah!
Chapter 40: Text Editing with FEditor Adv
The reason why this chapter is called ‘Text Editing with FEditor Adv’ and not just ‘Text Editing’ is because there ARE other ways to edit text, but they are kind of inferior and obsolete. So much so that I am not even going to cover it in this tutorial, because there is no point in teaching old methods if the old methods are inferior in almost all ways.
Anyway, open up FEditor Adv. The first thing I see is a Memory and Free Space Manager that I have no idea how to use. Sounds pretty bad, right? Well, I’ve gotten along without it just fine… That’s probably the only major thing you won’t find in this tutorial, unless someone else submits a chapter on how to work it.
Go to Tools-> Text Editor. Bam, text editor loaded. It should look like this:

It starts at text entry 1. It goes as far as text entry 133D. The input index is what text entry is being loaded at the moment. The max index is as far as it goes-you can change it if you want to, but you shouldn’t have to change it unless your game is like 40 chapters long and text-heavy.
The find and replace boxes should be simple. You can find some text in the script or you can find AND replace some text in the scrip. Just type in the text and hit “find”, and hit “find next” to find every other occurrence after that (find previous obviously just goes back an instance). It works like a hex editor, except it’s a tex-t editor. “Replace all” replaces all occurrences of something.
I don’t know what the “Use Reg ex?” does. It’s probably not too important.
Now, actually editing text is easy. There are some control codes you should know and stuff but mainly it’s just loading portraits, typing text, and pauses. I’ll get into the details later, but when you make changes to text, you have to hit ‘apply’-you have to do this after EVERY ENTRY, not after you’re all done with text. Wait to press it, you’ll regret it. :P
The ‘revert’ button just undoes applying something. I think. The ‘dump…’ button dumps the script to a text file (and it asks you where to save it/what to call it). The insert is the opposite, it lets you insert a dump script. The idea is that you dump a script, edit it, and then re-insert it. And when you’re done with the text editor, you press ‘Quit’.
Now, about actually making text. You have to load portraits, and to do that, you use the following code:
[LoadFace][0xPP][0xVV]
0xPP is the portrait value. You can find a portrait list in the folder with the character and class editor modules, and probably some other folders too. 0xVV is almost always 0x01, except for when you’re in a village, house, or other type of scene. To have a portrait be the portrait of the current character in use, use [0xFF][0xFF]. So in a village you’d just use that and whatever character is used to visit the village will show up with their portrait.
However, there’s one more aspect to loading Portraits. Positioning. There are various positions. You just put the positions right before the [LoadFace].
[OpenFarLeft]
[OpenMidLeft]
[OpenLeft]
[OpenRight]
[OpenMidRight]
[OpenFarRight]
[OpenFarFarLeft]
[OpenFarFarRight]
To move a portrait from one position to another, just change the ‘Open’ to ‘Move. So to move to the Far Right, you’d do [MoveFarRight]. However, note that when a portrait moves, the way they are facing does not change, so you have to clear a portrait and then reload it to change position. To clear a portrait, use the code [ClearFace]. [ClearFace] is also commonly used in special battle conversations; after every line one character says, their portrait is cleared, because during a battle there is only room for one person to be talking (lol).
When typing your text, you can’t just type straight through. After about a max of 30-35 text characters (it depends on how big the characters are), you should make a new line.
01234567890123456789012345
About that long. That’s actually only 26 numbers, but trust me here. However, sometimes if you do this you’ll have one line that has reached its max length and another line that only has one word. It looks odd, and so I suggest evening out the length when ‘formatting’ text.
Text text text text text text text
text.
Should become
Text text text text
text text text text.
It’s better for reading and professionality. Another thing that helps a lot with reading is pauses where you have to press the “A” button to continue the text. To make one of these “blue-arrow pauses” (a blue arrow appears in the corner when it happens), use [A]. This is best used every two lines, but once in a while you may make it 3 lines. The original game sometimes has pauses in the middle of sentences, which is kind of odd and unprofessional, but it means that if you don’t care so much, use [A] every two lines and whoever plays your game shouldn’t miss any text.
[.] is a very quick pause. Sometimes you’ll see it randomly but it’s not random—just don’t worry about it. […..] is a slightly longer pause. [ToggleSmile] makes a character smile, [ToggleMouthMove] makes their mouth stop moving (used for ellipses), [Yes] asks a Yes/No question with “Yes” selected to start (No does the same but with “No” to start), [CloseEyes], [OpenEyes], and [HalfEyes] are obvious, and for all the other interesting codes, just look in FEditor Adv’s ‘doc’ folder-there is a folder called “Text Control Codes” with codes to use. (Note that the ‘NL’ code is redundant as FEditor Adv automatically converts the invisible linebreaks into codes for the game to interpret).
Remember all those “text pointers” and “convo values” we’ve seen in Nightmare Modules and the such? Just type in the values there into the “Input Index” to go right to that text. By the way, Lyn’s mode text starts at index 813. J
With all that knowledge you’re on your way to making an awesome script. Just make sure to apply after every change to an entry, and save often just in case. Also, experimenting is the best way to learn!
Chapter 41: Portrait Formatting &
Preparation
Yes: like text editing, there are other ways to do portraits than FEditor Adv. However FEditor Adv > all. It’s much easier than it used to be.
First, you need a portrait with frames and a chibi. I can’t help you with this. This is a spriting thing. You’ll have to learn how to sprite and make your own portraits or request portraits from others (the latter is a bit difficult—people don’t wait around for random people to request portraits, most of the time).
Once you’ve got that done, clear up your spritesheet (a sheet with the portrait, normal talking frames, normal smiling frames, blinking frames, and chibi) so that ONLY the sprites are on there.
Next, we have to reduce colors. Look at your image. The hair should have one set of colors with 3 shades, and the armor should have another set of colors with 3 (max 4, sometimes). Everything else should be either skin colors or outline colors (there is typically an orangish color and dark brown color in skins and the outline color is usually a dark purple).
Open up your image in Usenti. If it won’t load, that’s most likely because it is a GIF, and Usenti is a bitmap editor, so your image must either be a BMP or a PNG to load. PNGs are superior to BMPs because they are MUCH smaller in size, have transparency capabilities, and when you upload them to photobucket, photobucket doesn’t convert them to JPEGs and distort the image with fuzziness. (Cough, BMPs get distorted by photobucket…)
Once it’s loaded, we need to check colors. On the bottom right there should only be one row of colors—16. Lemme show ya.

See, only one row of colors (look at the bottom left). If it’s NOT like that, there IS a way to reduce colors without tedious work. However, there’s a limit to how much reducing can be done before the image changes.
First, zoom in to your image, about 4x or so, so you can easily see the shades of colors and their differences. Next, go to Palette-> Requantize at the top.
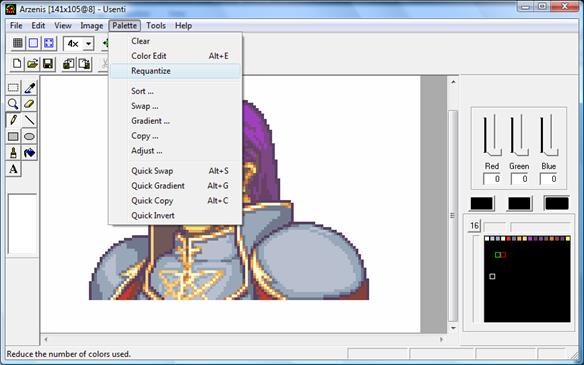
Type in “16” like so.

Hit “OK”. Look at your image carefully to see if the quality has changed a lot. If it has, that means you have too many variety in colors, and you need to manually use spriting techniques to reduce the # of colors. Otherwise if there’s no major difference, you should be OK. (Tip: you can use ctrl+z and ctrl+y to go back and forth between the lots-of-colors and 16 color images and look for differences.)
After that, you need to format your portrait. This is what most people have a hard time with. I will post multiple methods on how to do this. Also, there is an ‘old format’ which hardly anyone uses anymore, and a ‘new format’. I will include a few details on both, but mainly the new format.
Tutorial
1: Formatting Portraits Step-by-Step with Layers by Nayr
Note: The following images are used in this tutorial as formats/templates.
Alignments | Standard Format Box
[16:08]
NayrLRosfar: step
1: Paste the mug into the hack box on the template.
[16:08] NayrLRosfar: step 2: Copy the mug and hack box and paste into the alignment
sheet in a new layer.
[16:09] NayrLRosfar: step 3: Move the box over until it fits into one of the
alignments, find the one that fits and copy paste under the red box on the mug.
That'll copy the proper frame alignments.
[16:09] NayrLRosfar: step 4: Past into the appropriate spots in the template. Repeat
process for mouths.
[16:10] NayrLRosfar: step 5: Copy/paste the eye blinks, mouth flaps for talking, and
smiling [frames] into their appropriate places on the frames. Edit to fit if
splicing in from another mug.
[16:11] NayrLRosfar: step 6: Paste in the chibi in the box above the blinking frames.
[16:11] NayrLRosfar: step 7: Merge all layers down on template and remove the
background color or fill it in completely.
[16:11] NayrLRosfar: step 8: Optional. Double check to make sure there are no stray
colors that could prevent insertion.
[16:12] NayrLRosfar: step 9: save as [a 24bpp] png
Tutorial
2: Video Tutorial on Portrait Formatting by Flyingace24
Tutorial
3: Video Tutorial on Old Formatting by Blazer
Hopefully those tutorials have taught you how to format a portrait. Now you have to insert your portrait, so get ready!
Chapter 42: Portrait Insertion with FEditor
Adv
This will be quick and painless, assuming you’ve done everything right so far.
Open up FEditor Adv. Go to Tools-> Portrait Editor.
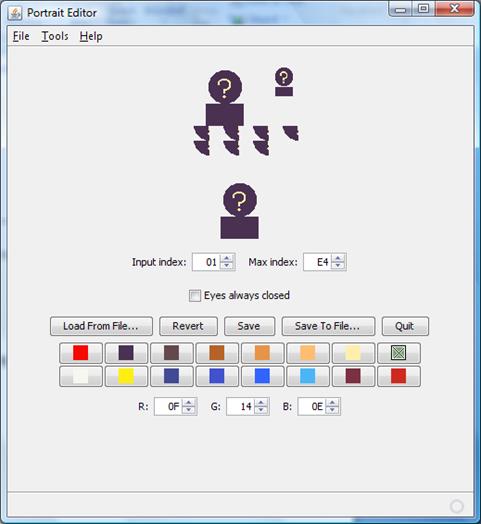
At the top we see the formatted portrait with its frames. In this case, it’s the ‘dummy’ portrait. Below that we see what it actually looks like. The input index is which portrait you are viewing. You can type in a value from a portrait list to go right to a portrait—for example, the portrait says Lyn’s default portrait is 0x16, so we type in 16 and go to hers.
The ‘max index’ is just how many portrait slots there are.
‘Eyes always closed’ makes it so that the portrait’s eyes start off as closed. You can have this same effect by just using the closed eye frames for the open eye frames, too, if you wanted.
I wouldn’t mess with the palette editor (the colorful boxes).
‘Load from File…’ loads a portrait (I think only BMPs and PNGs work). ‘Revert’ will undo a portrait load. ‘Save’ saves it. ‘Save to file…’ saves a portrait to a file. However, when you save it, you have to add the extension yourself (so to save Lyn’s portrait as a png, type “Lyn.png” or something). ‘Quit’ is kinda obvious…
What we’re going to do is hit “Load from File” to load your formatted 128x112 16-color portrait with proper formatting and saved as a PNG. (Tip: make sure it’s everything I just said, and if your insertion doesn’t work, go back and make sure it’s everything I said again.) If it’s done right, it should show up in place of the current portrait.

Hit “save” to save. Then hit “quit” to exit out of the portrait editor.
Now go File-> Save to save your ROM per usual. Portraits almost never cause a game-breaking crash so I wouldn’t worry about backing up before portrait insertion (as opposed to bigger less foolproof stuff like animation insertion, graphic insertion, or event insertion).
Test it out in VBA and hopefully it looks nice! Enjoy your new portrait! ^_^
Chapter 43: Locating Palettes
Wow, we’re already on chapter 43. I’ve only been working on this for a couple of days...
Well, it’s about time we learn how to find palettes. First of all, re-read the
definition in like, the first chapter. Once that’s done, open up your hex
editor of choice, mine being HxD, and open up VBA.
Play the game until the palette who you want to find in your hex editor shows up. I’m going to be really simplistic and edit the title screen palette of FE7.
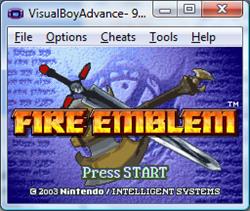
Alright. We’re going to look for the bluish/purplish background’s palette. Go to Tools-> Palette Viewer in VBA.

The palette we want to edit is the one at the bottom left. Palettes are in rows, so it is the bottom row in the “Background” area of palettes. By clicking on a color, we can see it’s Address (where it is in the RAM—RAM is memory, a temporary place for storing data), it’s RGB (Red, Green, and Blue values used to make a color), and value in hex.
The RGB values are on a 0-31 scale. Normally people use a 0-255 scale, but the GBA is sort of limited. That being said, just multiple each value by 8 to get the RGB in “standard terms”. So for the color I have selected in the image above (a transparent green color), I multiply the RGB (16, 20, 16) by 8 to get (128,160,128). Keep this in mind for later.
The value is the hex value of the color. The game uses little endian, so if we want to know its value, we have to reverse the order of the bytes first. So 0x4290 becomes 9042. That’s only one color though, and we can’t find a palette by just one color. So get 3 more colors, so we have the first 4 colors used.
9042 987F 567F 147F
Sometimes doing more than the first 4 colors can be dangerous because of compressed palettes. Compression makes it so that you can’t just search all the colors in a row, because there are other bytes (usually 00s) in between.
Now use a find command (typically ctrl+F) in your hex editor and search for those bytes. (Tip: starting a search from offset ‘0’ is the best because it searches the whole ROM. If you start a search at some random offset, you can often times only search either forward and backward, and will have to do multiple searches, and waste time.)

With that ready, do a search. My hex editor automatically takes me to where it finds those bytes.

This palette is uncompressed. How do I know? Here are some easy tricks to recognize LZ77 compression. Of course, when you don’t recognize it, that means that it’s not there.
Recognizing
LZ77 Compression
1) Standard LZ77 compression starts with a ‘10’.
2) After that it has two bytes saying the size of the data. You’ll see common sizes and recognize them quickly through experience.
3) A ‘00’ byte every 4 bytes. (This does not hold true all the time, but usually at the beginning of LZ77 compressed data, you’ll see this pattern.)
That’s all I have, actually, but if #1 and 2 don’t tell you almost instantly, then #3 won’t be too useful either (but it’s a good check to make sure).
Anyway, this makes it easy on us. We’ve now located the palette, and even if it were compressed, we still could have located it because we used a safe method.
One last thing. Sometimes there are multiple instances of a palette. Use a “find next” feature (or just do ctrl+f again from where you are) and you may find another instance of the same palette. There’s only two ways to know which palette is which if the whole palette is the exact same. You can A) just edit both and see what does what or B) debug. The latter is probably not within your skills, especially if you’re reading this tutorial to learn how to edit palettes. (No offense.)
Chapter 44: Editing Palettes
There are multiple ways to edit palettes and find the values to change them to.
Method
1: Editing Uncompressed Palettes with SNES Palette Editor
SNES Palette Editor works fine for GBA too, trust me. Download it from google or something and open it up. Load your ROM and go to the offset where your palette is (we already located the palette in the last chapter). Make sure your palette is uncompressed. See my guide in the previous chapter for telling the difference between compressed and uncompressed.

YESZ! We can clearly see the colors and their values. We can even see the Raw Color value and the RGB. If we wanted, we could even do searches for colors, but that’s not really my thing, so I didn’t cover that in my previous chapter’s instructions.
To edit the color, we can drag the bars left and right until we get the color we want. To change which color we’re editing, we just hit the ^ arrow next to the “Address:” slot/the offset. If you want to use a specific color, you can get the color’s RGB from MS Paint or some other program (this is a spriting thing really…), round each value to the nearest multiple of 8, and then divide.
However, converting colors like this can sometimes be a pain, and this method only works for uncompressed palettes, unfortunately.
Method
2: Getting the RGB of a Color and Converting to Hex
I don’t exactly have a color I want to use for this title screen background, so I’m just going to show you how to get the RGB of some random color on a portrait.
Load up MS Paint or another program, zoom in, and use the eyedropper tool to select the color you want to find the RGB of. Often times you can see the RGB off to a window on a side for programs like Photoshop or Corel Paint Shop Pro. I’ll just show you how to do it in MS Paint:

(You can’t see my eyedropper, but I’m about to select the light orangish/brownish color.)
After it’s selected, go to Colors-> Edit Colors… and hit “Define Custom Colors” so that the following pops up (except with whatever color you’re using):
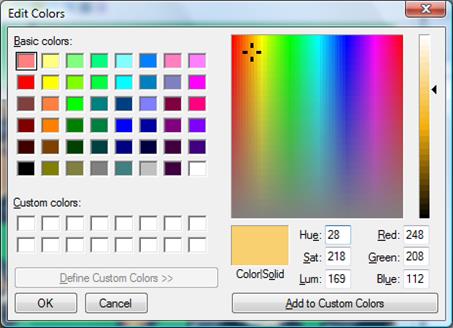
To the far right you can easily change the shade of the color to something lighter or darker. You can also pick another color from the rainbow-like area. What’s most important is the RGB: it is 248, 208, 112.
With this, we can A) round it (it’s already rounded, actually…) to the nearest multiple of 8 and divide by 8 to get the RGB on a 0-31 scale, then put it in SNES Palette Editor or B) put it into GBA Color Picker and get the hex value to use with SNES Palette Editor or a hex editor. We’re going to do B.
Download, extract, and open up GBA color picker. Put in the RGB for your color and it’ll get the nearest match—and it does the rounding, too.

We now have the hex for this color—3B5F. If we put this in a hex editor to replace another color though, we have to reverse the order as usual. You can hit the “Byteswap?” checkbox in GBA Color Picker if you want, but it only does it once, meaning if you edit the RGB input, it’s not going to byteswap it again (you have to click the button everytime to byteswap, pretty much).
By the way, GBA Color Picker crashes if you leave one of the RGB slots empty (without a value). So don’t use backspace to delete the numbers there or it’ll freak out and crash.
So we take the color we’re trying to replace and put in the hex we got. We use this for every color until we’re done. We can use this to replace uncompressed or compressed colors as since we’re humans, we can just skip the ‘00s’ that occur every once in a while in compressed palettes and only replace the bytes that are actually color bytes.
Method
3: Editing Palettes with GBA Graphics Editor
This method involves Nintenlord’s GBAGE. Hopefully you know the very basics of how to work it—have Net Framework 3.5 or higher installed (or Mono, the Linux/other equivalent), how to load a ROM, how to save, and how to input offsets and navigate through images.
After loading GBAGE and your ROM, we need to locate the image you want to change. You can scroll through all the images if you want, you can find out the offset by debugging, you can find it by logic and a hex editor (the palette and the offset are often close to each other, so if you find the palette the graphics might be nearby—it’s up to you to search in a hex editor and find it, not me), or you can see if someone else knows. I happen to have some FE7 offsets, but I’m pretty clueless on FE6 and FE8, so you’ll have to “manually” search those games by scrolling through the images (or you can just use another method to edit palettes…).
Anyway, I happen to know that in GBAGE the title screen background image is at 1369 (offset 66AF8C). The preferred size is 30x32*. We already located our palette at 66AF6C, so we put that into the “ROMPalette Offset” slot of the Palette Control… hey, wait, that’s only 0x20 bytes before the graphics! Oh look, that stuff I said about logic before was actually kinda helpful maybe!
*30x20 will work too. The size is just the # of tiles the image is, with each tile being 8 pixels. The screen is 240x160, and 240/8 = 30 and 160/8 = 20, but it doesn’t matter how large you make the height because there aren’t any graphics to load anyhow.
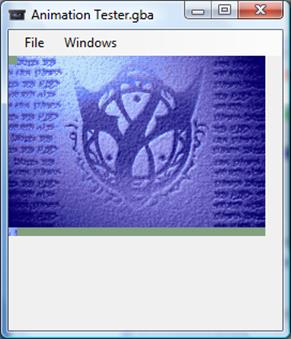
If you’ve done everything I told you, it should look like that. Actually, it looks kinda weird, doesn’t it? The top left tile (8x8 pixel piece) is missing, and it’s in the bottom left… The reason why the game does that is because it recognizes the first pixel it sees as transparent, and the first pixel would normally be a blue one, so it uses this image where the first pixel is green (the transparent color). To make up for the distorted layout of the graphic, it uses TSA. I suggest you read up on the battle background and CG chapters for this to make more sense.
Anyway, back to relevant information. We have the palette loaded. We can save the image as a PNG, edit the colors using Usenti by changing the RGB values to what we want (click on the colors in Usenti and just put your own RGB/use the scrolly thingies), save the image, and then re-import it. When you reimport the image, all that matters is that you replace the old palette with the new palette.
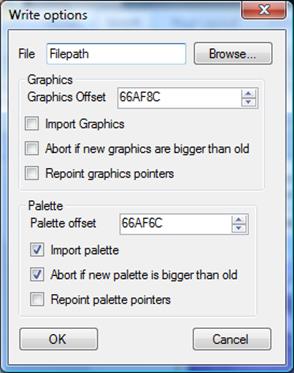
Yup, I wouldn’t even have anything else checked. Once you import the palette, save your ROM, and you should be done.
With that, we’ve found our colors and replaced the old colors and made our palette changes. After saving, we can load VBA and check out our palette changes to see if they look good, turned out right, and give us a refreshing feeling.
If something didn’t work right, make sure you:
- Didn’t overlap changes (change with one program, then change with another without exiting/reloading and all)
- Forget byte reversal when typing in the hex, or even do byte reversal twice
- Forget to convert properly (dividing/multiplying by 8, inserting the right values into GBA color picker)
- Edit the wrong colors (use the palette viewer to help know which colors you are editing)
- Edit the compression bits (be sure to avoid 00’s unless they are part of an actual color—remember, 00s come about every 4 bytes).
Wooh! We’re done!
Chapter 45: Working with GBAGE
Here we’re gonna learn a little bit more about graphics, palettes, and TSA. Just a little bit more.
Load GBAGE and your ROM, to start.
There are 3 main things you can input into GBAGE. The offset, palette, and TSA. The width and height can be adjusted to make the image look good. I’ll say it again just to make sure you know it: size is in tiles, and tiles are 8x8 pixels, and the GBA screen is 240x160.
You can dump and insert/load raw graphics. It’s like the raw hex for it. You can’t SEE anything unless you save it as a bitmap, however.
If you’re editing uncompressed graphics (just uncheck the ‘compressed’ button, although you have to know where the uncompressed graphics are) you can scroll through it by hitting the +/- block, +/- line, and +/- screen buttons. You can load palettes the same as normal as well.
When you save a bitmap, it’s best to save as a PNG, because PNG is one of the best common image file types out there in both functionality and size. You can then edit the image; however, I have to warn you about tampering with it too much. If you add colors to the image and save it, it’ll mess up the palette. If you insert an image with more than the original amount of colors, it’ll overwrite data AFTER the palette. Furthermore, sometimes images may appear to use more than 16 colors, but don’t actually—it’s all a bit tricky so just be safe with what you’re doing and constantly back-up as mistakes in graphical editing can easily lead to a completely messed up and glitch ROM (in the most unpredictable ways).
Similar things can happen with graphics. This is why when you check the ‘Import Graphics’ or ‘Import Palette’ button in GBAGE, also check the ‘abort if bla bla’, because it stops GBAGE from overwriting data. If it DOES abort, there is an easy way to insert your data without much fuss. Just find some free space (I manage mine pretty well so I know where I have free space in my ROMs) and put in new offsets for your data, then hit “Repoint X pointers” to repoint the graphic or palette pointers. This will insert the data without worry about space and then repoint the graphic or palette so the game knows where the new data is.
Another thing: it is VERY good to document what you find and change in GBAGE. I don’t spend my time bolding stuff unless I mean it. If you write down cool graphics you find while scrolling through, you can just go back to your list of graphics and what image # they are and be like “hey, I want to edit that”, then go to the image and do what you want with it. Also, when you repoint stuff, you’ll want to know where it is in case you need to go back and do stuff to it.
This includes palettes! Finding palettes isn’t the most fun thing ever. You might as well take 5 seconds out to write where the palette is so you save yourself 5 minutes later on. *even though it only takes me like 30 seconds to find a palette most of the time*
That being said, I have a little documentation for FE7’s graphics. Nothing for FE6 or FE8 not because I’m biased, but because I’ve just never hacked those as much. Oh wait, that could be considered bias… teehee. I only made one hack of FE6 so far and haven’t done much with FE8 except for importing data from that game for my hack Fire Emblem: Sacred Contention.
Graphic
Documentation
----------------------
#s
for use with GBAGE
FE7
----
800 -
Levelup
802 -
Numbers
805+
- Map Effects, Staff Anims?
825 -
"To Be Continued"
826 -
"Game Over"
835 -
Statsheet Related Stuff
836 -
" "
839 -
Arrows
846 -
Chapter Title Bar? (Menu?)
847 -
Chapter Title Bar (When Starting Capter)
848 -
"Game Over" again
849 -
Letters
854 -
"Help"
855 -
Misc. Graphics
857 -
Arena Menu Stuff?
860 -
Weapon Type Icons
861-862
- ^Same, but scrunched up and split apart
865 -
Another background
866 -
Vertical Arrow in statsheet (not sure)
867 -
Above, but horizontal
868 -
More Text
874 -
Star
879 -
Main Menu Graphics
880 -
^Same
883 -
Sound Room Graphics
884 -
Mode Select Stuff
898 -
"Personal Information" Scroll
900 -
Main Menu BG, Statsheet BG
904 -
Class Roll Primary Weapons Graphics
906 -
Another Text Font
907 -
Another Text Font
(CGs
between here)
1099
- "Fin" Text
1100
- Player Ranking Text
1101+
- Credits
1135
- Intro Text
1153
- 2003 Nintendo Presents
1154
- Various Weapons that circle around in opening
1156+
- Water Droplet Animation
1187+
- Opening "CG" Backgrounds (broken up into many pieces...)
1273+
- Misc. Opening Effects (I'm guessing, anyway)
1368
- "Fire Emblem" Shadow
1370
- Sword, "Fire Emblem", "Press Start", and Copyright
Graphics
1371+
- More
Misc. Effects? Thunder sparks are here...
1376+
- Beginning of Portraits/Chibis.
Wait! I have more!
Arena
Dialog Background
-------------------------
Image
Data at 0x3EFA3C
Image
#797 in GBAGE, data is LZ77 compressed
TSA
at 0x3F2618, uncompressed
Palette
at 0x3F2ACC, uncompressed
Battle
Preps/Miscellaneous Background
--------------------------------------
Image
at 0x407440
Image
#865
Palette
at 0x40D130
Menu
& Statsheet Background
----------------------------
Image
#900
0x418E44
Palette
at 0x41E2D8
CGs
----
Start
at around image 922, first broken up into 240x16 pieces, then total CGs, TSA
and battle
palettes can be found
at CG table, please see CG editor or other doc for more information.
Opening
Text
-------------
Starts
around image #1135 offset 0x5E9D4C
Fire
Emblem Shadow
--------------------
Image
#1368 0x66AB48
Title
Screen Background
------------------------
Image
#1369 0x66AF8C palette at 0x66AF6C
Armads
at 0x66F294 Image #1370
"Fire
Emblem", Shadow, Sword, misc.
stuff at Image 1371
offset 0x66FD80
^Palette at 66FCE0 (note: multiple palettes
for different parts, change the palette index appropriately)
OK, that’s all I have to share with you.
I think I’ve said enough about that topic then. Next, about palettes—there are different graphic modes. GBA almost always uses 4bit, so unless you’re an NDS hacker *like me*, I wouldn’t worry about it too much. I don’t think any images use 256 colors (which would be 8bpp), nothing definitely uses Truecolor or Indexed bitmaps, and the only other graphics are ones that use 2bpp and lower which isn’t included in this tutorial as GBAGE doesn’t support it (and it’s not very useful).
“Gray scale” makes it so that the image is grayscale. This is sometimes useful. It’s most useful when you’re scrolling through images trying to find out what they are. If it’s set to grayscale, it’s easier to see the details of an image and make out what it’s supposed to be, as opposed to using some palette with weird colors.
If you load a palette that is compressed, just click the appropriate button to load it properly. Else, said button will be greyed out.
The palette index is for palettes with multiple uh… indexes. Sometimes there are alternate palettes for an image that can be loaded with the ‘palette index’ button (for example, map sprites). You can quickly scroll through these by clicking the up/down arrows next to Palette Index.
Oh wait, there’s a way to edit colors in GBAGE too, I forgot! You can use the Color Control box and type in RGB (has to be divided by 8 though) to edit colors. I’m not really good with it, so you’ll have to experiment with it yourself if you want to use it…
Now, onto the last menu. Tile Control. You can choose to use TSA and, if the TSA is compressed, you can choose to load said compressed TSA.
The “amount of bytes to ignore for displaying” is a feature used to skip tiles to align images. I can’t explain it too well, but sometimes if an entire image seems to be off a little bit, either adjust said feature or the size. Usually you’ll see a weird tile at the top-left corner or everything will look like it’s shifted a little when this is needed.
You can even manipulate the tiles with GBAGE. “Tile index” is which tile you want to select, starting from the top-left, going to the right and then down the rows. You can flip the tiles horizontally, vertically, make them use another graphic by altering the graphic number, or make a tile use another palette in the index by adjusting the Palette index. This is extremely useful for TSA hacks—however, newer versions of GBAGE don’t let you edited compressed TSA, in which case you will have to use a decompressor to decompress the TSA separately and then edit it.
I realize that this part is a bit more difficult than the other aspects of GBAGE, and so I’m going to help out a little. First of all, you need to use TSA, and if it’s compressed, hit that button.
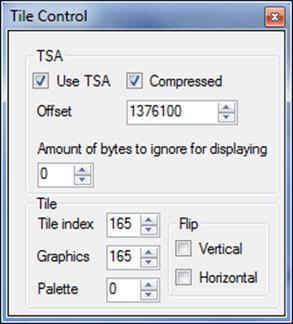
While I’m at it, you may be thinking “how do you even know where TSA IS?”. There are several ways to find TSA:
1) Find it in a pointer table/array. For example, the Battle BG Array Editor (it’s a nightmare module) has a list of graphics, palette, and TSA for battle background.
2) Use debugging. If you don’t know how to debug though, this won’t prove to useful.
3) Look using a hex editor. Often times TSA, palette, and graphics are all right next to each other. In fact, most of the time they are. Thus it wouldn’t be surprising to find TSA data right after the palette data, for instance. Being able to recognize different types of data is a skill you’ll develop over time just by experimenting and studying—it’s mostly as simple as looking for patterns.
Anyway, back to editing the TSA. You can click anywhere on the image and select a tile like that (probably preferable), or type in a “tile index” to select which tile to edit. The “Graphics” slot dictates which tile should be used at this spot in the graphic.
It’s like this:
The raw graphics are a bunch of building blocks.
The palette is the paint.
The TSA is the map telling which blocks go where.
However, not only can the TSA tell which blocks go where, but also control how they are placed—which you can change by clicking “horizontal” and “vertical” under Flip—and reuse blocks an infinite amount of times. It can even specify which palette a tile uses, which can be changed by clicking up or down on the “palette” box. This makes it so that a 16 color image can be more than 16 colors by having different parts of the graphic use different palettes and thus different colors.

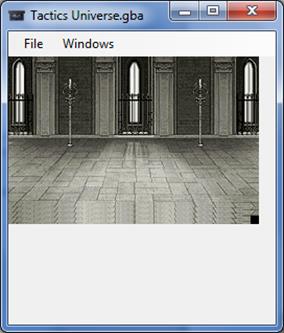
Here you can see that I’m editing the tiles at the bottom right. I’ve not only flipped them but I made one of the tiles (the tile being highlighted) use palette “1”. Unfortunately palette 1 is just a dud—it’s just a bunch of 00’s there and 0000 = black, so we get a black box, but it still illustrates how the Tile Control menu of GBAGE can edit TSA to change how images are displayed in-game.
There is one other use for changing the palette. If you’re not sure what tile you are editing, you can change the palette quickly and spot the tile that changes palette—that’s easier than trying to tell which tile was just flipped or something.
Now, let’s get some practice with the title screen menu background. I’ll tell you where the graphics, palette, and TSA are, so load them into GBAGE. Note that the graphics are compressed.
Graphics- [Approximately] Image 1369, Offset 0x66AF8C
Palette- Offset 0x66AF6C
TSA- Offset 0x66EDC0
Once that’s done, you should see the following in the image panel:
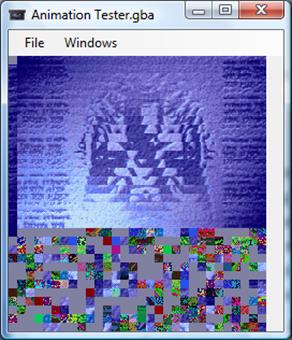
WAIT! I CAN EXPLAIN!
First of all, there’s an extra tile there that is causing some problems. We can use the ‘ignore bytes’ feature to get rid of that. Ignore two bytes (the equivalent of one tile).
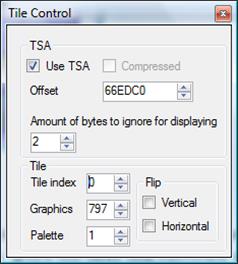
That should look something like that.

And that’s how that should look. Yes, it should look like the whole image is flipped upside down and every row is also flipped upside down. The reason why is because the game undoes these flips. I don’t know why, but it’s the truth. The game initially processes the image like this, and then it undoes the flips. It’s a result of uncompressed TSA—compressed TSA is not flipped like this, meaning “what you see is what you get” with compressed TSA. If you’ve done the chapter on battle backgrounds, you’re familiar with compressed TSA already.
If we really wanted we could flip each tile and change the order manually. But as I said, that isn’t necessary, because the game does that for us. Still, we can practice manipulating TSA by changing random tiles. Just click on a tile and edit the ‘graphic’ part, flip it both ways for the lulz, and edit the palette. Just so you know how it works.
Here’s one more example of how this works, just for emphasis:

And my results (the tile at the top):

That’s just to show you what I mean. And with all that practice and explaining done, you should now have a decent grasp of editing graphics using GBAGE, or at the very least, you should be less intimidated by all the features popping out at you!
Chapter 46: Chapter Data Editor
Finally, this chapter. The chapter on the chapter data editor, the only Nightmare Module that Blazer hasn’t covered.
Open Nightmare, your FE ROM, and the chapter data editor. We’re going to do this.
Chapter Reference Pointer… eww. I wouldn’t worry about it. So far no one has (publicly) shown that this is useful to anyone.
Object Set 1, Object Set 2, Tile Configuration, and Palette are all important and all related. They are properties of the map’s tileset (see definitions for what a tileset is). For a map to work properly, these settings have to be right. If you make a field map, you have you use the field object sets and tile configuration. The palette can be changed, but it can only be changed to a palette that is labeled as ‘Fields’. For example, palette 0x1E is fields, and palette 0x17 is Fortress&Fields. They are TOTALLY DIFFERENT. You can only use something marked as ‘Fields’ and solely fields.
To know which tileset settings you use, you have to look at the name of the tileset you used to make your map. If you used tileset 0A000B0C, then you set object set 1 to 0x0A, object set 2 to 0x00, palette to 0x0B, and tile config to 0x0C. If you take a look, all of those bytes are marked with “Plains&Castle”, so they should work together. Keep this information in mind as it is important for when you make your map (although I’ll probably repeat myself and tell you what it is again anyway).
The map is a byte that reference the Event Table that says what map to use. You can change this to any other map if you want, but remember to change the other settings as well to match whatever map you change it to.
The tile animations are for changing tiles like water tiles. If water tiles were still they’d be slightly less cool, so we have tile animations to make them move. It’s kinda obvious what to put for what map.
Triggerable Map Changes are for tiles that can change into other tiles. For example, when you open a chest, it changes from a closed chest tile to an open chest tile. Same thing with doors and breakable walls. The data for these changes is at an offset in the Event Table, and this byte references the Event Table.
Vision Distance is for Fog of War (FOW). If it’s ‘0’, it’s assumed there is no fog of war.
Preparations Screen can be disabled or enabled, but ultimately if you do not set up the events to match the settings, the Preparation Screen will not load regardless of what the byte is (your game might crash though).
Weather is kind of obvious, except some values don’t exactly work right. Thus I only suggest using the Snow, Rain, or if you’re in a firey area, Fiery Glow weather effects.
The battle tileset is for which battle backgrounds/tiles to use. For a foggy map or a night map you’d use different tiles, of course. This changes that. If you’re not sure what to use, set it to something that sounds right, and then test it out until you get what you want.
The Phase music choices are the map themes for the different phases. I wouldn’t touch the Secondary Player/Enemy phase things, mainly because I don’t see a need for them, I don’t know what they do, and I don’t recall them even being used (they probably are used SOMWEHRE, idk where though).
The Worldmap Chapter Prologue music is for when you start a chapter and you’re on the world map and it goes over recent events and stuff.
The opening music is kinda obvious, it’s just the music that starts when you begin the chapter and the first scene starts.
Destructible Walls HP is just how much HP the walls have before they get broken down.
The tactics stuff is tactics stuff. I really don’t give a crap about tactics and all, but if you want to change it, it’s there for you.
The EM/HM Chapter Number Text is the chapter with the # in front of it, which you see on the main menu. The ‘Chapter Name’ text pointers are the ones with just the name that you see in like the Status Menu and stuff.
The Event Data Reference is a byte that references the event table and tells the game which events to use. Same thing applies to Worldmap events (labeled “Worldmap Chapter Prologue Scene”).
The Pre-Augury text is what the fortune teller says before you pay. After that is the actual augury text (and it can change for each mode, of course) and then there’s the Post-Augury Text, which is what is said after the augury is all said and done.
The Augury Portrait is just what portrait to load for the Augury… either that old lady or Nils, typically.
Augury price… obvious.
The chapter no. thing is for the battle preparations. It says at the top what chapter you’re playing. Unless you reorder the chapters (like say, make chapter 7x into chapter 8, and so on) then you probably won’t need to deal with this.
The Merlinus Co-ordinate is where Merlinus’ tent starts off. It’s in the chapter data editor because you don’t get to reposition Merlinus during battle preparations.
Enemy count for Winning Road is so obvious…
When the chapter begins, the game either fades to black, or fades to the map. This is important when you are making your events, but we aren’t to that point yet, so I’ll leave it be.
The status objective text is for the status menu. The text is a little bit longer and a little bit more descriptive than the Goal text pointer, which is usually just two words, like “Seize throne” or “Defeat enemy”. By the way, this just changes the text, not the actual goal. The actual goal is a part of events.
You can also choose what information the game should display in the corner. If you don’t want anything, 0x00 is fine.
If there’s a turn limit during your chapter, you can display it. If you need to defend for 13 turns, type 14.
If you have good memory you may recall that Natalie in FE7 has a blue symbol because she is a character that is supposed to be protected. You can give this symbol to any unit in the chapter. It’s kind of cool, I guess. This is the “Protect Character Marker” dropdown that I’m talking about.
Lastly, in chapter 28 (Eliwood) or so I believe, when you’re getting Durandal, there is an arrow that points to a certain tile you are supposed to wait on. You can set this arrow to be anywhere by giving it some co-ordinates on the map.
Well, that wasn’t so scary, except for the fact that I had to type almost 3 pages of explanations and stuff. The chapter data editor is most important when you’re doing events—you have to change the goal text, sometimes do special attributes (character marker, tile marker), the augury text, chapter numbers/text, set the events, and most commonly set the map settings to the right ones.
HOLD IT! (Unless you aren’t hacking FE7!)
After Final Chapter: Light (pt2) are some cutscene/miscellaneous maps. They are chapters that are loaded through events during cutscenes. For example, when Rath joins at the end of chapter 7, I believe, you see some village/town. This map is a cutscene map—it only appears in a cutscene. However, you can use these spots for either your own cutscene maps OR your own chapters. Chapter 0x41 (it’s actually 0x42, but NMM has the prologue as 0x00 when it’s actually 0x01) is actually the link arena ‘chapter’, however, so I would refrain from editing that. Anything before that and after the final chapter part 2 is safe game. *Unfortunately the chapter data editor for FE7 is not compatible with the ‘extra chapters’, and I myself don’t have time to make the proper updates…*
Chapter 47: Map Creation
I’m tired of writing this tutorial. Honestly. So from now on, I’m going to stop making so many wasteful comments like the one I am typing right now.
First
of all, download Mappy and the appropriate tilesets. Go. Do it. Google “Fire
Emblem Mappy Map Editor”, or look on my site. No excuses.
Extract the files as usual, blab la. Depending on what game you are hacking, there are different tilesets. As usual this hack is FE7 oriented and I will be using FE7 tilesets to make an FE7 map for insertion to FE7.
Open up Mappy and make a new map. File-> New.
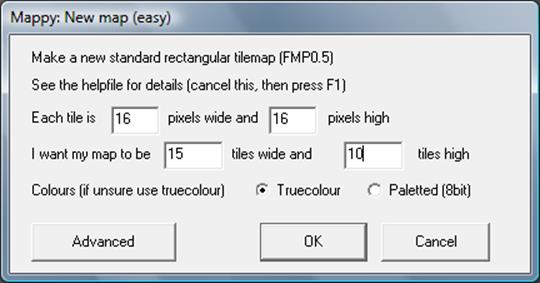
Your settings should be as follows. All GBA maps use 16x16 tiles. The smallest size is 15x10; the biggest size differs for each game or something. FE7’s biggest size is 43x36. I am going to make a very small and simple map for this tutorial. When you’re done with the settings (should take 10 seconds) hit “OK”.
A message will pop-up. Read it, but don’t do anything. Mappy should look like this:
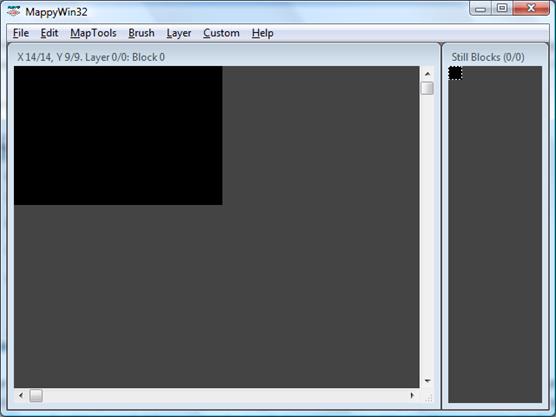
But not for long. Do File-> Import… or hit Ctrl+I. Select a tileset, and only ONE tileset.
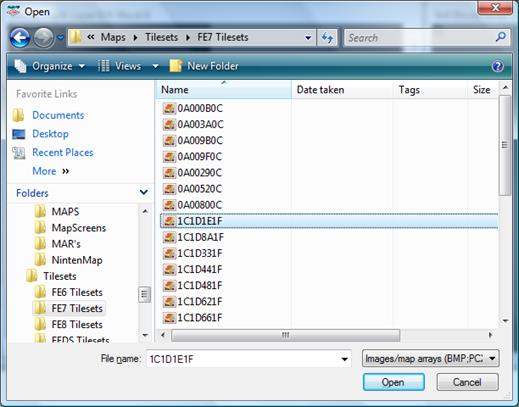
I am going to use the fields tileset, 1C1D1E1F. Note the name of the tileset you use. It is very important that you have this for later.
Thus I click “open” and load my tileset.
I now see a bunch of tiles to the right. You should too.
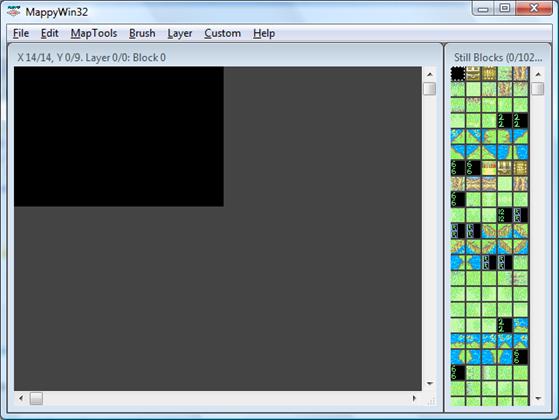
I can use these tiles to make a map. I will make a very, very simple map, because I am just testing—making a simple map is good in case you mess up and need to restart from scratch. Learn how first, then you can spend time with fancy map making later.
Despite this, I’m going to teach you the fundamentals to map-making:
- Drawing a rough draft/doodle can be very useful.
- Reference other maps to make maps properly.
- Don’t spam/abuse tiles.
- Think about realism.
- To actually use a tile, click on it on the right and then click on it on the map area.
- You can hold your mouse and drag to apply a map tile in multiple places.
- Ctrl+Z undoes the last change you made. You can only undo one change.
- Don’t use glitchy or black tiles.
- Make sure to shade castle maps. Remember, walls make shadows, so tiles next to walls need the appropriate shading on the left and top.
- Look at elevation and make sure it is correct.
- “Grass patches”—different colored grass—helps make grass look less bland.
- Don’t abuse fortress or pillar tiles like some people do.
Once you’re done with your map, save it. Here’s what my real quick test map looks like.
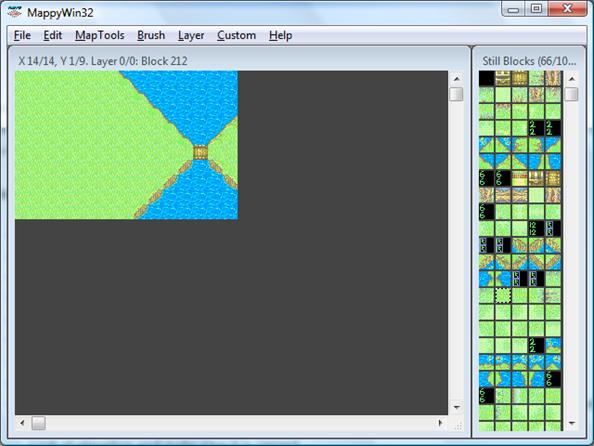
Before we move on, I am going to cover some of the functions in Mappy (mainly the ones you will use).
File-New Map – makes a new map.
File-Open – opens an FMP/map.
File-Save – saves a map.
File-Save as – saves a map as a different file/as a copy.
File-Import – imports a tileset
File-Export – I will cover this in a minute.
Edit-Undo – undoes a map change.
MapTools-MapProperties – tells you the properties of a map (the size, tilesize, and other stuff)
MapTools-Resize Map – lets you change the size of a map and add rows/columns based on where the ‘center’ of the map is. To add columns to the right and left, center at ‘1’. To add columns all around, center at ‘5’. To add columns to the left and right, center at ‘9’.
MapTools-Grid – turns grid on/off. Alternatively use Ctrl+G.
MapTools-Zoom (X) – zooms a certain amount. Useful for analyzing tiles.
We are now going to export the map as two things. We can do each export separately, or both at once. The latter is more convenient. Start by doing File-> Export.
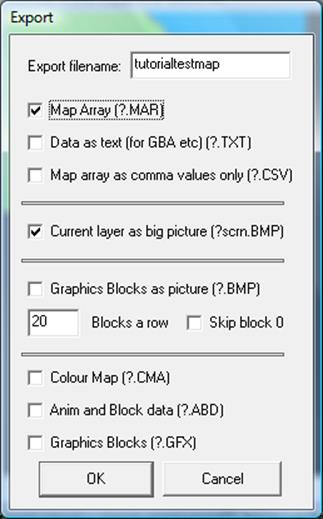
Check the things marked. The .MAR is for hacking purposes. The “current layer as big picture” exports the picture of a map as a BMP. If you want to share it with others, I suggest you resave the image as a PNG first. The image will have the extension ‘scrn’ at the end and be located wherever the FMP is. Same thing with the .MAR.
After you do this, save your map, and we’re done with map creation!
Chapter 48: Map Insertion
Now that we’ve made our map and have a .MAR, we can insert it into the game.
First we need to insert the .MAR. Thankfully the awesome Nintenlord made a program that does it for us (yes, you used to have to do it manually, and man was it a pain). It’s called the MAR Array Inserter. Like many other things, you can find it on google or on my website. It’s a simple but useful program.
When you first open the program it should look like this. Please note that like all of NL’s programs, you have to have the Net Framework or Mono installed… this should already be done if GBAGE worked for you and all.
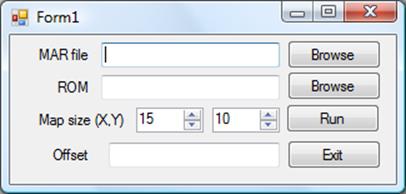
Use the “browse” button to locate the MAR file that we just exported. Use the browse button below that to navigate to where the ROM you are going to insert to is.
Now you need to know the size of your map. If you don’t already know it, you can go into Mappy, load your map, and use MapTools->MapProperties or MapTools->Resize and it’ll tell you the size of your map. Anyway, enter that into the ‘Map size’ slot.
Lastly, we need some free space to insert to. Let’s say 0x1009100 is empty so we are going to insert our map at that offset. This is just my example though—like always, you need to know your own free areas and manage them so you don’t overwrite data and stuff.
Once you’re done inputting the info, it should look something like this:
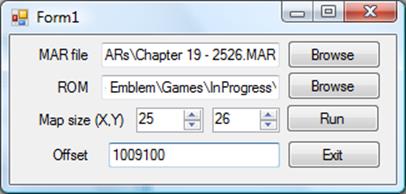
Except with different offsets and stuff. If you notice, I label the map I am inserting with its size beforehand so I don’t have to go back and look it up.
Anyway, once that’s all set up, we hit “run”, the program says “Finished”, and the map is inserted, so we can exit the program.
Now we have to fix up our tilesets. I was smart and I wrote down before what tileset I used for this map: 1C1D1E1F was the name. These also happen to be the bytes I use in the Chapter Data Editor. It’s pretty nifty. So let’s load Nightmare, our ROM, and the chapter data editor.
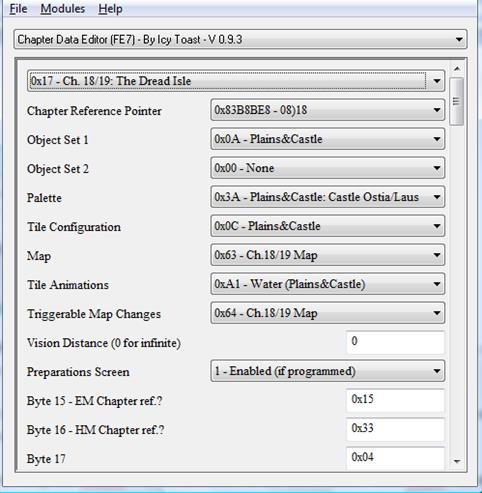
In my case I’m inserting over chapter 18/19 (I’m actually killing two birds with one stone and doing legit hacking ATM), but it works all the same for all the maps. Currently it’s set to 0A003A0C for a Plains and Castle map. I’m going to have to change those bytes to 1C1D1E1F. And bang.
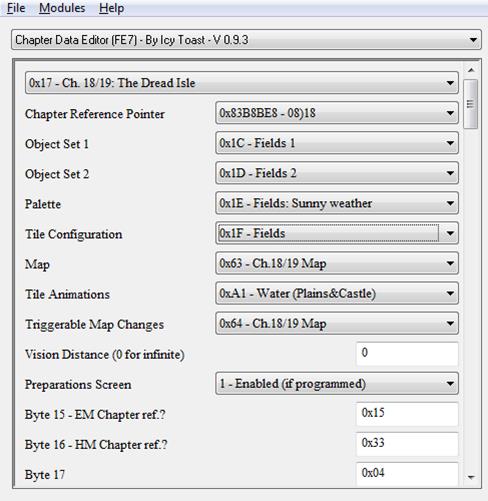
Remember! The maps palette can change to anything in the same set, but nothing else can change! You can’t make a map meant to be an outdoor field map and then use castle tiles. It just won’t work.
Hit enter/apply your changes in Nightmare and save. Now we are going to use the Event References module to repoint the old map to our new one.
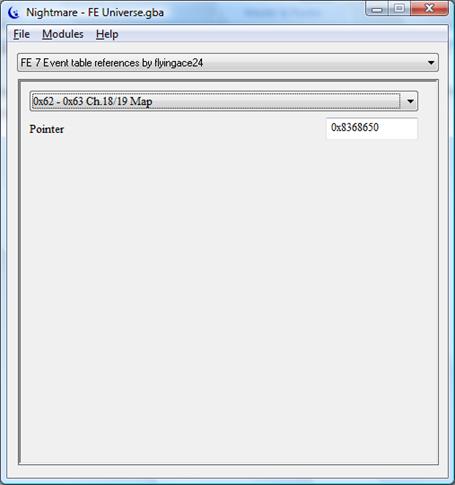
Alright. I loaded the module and scrolled down to the chapter 18/19 map pointer, since that IS what I am changing. I see some pointer that I don’t care too much about. I’m going to repoint it to my new map. Since my new map is at 0x01009100, the pointer is +0x08000000 to that, meaning 0x09009100. So that’s what I type. I hit “enter” to apply changes and then save. I’m done!
Congratulations, you’ve inserted your first map! I hope you enjoy it!
If you’re looking to make a totally new chapter (instead of being limited to the old game’s EXACT same scenes with EXACT same events) then read on, because I’m going to hack events next!
Chapter 49: Event Assembler Basics
There’s two main ways to do events. You can do them straight in hex with a hex editor, or with the Event Assembler. The Event Assembler is much easier, so I’m going to cover this.
First, some things to start you off:
- EA = Event Assembler
- STLB = Standard Library = the standard definitions included with the EA
- EALF = Event Assembler Language file = the text file with all the EA codes you can use.
- Assemble = use the Event Assembler to interpret the codes in a text file and turn it into hex that the game comprehends.
- Disassemble = Opposite of assemble, take the game’s events and put it into a text file with codes that you can understand.
You should of course know what pointers and offsets are. While knowledge of programming languages can be useful, it is not by any means necessary.
Download the Event Assembler and extract its files as you would any other program. I’m now going to tell you about the basics of event assembling.
The program itself isn’t going to be used much. Open it up and see for yourself.
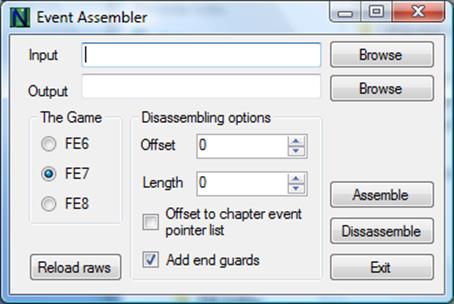
The input is either where you put the text file (for assembling) or the ROM (for disassembling). You put the opposite thing in the output (so for assembling, you’re going to output a ROM, and for disassembling, you will output a text file).
Obviously you have to choose which game you want. When disassembling, you need to input an offset. The offset can either be an offset a pointer in the event reference table, or it can be the actual ‘header’ of the events. The header is a list of pointers saying what event data is where. If you are going to point to the latter, you need to select the appropriate checkbox.
I would just always add end guards since it’s not something you need to worry about too much.
Of course, when you have your correct input and settings, click “assemble” to assemble or “disassemble” to disassemble. This is how you work the EA. You’ll likely reference this part of the tutorial later because you’re not actually going to do any assembling for a while.
Your event assembler folder should look like this, but without the NewMacros file or template file.
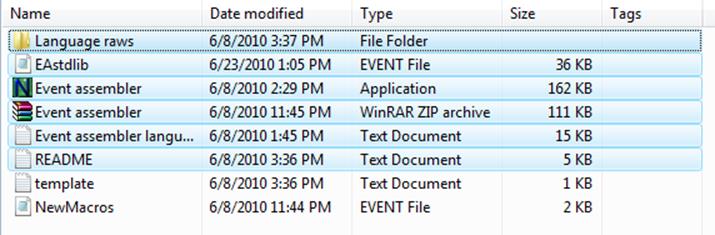
“Language raws” is a folder of the EA assembler language raws… as in, it defines what code is what/it’s hex equivalent and the format of the code, as well as some other stuff. You can change it if you want.
EAstdlib is a library of standard EA definitions. You can edit it if you want, but since it’s the standard definitions, it’s not exactly supposed to be edited. If you look at my icon, it shows a notepad in it. That’s because I have set .event files to open with Notepad so I can edit them. Yes, that’s right—to edit the file, just open it in notepad.
Now, what exactly are definitions? It defines stuff. It can define a name for a value—for example, Lyn’s character hex is 0x2D, but instead of typing 0x2D, you could type ‘Lyn’ in the event assembler. This is easier than remembering the hex for every character/having to look it up. Tutorial (i.e. Lyn’s mode) Lyn would be Lyn_t. As said, you can view the files and see the definitions for each game.
#ifdef _FE8_
#ifndef _NO_FE8_DEFINITIONS_
#define Eirika 0x01
#define Seth 0x02
#define Gilliam 0x03
… (more entries)
#endif
#endif
This is stolen from the STLB. #ifdef _FE8_ is an ‘if’ statement that see if it’s FE8. It also checks to see if _NO_FE8_DEFINITIONS is marked. That is, if you DON’T want to use the standard FE8 definitions but rather your own definitions, you could use _NO_FE8_DEFINITIONS in your code, and when the EA checks to see if it should use the definitions, it’d be like “no, this is marked, so I can’t do it”.
For each #ifdef/#ifndef there has to be an #endif. Thus after all the definitions for characters, classes, and items, is an endif.
There are also these ‘shortcuts’ called macros. Macros simplify otherwise long processes. Let’s look at a few macros as well as other definitions in the STLB.
//Backwards compability
#ifdef _FE7_
#define IFEV IFEF
#endif
This defines one code as another code, so if a person had used an older verison and used one spelling, their code would still work.
#ifdef _FE8_
#define GotoPrepScreen "GOTO $591FD8; ENDA"
#endif
This macro makes a code “GotoPrepScreen” that the EA interprets as the code in quotes next to it. Instead of remembering that offset and the whole code, you can just type something easy to remember. Much better, huh? While we’re at it, do you see the semi-colon after the 8? A semi-colon is like a way of signifying a line break (a new line) without actually making it. Thus the EA knows that “GOTO” and “ENDA” are separate codes.
#define Village(eventID,offset,X,Y) "VILL eventID offset [X,Y] 0xE; LOCA eventID [X,Y-1] 0x1D"
While you still don’t know how to actually use macros and codes in your events, you should understand how they work. Everything inside of the parantheses, separated by commas, is a paremeter. eventID is a parameter—we know what event IDs are, of course. So is the offset of the village, as is the X and Y co-ordinates. However, that small code on the left comes out to be the code on the right—it’s much easier for us to use the code on the left. Make sure you get the connection—the input ‘X’ and ‘Y’ is the same input on the right for the ‘X’ and ‘Y’ there. However, we’re avoiding all the other codes and bytes by using our little shortcut. It’s why macros are so useful.
I think we’ve covered macros well enough that we can move on to the next file in the folder.
The Event assembler language file that I will be calling “EALF” is a list of all the codes you can use with the Event Assembler. It does not, however, include macros. It contains the “base codes”—the very codes that are defined in the language raws. It says what paremeters there are and explains the basics of each code.
I’m going to cover many codes (as well as some of my own macros) in another chapter. I will not cover every code, but I will cover enough that you will know what codes to use when and where and how they work in conjunction with the rest of the events.
The README should be read. Nothing else to say about that.
There’s also the template file Markyjoe1990 made. It has a base layout for codes. I’m going to give you a similar template in the next chapter.
The other file you saw me have was a custom file for my own macros. Don’t worry, I’ll share the macros with you in a couple chapters. :D
Chapter 50: Events – The Layout
How do we actually make our events? Well, there are different ‘sections’ for different types of codes. We need to know the layout of the events, and then make the actual events. We do all of this in a simple text file. If you by some chance don’t know how to make a text file, I can tell you how to do it on windows. Either A) right-click on a folder, do New-> Text Document (it might say Notepad File or something maybe), then rename it to something that makes sense like “Chapter X events”, B) go to program files in the start menu, then go to Accessories, then load Notepad, and save the file, or C) copy an existing text file, rename it, and open that.
Now I’m going to post my template; don’t be alarmed.
//Made by markyjoe1990 of Youtube
//Modified by Nintenlord
//Modified by Blazer
#define DISABLE_TUTORIALS
#include EAstdlib.event
EventPointerTable(0x??,Pointers)
org 0x????????
Pointers:
POIN Turn_events
POIN Character_events
POIN Location_events
POIN Misc_events
POIN BallistaData BallistaData
POIN BadEN BadEH BadEN BadEH
POIN GoodEN GoodEH GoodEN GoodEH
POIN Opening_event Ending_event
Turn_events:
CODE 0x00
Character_events:
CODE 0x00
Location_events:
CODE 0x00
Misc_events:
CauseGameOverIfLordDies
CODE 0x00
Ballista_events:
CODE 0x00
Opening_event:
ENDB
Ending_event:
MNCH 0x??
ENDA
GoodEN:
UNIT Empty
GoodEH:
UNIT Empty
BadEN:
UNIT Empty
BadEH:
UNIT Empty
#ifdef _FE7_
#define TileMap(TCN,X1,X2,L1,L2,TilePointer) "CODE TCN X1 X2 L1; CODE L2 0x00 0x00 0x00; POIN TilePointer"
#endif
org 0xC9C9C8+(4*0x??) // - Pointer to tile map changes
POIN TileChanges
org 0x????????
TileChanges:
TileMap(0x00,X1,X2,Y1,Y2,TilePointer)
CODE $FF
CODE $00
CODE $00
TilePointer:
CODE (Tile hex)
CODE $00
MESSAGE Events end at offset currentOffset
//The map for this chapter is at offset: ????????
This template includes:
- all main structure events
- getting rid of the tutorial
- including the STLB
- the format for tile map changes
- event table repointing
- normal and hard mode enemies (no differentiation between E/H modes to save space/I forgot which is which…)
Please copy that to your text file and take a good look at it. I’m going to explain everything from top to bottom.
“//” denotes a comment. Anything after that is ignored, but can be seen. Thus all the comments there that say who have edited the template are rightfully ignored by the program.
#define DISABLE_TUTORIALS - disables the tutorials. I covered this in a MUCH earlier chapter. Once you disable the tutorials once, you don’t need to do it again.
#include bla.event – this includes the standard definitions so that you don’t have to waste space defining them all in one text file. You can include other definitions (like your own) as well.
EventPointerTable(0x??,Pointers) – this is to repoint the pointer in the event table (you can also do it manually using a hex editor or the Event Reference module). 0x?? is the ‘reference byte’ for the events. To know what this is, you can go into the Chapter Data Editor and scroll down to where it says ‘Event Data Pointer’ or something like that. I’ll show you a screen real quick:
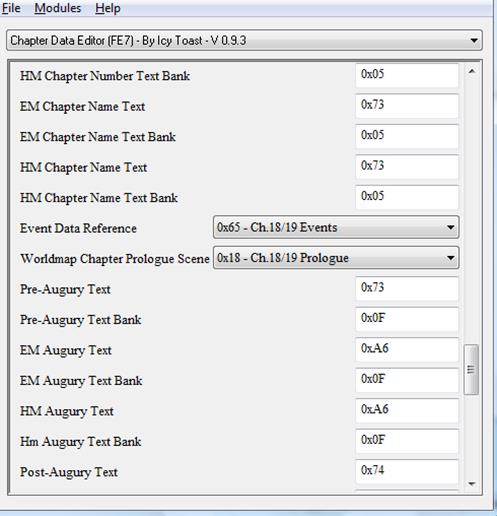
It’s called ‘Event Data Reference’ (I was close). The byte is 0x65, so that’s what I use. The text ‘Pointers’ is a pointer itself. What this does is go to entry 0x65 in the event table and repoint the pointer there to wherever the ‘Pointers’ data is.
org 0x???????? – this is uh… we’ll say it’s a code that says where to put data. Anything that comes after it (but before the next org) goes at this offset. For our events, we need a bunch of freespace. We’ve been through this before. Note that when you put your offset, you don’t need the ‘0x08’ in front of it. Personally I am using 0xCB3800 although this is not typically free space so I don’t suggest using it yourself.
Pointers:
POIN Turn_events
POIN Character_events
POIN Location_events
POIN Misc_events
POIN BallistaData BallistaData
POIN BadEN BadEH BadEN BadEH
POIN GoodEN GoodEH GoodEN GoodEH
POIN Opening_event Ending_event
These pointers are the header we were talking about. As said before, the EventPointerTable code repoints a pointer in the event table to wherever this data is—and we specified where this data is with the org code. The pointers themselves are the base 16 pointers for FE7 events. FE6 and FE8 have a slightly different format, IIRC.
Anyway, POIN is a code that makes a pointer. It’s going to make a pointer of each word there (a word is separated by a space, of course). So if we make a pointer to “Turn_events”, there has to be some events labeled “Turn_events”. Verily, there is.
Turn_events:
CODE 0x00
Before I explain what turn events are, let me explain what it means to put a name and a colon after it. It’s making a ‘label’ or a ‘group’ or an ‘event’. Because you use the same thing for units, I don’t want to call them events, so I am going to call it a label. Back to the POIN code above, it points to this Turn_events, which has some code beneath it. Right now all it has is a CODE 0x00—CODE 0x00 is a nullifier that signifies the end of these events. The actual events we’d put here are events that take place during a certain turn—for example, for a scene at the opening, you could have a scene on turn 1, and for a scene on turn 4, you’d use turn events. I won’t actually teach you what codes to use here/how to make turn events until later though.
From here on out I’m going to be less detailed on my explanations, so here we go:
Character events – talks/conversations between characters
Location events – villages, shops, doors, chests, etc., any events that take place on a certain tile
Miscellaneous events – other types of events. Includes “after-events” and chapter goal conditions.
Ballista events – events for ballista units
Opening event – the events for the opening scene. If battle preparations are on, then it loads this automatically, and the event ends with “ENDB”. If battle preparations are off, you need to have a turn event on turn 1 that uses the opening event, and the event ends with “ENDA” (you also have to manually load units onto the map).
Ending event – the event at the ending scene. This is only directly used if you have a seize event with event ID 0x03.
GoodEN – Ally unit data for Eliwood* normal mode.
GoodEH – Ally unit data for Eliwood hard mode.
BadEN – Enemy unit data for Eliwood normal mode.
BadEH – Enemy unit data for Eliwood hard mode.
*Also used for Lyn’s mode
The stuff at the bottom is all for tile changes, except for the message at the end, which just says where the events end after they are inserted. You’ll see what I mean when you assemble events. As for a map’s tile changes, you’ll have to see another chapter on that. :P
Chapter 51: Events – The Event Codes
This part is going to be a drag—it’s where I explain all the codes in the Event Assembler so that you have no excuse to not know how any of them work unless it’s A) a code not listed here, B) something I can’t work, C) glitch due to the program, or D) a CODE or ASMC thing that you can’t figure out because it’s not a supported code but rather some special code.
Open up the EALF. The EAL text file contains a list of all the codes, as said. It doesn’t include some macros though. I’m going to skip any codes that can be easier done with macros, and I’m skipping any codes I don’t know. I’m also only going to give the important details that aren’t obvious, so if I don’t mention an aspect of something, that means it is obvious.
Here are some generic principles to know:
- Event ID/event identifier is covered with its own chapter, and thus I will not cover how it works again, and will just expect that you know it.
- $ and 0x both denote hex, otherwise it is decimal. Binary has a ‘b’ at the end of it.
- a pointer is a name, not an offset. When it asks for a pointer, you give a name, and later on you use “NameofLabel:” and give the appropriate info for that event (i.e. you use codes to tell what happens during said event).
- [X,Y] asks for co-ordinates. Co-ordinates are from the top-left of the map, which is considered (0,0). You can use Mappy to figure out co-ordinates easily by just highlighting a tile in Mappy (it tells you at the top left what the co-ordinates are).
With that, let’s get started! XP
Turn based events.
TURN 0xPP $pointer [XX,YY] 0xZ 0xMM
PP = event identifier
XX = starting turn
YY = ending turn+1
Z = 0 beginning of player phase
Z = 8 beginning of enemy phase
MM=mode 01=ENM 02=HNM 03=EHM 04=HHM, FE7 only
This is like, the only code you’ll used in the Turn_events area. If you want an event to happen on any mode, just set ‘0xMM’ to ‘0x00’. A turn-based event might look like this:
TURN 0x00 Opening_scene [01,00] 0x0 0x00
Character based events.
CHAR 0xPP $pointer 0xAA 0xÄÄ 0xMM
PP = event identifier
AA = character1
ÄÄ = character2
MM = 1, eliwood
MM = 2, hector
MM = 00XX0003, if event XX has happened, for FE7 and FE8 only
These go in the character events area, of course. This code is for a talk between two characters. To make a talk go both ways you need two events, with the characters switched in them. However make sure that they have the same event ID so that if the conversation goes one way, it can’t go the other way as well.
Example:
CHAR 0x07 RecruitmentConvo 0x03 0x0D 0x00
CHAR 0x07 RecruitmentConvo 0x0D 0x03 0x00
CODE 0x00 // - nullifier
Shop list.
SHLI 0xI1 0xI2 0xI3
0xI1,2,3... = item.
This is an easy code. In a shop/armory/secret label use this to specify what items/weapons are available. Note that there IS a limit to how many there can be, so I would not add too many. Idk what the specific limit is though. 0xI1, 0xI2, etc. are just the hex values of the items. You can also use names ‘IronSword,IronSpear’, but they have to be defined (I covered definitions earlier—this is how you use them).
Area events.
AREA 0xPP $pointer [X1,Y1] [X2,Y2]
[X1,Y1] = upper left corner of trigger area
[X2,Y2] = lower right corner of trigger area
Honestly, I’ve sort of forgotten where this goes, but I think it actually goes in the Misc_events section, NOT the location events. It sounds ironic, but this is what I remember (and I’ve been doing events for years, guys). This is pretty self-explanatory—it sets a rectangular area to have an event such that when you wait on a tile there, the event activates. Note that certain codes won’t work with an area event because the character is still considered moving when this activates (thus the DISA code, which removes a character from the map, does not function properly).
Event after another event.
AFEV 0xPP *pointer* 0xRR
0xRR = The event ID of previous event.
This goes in the Miscellaneous section as well. It activates an event after another event has been activated. This is actually how the game over event works—when event 0x65 is activated/triggered, it uses an after event to go to the game over screen. *this is one of the event codes I told NL about, tee hee*
Event if ASM condition is fulfilled
ASME 0xPP *pointer* *ASM pointer*
ASM pointer = pointer to ASM code
Unless you are familiar with specific ASM conditions, I don’t suggest using this codevery often. Despite this I think the ‘Defeat All Enemies’ goal uses this kind of event (but there should be a macro for it…).
Unit data FE7 and FE6:
UNIT 0xZZ 0xCC 0xLC 0xLL [X1,Y1] [X2,Y2] I1 I2 I3 I4 A1 A2 A3 A4
UNIT 0xZZ 0xCC 0xLC 0xLL [X1,Y1] [X2,Y2] *Items* *AI*
UNIT 0xZZ 0xCC 0xLC 0xLL [X1,Y1] [X2,Y2] [I1,I2,I3,I4] [A1,A2,A3,A4]
ZZ = Character
CC = Class
LC = Leader character
LL = Starting level
[X1,Y1] = Loading coordinate
[X2,Y2] = Starting coordinate
I1 I2 I3 I4 or *Items* = Starting inventory
A1 A2 A3 A4 or *AI* = Units artificial intelligence
Character and class are obvious. Leader character is described in the “Chapter Unit Editing with Nightmare” chapter (it’s not very important, so you can just set it to 0x00 if you want). Starting level is a byte that determines the allegiance, starting level, and whether a unit is autoleveled or not. There is a list of values in the Nightmare modules; however, there is also another (MUCH better) way to do starting levels. Use the macro:
Level(Level,Allegiance,T/F) where “Level” is a number that determines the level, “Allegiance” is either “Ally”, “NPC”, or “Enemy”, and T/F is either “True” or “False”.
The first co-ordinates are the loading position. Units will then move to the starting positions. If battle preparations are on, these co-ordinates might as well be the same.
Items is just a list of items with a max of 4 starting items. I prefer to use the 3rd method of writing them, with the brackets and all. Each item is separated by a comma.
AI is the hex for AI, with each byte being separated… You can see my Chapter Unit Editing with Nightmare chapter on how AI works.
Now, for an example:
UNIT Hector 0x03 0x00 Level(5,Ally,False) [03,00] [03,02] [IronAxe,SteelAxe,Vulnerary] [0x00,0x03,0x09,0x00]
(Note: Allies don’t actually use AI, but I included it to show you how it works anyhow)
Ballistae's
BLST [XX,YY] *Ballista type*
“Ballista type” is either 0x34, 0x35, or 0x36. After the BLST code you have to add the code “ALIGN 4” for reasons I don’t want to get into—it prevents some glitches from happening, however. Both codes go in the ballista events and are probably the only codes you’ll use there unless you know super special codes. XP. It should look like this:
Ballista_events:
BLST [14,23] 0x34
ALIGN 4
That’s just an example, of course.
Showing text.
TEX# 0xZZZZ
ZZZZ=text value
//# - code
//1 - 0d
//2 - 0e
//3 - 0f
//4 - 11
//5 – cf
TEX1 0x0816 – this loads some text at the beginning of lyn’s mode. it uses the default text loading code, which is TEX1, and is for dialog. I forgot what 0E and 0F are for, but 11 is for continuing text while still using the same loaded portraits and the such. You’d use this if you have some dialog, need to change the music playing, and then continue dialog, but don’t want to show all the portraits being cleared and then reloaded just when the music changes.
CF is for CG text. Just make sure to use the [SetName] text control code in FEditor Adv to set the name of who is talking. (And of course, every time it changes whose talking, you need a new text event…)
TEX8 0xZZZZ [XX,YY]
Show small brown textbox
ZZZZ = text value
XX,YY = position of the textbox
RETB
Hide brown text-box
This text code is mainly used for displaying the name of a location when there is a scene that shows something happening in another area. It’s just a small brown box though, really. The position is in pixels, IIRC, that is if you want it at the top left, you could use say [24,16] and it’d be there. It’s up to you to experiment and figure out where you want it.
The latter code just hides the text box afterwards. It’s necessary for your events to work properly.
Makes event ID usable.
ENUT 0xNN
Makes event ID used.
ENUF 0x00
NN = event number
This is mainly used amidst conditional events but doesn’t have to be. It can set an event ID to be usable, i.e. an event with said event ID CAN activate, or it can set it to be unusable, so that an event with said event ID CANNOT activate.
Condition related codes.
Turn condition
IFTU 0xII 0xTT
Event condition
IFEV 0xII 0xVV
Previous yes/no statement
IFYN 0xII
Checks for Eliwood mode
IFEM 0xII
Checks for tutorial mode
IFTT 0xII
Unit is Fielded
IFUF 0xII 0xXX
Checks for active character
IFCA 0xII 0xXX
Checks if character is dead (or recruited?)
IFCD 0xII 0xXX
ASM condition is true (returns non 0 value in r0)
IFAT 0xII *pointer*
ASM condition is false (returns 0 in r0)
IFAF 0xII *pointer*
End of if statement
ENIF 0xII
Else statement
ELSE 0xII
II = condition identifier
VV = Event number
TT = Turn number
Wooh, so many conditional events! Conditional events are just if/else statements, really. The base structure for them is:
IF (insert parameter)
// - (insert event to happen if condition is met)
ELSE
ENDIF
// - (insert event to happen if condition is not met)
ENDIF // - it really does “ENDELSE” but it’s ultimately the same code as “ENDIF”, so…
Btw, for the turn condition, it’s actually like “TURN LIMIT -1” or something. I think...
Anyhow, conditional events are a bit tricky, so I would just follow the general format above and use whatever beginning codes you want to check for whatever thing you want (check what character is fielded/dead/currently in use, or what mode, or turn #, etc.).
Change weather.
WEA1 0xZZ
WEA2 0xZZ
ZZ=Weather
You know the ‘Weather’ dropdown in the Chapter Data Editor? You can find values for weather in there.
Load units.
LOU1 $pointer (repeatable)
LOU2 $pointer (repeatable)
LOU3 $pointer (repeatable)
LOU4 $ENM pointer $EHM pointer $HNM pointer $HHM pointer
LOEV 0xZZ 0xPP [XX,YY]
ZZ = Character
PP = Class
[XX,YY] = coordinate to load into.
This is how you actually load units. I almost always use LOU1. In your early chapters there won’t be battle preps and so you’ll need to load units during a cutscene like this. WITH battle preps, units are loaded based off of the ‘GoodEN’, ‘BadEN’, etc. pointers in the header that we talked about a while ago.
The actual pointer is the pointer to a list of units. I already covered how units work, but here’s another bit of example anyhow:
LoadUnitsEvent:
LOU1 AlliedUnits
ENUN // - this code is used after an event. It waits for the previous event to be finished. It’s almost always used after loading units or movement, however.
AlliedUnits:
UNIT Eliwood 0x01 0x00 Level(1,Ally,False) [0,0] [2,2] [IronSword,Rapier,Vulnerary] [00000000]
UNIT Empty // - this has to be at the end of your units. Otherwise the game will not know when to stop loading units and your units WILL crash and stuff. Almost guaranteed crash (I won’t tell you how to not include this and not crash it, some secrets are better kept secret).
OH WAIT! I forgot about the LOEV code. It loads an NPC with said character and class at the coordinates [X,Y]. That’s all. =D
Move units on map.
MOVE [X1,Y1] [X2,Y2]
MOVE [X1,Y1] [X2,Y2] 0xGG
MOVE [X1,Y1] *pointer To Move Manual*
MOVE 0xZZ [XX,Y2]
MOVE 0xZZ [XX,Y2] 0xGG
MOVE 0xZZ *pointer To Move Manual*
[X1,Y1] = Starting coordinate
[X2,Y2] = Ending coordinate
ZZ = Character
GG = Speed of moving
There are various different MOVE codes but the EA has them all start out the same. If there are multiple co-ordinates, it moves the unit at the first co-ordinates to the 2nd co-ordinates. 0xGG is optional—you can test out values to see what you need. Alternatively, you can use 0xZZ to specify a character instead of specific co-ordinates. You can use ENUN to wait for movement to be finished before executing the next event. That’s about all I have to say.
End unit load or/and move event
ENUN
I covered this earlier, but you just use this aftering loading units or moving units. It can also be used to wait for an earlier event to finish taking place before continuing on (but it’s not used much like that).
End of an event
ENDA
At the end of a scenic event (a scenic event is one with say, dialog, character movement, etc., as opposed to one of the codes in the ‘Turn_events’ or ‘Location_events’ areas) you put this, UNLESS the scene is the opening scene and you want battle preparations, in which case you need to use ENDB (for FE7) or GotoPrepScreen (for FE6-FE8 IIRC).
End chapter and transfer to next one
MNCH 0xYY
MNC2 0xYY (skips world map)
YY = Chapter number.
An alternate way to skip the world map is to set it to 0x00 in the Chapter Data Editor. Anyhow, this code is used at the end of chapters—it takes you to the save screen and continues to the next chapter. To know the chapter # of your chapter, there is a list of chapters in the “Quote Editor” folder with the hex next to them (at least, for FE7 there is—for FE8, you can use the hex values seen when you load the Chapter Data Editor). Use the hex of the chapter you want to go to in place of ‘YY’.
Stall.
STAL 0xZZ (repeatable)
ZZ=time to stall
Very simple code. It makes the game wait. The time is in… uh… I’m not sure, and I’d guess “frames”, but I could easily be wrong, but anyhow, 0x1E is a short pause, 0x64 is a second pause, 0xFF is like 2-3 seconds or so… just test out values until it looks good, kay?
Move camera on map.
CAM1 0xZZ
CAM1 [XX,YY]
CAM2 [XX,YY] //1F
ZZ=character
[XX,YY] = Character
The “camera” of the map is what part of the map is being focused on. You can set it to focus on a character or a co-ordinate. (Warning: If you set the camera to focus on places too close to off-screen, the map will get messed up and stuff… in other words, be careful about where you focus it on—don’t try and focus it on the bottom-right corner, that will surely be screwy.)
Changes vision distance
VCBF 0xZZ (black fog)
VCWF 0xZZ (white fog)
ZZ = vision distance
00 = infinite
This is a code that changes how far a unit can see in the fog. It loads fog if there wasn’t fog before. Kinda simple…
Changes/puts up a convo background
BACG 0xZZ
ZZ=background
This is a simple code and used somewhat frequently. It loads a background for dialog. To use it properly, you need to have a FADI and a FADU after it, or else the transition to the background will not look good. I made a list of backgrounds for FE7 but for the other games, you’re kinda on your own, unless someone has a list they want to share…
Shows a CG picture
SHCG XX
XX = picture value
Like the BACG code, but shows a CG.
return to map
REMA
Used after text to clear the text and return to the map view.
Changes music
MUS1 0xZZ
MUS2 0xZZ
MUS3 0xZZ
ZZ=music value
See the music list for values to use.
Makes sound effect play
SOUN 0xZZZZ
ZZZZ=sound effect value
See the music list for values to use.
Fades music out.
MUEN 0xZZ
ZZ=fade out speed
0x05 is a decent speed. Ending music abruptly as well as ending one song and switching to another song abruptly are both bad ideas that don’t sound good and people will notice it. Thus this code could be used more than you might think.
Lowering/Highering volume of the music
MUSI (makes music more silent)
MUNO (makes music normal after MUSI)
…I have nothing to say.
Causes map changes.
MAC1 0xZZ 0xY
MAC2 0xZZ
MACE (placed after a bunch of MAC2)
MAC3 0xZZ
ZZ=map change number
Y=0 does them
Y=8 undoes them
You’ll mainly use MAC1 (especially because I don’t know/remember what the differences for the other ones are). The ‘map change number’ is the first byte in the map changes. The first map change in the list is 0x00, the 2nd is 0x01, and so forth. You’ll learn more about map/tile changes later.
Load map
LOMA 0xZZ [XX,YY]
ZZ = Map number
[XX,YY] = Coordinate
Mainly used for cutscenes, which is why it’s called ‘Load map’, but it’s sort of like going to another chapter without actually going through the save screen and world map. The map number is actually the chapter number (and when it loads the chapter, it consequently loads the map). Unless you’re really smart and understand all of this and think you can manipulate event codes really well, I wouldn’t try and use this code to do a “chapter after a chapter” (i.e. without actually saving). XP
Giving items to character
ITGC 0xPP 0xZZ
ITGV 0xZZ (village)
ITGM 0xZZ (to main lord)
ZZ=item
PP=character
Money giving
MONE 0xZZ 0xMMMM
MMMM = Amount of money
ZZ=00 village
ZZ=01 cutscene
So very obvious. The ZZ byte in money giving is important because it helps decide whether a weapon is received or “pilfered” -_-.
Execute ASM
ASMC $pointer (repeatable)
Unless you want to write your own ASM routines using the EA (*sweats* D:) you want to actually put in a pointer here. What pointer to use? Well, there are different ones for different effects. I guess you have to be smart and know them. One way to know them is to analyze existing event codes by disassembling and figuring out what certain ASMC codes do. That’s how I figured out most of my event hacking back when there wasn’t any Event Assembler or FEditor Adv. >_>
Change unit condition
UNCM 0xZZ 0xXX (causes)
UNCR 0xZZ 0xXX (reverses)
ZZ = character
XX = condition values
01 = invicibility
02 = Grayed out
10 = rescuing a unit
20 = being rescued
Effects map sprites, btw.
Makes unit disappear and re-appear
DISA 0xZZ (disappear)
DISA [XX,YY]
REPA 0xZZ (re-appear)
REPA [XX,YY]
ZZ = Character
[XX,YY] = Coordinate
Very obvious… use co-ordinates or the character #.
Make units fight (FE7)
FIGH 0xZZ 0xPP $pointer $code
ZZ = Attacker
PP = Defender
code = 00000000 normal, controlled fight
If you want a totally scripted fight, there’s a trick. Yes, there is. Oh yes. There’s a bunch of things you can do with the data pointed to by ‘$code’… I think I’ll teach you.
To start, the $code can do some special things. One thing it can do is make the attacking character equip any weapon, even if it’s not in their inventory. lolwut? Yes it can. $0000001F would make them equip an Iron Axe, for example. It’s the first byte that controls it (when using ‘$’ you are reversing the byte order though, making it seem like the last byte).
Now, the data pointed to by the pointer controls what happens in the fight. You can have multiple attacks, but typically any more than 4 attacks and the game may start to act a bit silly, so be careful.
FightData:
CODE (bytes)
CODE 0x00 0x00 0x80 0x00 // ends the fight
A general fight looks like that. There are many things you can do with the fight, though. One attack consists of 4 bytes, and those 4 bytes control everything about that one attack.
CODE 0x00 0x00 0x00 0x20
What this does is make an attack that 1) hits 2) acts normal 3) that the attacker does and 4) that does 0x20, or 32 (yes a lot) damage. The first byte controls the outcome of the attack.
Byte 1:
0x00 = Hit
0x01 = Critical
0x02 = Miss
0x40 = Poison
0x80 = Devil
The second byte is, to my knowledge, only used to control whether the hit is a silencer or not. 0x00 is normal, and 0x08 is silencer (it has the silencer special dark kill effect too).
The third byte controls who attacks, if anyone. 0x00 means the attacker attacks. 0x08 is to make the defender attack. And 0x80 ends the battle (which is why 0x00 0x00 0x80 0x00 is used at the end of all fight events, if you’re smart).
The last byte is the easiest byte to remember, as it is the damage—in hex, mind you. As usual, use your head or MS Calculator or an online calculator to convert from decimal to hex.
Now, here is an example of a scripted fight.
FIGH
0xED 0x01 AnakinFight $0000001F
UNCM 0xED 0x01
MOVE 0x2D [16,23]
ENUN
FIGH
0x2D 0xEE SiegFight $00000000
UNCM 0xEE 0x01
AnakinFight:
CODE 0x02 0x00 0x00 0x00 // attacker misses and does 0 damage
CODE 0x01 0x00 0x08 0x30 // defender attacks, critical, and does a whopping 48 damage
CODE 0x00 0x00 0x80 0x00 // the battle ends
SiegFight:
CODE 0x81 0x08 0x00 0x30 // attacker critical and does 48 damage WITH a silencer… to HIMSELF
// because of the devil effect. So he pretty much assassinated himself. XD
CODE 0x00 0x00 0x80 0x00 // the battle ends
***USEFUL INFO ON SCRIPTED MAP FIGHTS***
Alright. So character 0xED fights character 0x01 (happens to be Anakin). The enemy uses weapon 0x1F to fight (see the last byte of the FIGH code), which is an Iron Axe, but the unit data (which I didn’t show) says his class is a soldier. Do you know what this means? It means that the game can’t load an animation because soldiers don’t have an axe animation. The result? The scripted fight happens on the map instead of with full animations on. This is useful for fights with generic enemies where people typically don’t want to see battle animations. I think it’s a pretty good idea because I can’t find a byte that forces animations off, but then again I came up with it so I am biased. XD
As for what happens in the fight, see the comments and look at what I said about what byte values do what, and you should figure it out.
Now admittedly there are some other codes in-between the two FIGHs but just ignore them for now. In the next FIGH code, character 0x2D attacks character 0xEE, and uses the weapon he has equipped. Notice how in the code I used 0x81 for the first byte. Wait, that wasn’t an option! 0x80 is devil, and 0x01 is a critical, but 0x81… oh, get it? It’s just a critical with the devil’s axe effect. He’s essentially critical-ing himself like an assassin. Fun stuff.
That’s all there is to FIGH commands. Just be careful that you don’t do anything reckless, as they can EASILY mess up. For one, make sure the fighting units are within range of each other, and don’t try doing anything stupid (not that you would) like a missing critical (0x03—I sincerely doubt it would work…).
As for the FE8 scripted fights… I have almost no clue how the FE8 code works so I can’t help you there. Then again, this tutorial is FE7 oriented, so I have few regrets. T_T If you need help, try Arch’s event tutorial, as it includes info on the differences between FE7 and FE8 and the like. It’s useful.
Kill a character
KILL [XX,YY]
KILL 0xZZ
ZZ = Character
[XX,YY] = Coordinate
Actually kills the character rather than just making them disappear. When a character is killed, so is their data, meaning if you try and load the character you killed later, they will have their base stats. This only applies to allies, of course, because enemies and NPCs can’t level up, but why would you want to kill an ally…? :P
Changes units AI
CHAI 0xZZ $AI code
CHAI [XX,YY] $AI code
ZZ = Character
[XX,YY] = Coordinate
The AI bytes are the same AI bytes used in unit data. Whoop-dee-doo.
Changes characters affiliation (FE6/FE7)
CUSI 0xZZ 0xPP
ZZ = Character
PP = affiliation code
Changes characters affiliation (FE8)
CUSA 0xZZ to ally (blue)
CUSE 0xZZ to enemy (red)
CUSN 0xZZ to neutral (green)
ZZ = Character
For FE6 and FE7, 0x40 should work for NPC, and 0x80 should work for Enemy. I think. If they don’t work, then just test values (I know 0xA0 should work for enemy, NPC should be somewhere in the middle…). There are macros for FE7 to simplify this so you don’t have to remember values.
FE8 is lucky and has 3 separate codes for each allegiance. Well, idk if you consider having to use 3 separate codes lucky, but it’s better than having to remember random ‘allegiance values’…
Promotes character (FE8)
PROM 0xZZ 0xYY
ZZ = Character
YY = Class to promote to
FE8 is lucky and has its own code for promotions. I only know a code for promoting the Main Lord in FE7. D: I’ll give you some of these macros later (very soon).
Fadi in/out black
FADI 0xZZ
FADU 0xZZ
ZZ = Speed of the fade-out
01 = slowest possible
FF = Fastest possible
Fade in/out white
FAWI 0xZZ
FAWO 0xZZ
ZZ = Speed of the fade-out
01 = slowest possible
FF = Fastest possible
Fade in/out for CG
FADICG 0xZZ
FADUCG 0xZZ
ZZ = Speed of the fade-out
01 = slowest possible
FF = Fastest possible
These codes are pretty important. When you fade to black, you can execute events without the player seeing them. You can “secretly” load units, make them all invisible, load music, load a background, load a CG, or something else. These codes generally work the same, except one is black, one is white, and one is for CGs, apparently (I never used the CG code myself). A good value for average-speed fades is 0x10 and for slower fades, 0x04. For faster fades, something high (but probably not 0xFF).
Pointer
POIN $pointer
It makes a pointer. I can’t believe I just said something so obvious.
Go to event
GOTO $pointer
Executes pointed events and then returns.
The EALF already explains this one. Once again, I find myself near stunned that I even pasted this. I must be tired/bored…
Now, onto those macros I said. I’ll give’m, but they’re only for FE7, unfortunately. Once again FE7 is treated better than all the other games. Sorry, but FE8 hacking never got my interest, and I don’t feel like going to that game and having to figure out all the stuff that I already know about in FE7. D:
//NewMacros
//Most new macros are by Blazer. The CameraOff and FE7 allegiance codes as well as the rescue
//code are all thanks to Arch. Some of the hex I got for the codes is in thanks
//to Nintenlord and Icy Toast.
//Please make sure you have the latest version of the Event Assembler and this file before using.
//Please credit Blazer, Arch, Nintenlord, and Icy Toast if you use these.
//Also, check to make sure that some of these macros don't have language codes made for them in
//a newer release of the Event Assembler. Thank you and enjoy!
#ifdef _FE7_
#define UnitClear "ASMC 0x7A8B9"
#define Scroll(Box,Index) "CODE 0xA7 0x00 0x07 0x00; CODE 0x00 0x00 0x00 0x00; CODE Index Box 0x00 0x00; CODE $42; CODE $08083181; CODE $89"
#define Reposition(Char,XC,YC) "CODE 0x2F 0x00 0x00 0x00; CODE Char 0x00 0x00 0x00; CODE $00YC00XC"
#define UnitFlash(Char,Time) "UNCM Char 1b; STAL Time; UNCR Char 1b; STAL Time; UNCM Char 1b; STAL Time; UNCR Char 1b; STAL Time; UNCM Char 1b; STAL Time; UNCR Char 1b; STAL Time; UNCM Char 1b; STAL Time; UNCR Char 1b; STAL Time"
#define MoveOff(Char,X,Y) "MOVE Char [X,Y]; ENUN; DISA Char"
#define TileMap(TCN,X1,X2,L1,L2,TilePointer) "CODE TCN X1 X2 L1; CODE L2 0x00 0x00 0x00; POIN TilePointer"
#define Rescue(Char,Rescuer) "DISA Char; ENUN; UNCM Rescuer 0x10; STAL 0x10"
#define CameraOff "CODE 0x3D"
#define CameraOn "CODE 0x3C"
#define Ally(Char) "CUSI Char 0x00"
#define Enemy(Char) "CUSI Char 0xA7"
#define NPC(Char) "CUSI Char 0x37"
#define BlackOff "CODE $0C"
#define QuintessenceEffect "ASMC 0x7D711; STAL 0x3C; ASMC 0x7D7B5; STAL 0x3C; ASMC 0x6CCB9; ASMC 0x7D771"
#define LynModeEnding "CODE $58; CODE 0x30 0x0F 0xCC 0x08"
#define UnitInvisible "ASMC 0x7A939; ASMC 0x7A9D5"
#define Rumble "ASMC 0x7D645"
#define MainCharPromote "ASMC 0x79AF5"
#define DarkenScreen "CODE $E1; CODE $E0; CODE 0xFFFFFFFF; CODE 0x04 0x00 0x00 0x00; CODE 0x80 0x00 0x02 0x08; CODE $E2"
#define MapColorChange(Speed,ColorByte1,ColorByte2) "CODE $E1; CODE $E0; CODE 0xFFFFFFFF; CODE Speed 0x00 0x00 0x00; CODE 0x80 0x00 ColorByte1 ColorByte2; CODE $E2"
#define MapColorReturn "CODE $E1; CODE $E0; CODE 0xFFFFFFFF; CODE 0x04 0x00 0x00 0x00; CODE 0x00 0x01 0x04 0x10; CODE $E2; CODE $E2"
#define LightningStrike(X,Y) "CODE $DD; CODE X 0xFF 0xFF 0xFF; CODE Y 0xFF 0xFF 0xFF; CODE $42; CODE 0x99 0x14 0x01 0x08"
#define DefeatAllEnemies(pointer) "CODE $0E; POIN $pointer; CODE 0xE9 0x9F 0x07 0x08"
#define DefeatBossGoal(pointer) "AFEV 0x00 pointer 0x02"
#define IfPlayerUnitsOnly(evid) "CODE $48; CODE $01; CODE 0xF1 0xA2 0x07 0x08; ENUT evid; CODE $45; CODE $09; CODE $44; CODE $01"
#define IPUO(evid) "CODE $48; CODE $01; CODE 0xF1 0xA2 0x07 0x08; ENUT evid; CODE $45; CODE $09; CODE $44; CODE $01"
#define ENDPUO "CODE $44; CODE $09"
#define LoadLynsModeFallenText "GOTO 0xCC0928"
#define GUARD "0x03,0x03,0x09,0x20"
#define ATRANGE "0x00,0x03,0x09,0x00"
#define NOAI "00000000"
#endif
You can use them, of course, as long as you give credit. People who make programs, codes, and even nightmare modules all deserve some sort of thanks, IMO. Especially people like Nintenlord and Xeld who have contributed a LOT.
Anyway, I’ll cover each code briefly.
The UnitClear code is used in cutscenes to clear all the units off the map leftover from the battle.
The Scroll code loads a scroll-esque box (the ones often seen in tutorials) with text. “Box, Index” is an old-fashioned way of dividing up the text pointer into two parts (sorry, my macros are not very efficient). “Box” would be the first part and “index” would be the second part.
The Reposition code is used to move a unit without actually seeing them move there.
The UnitFlash code is mainly for me, but anyhow, it makes a map sprite flash (appear invisible and visible repeatedly) as if though the unit is coming out of the shadows.
The MoveOff code simply moves a unit off the map (you still need co-ordinates though. L)
TileMap is a macro used for map/tile changes. Beware: it uses all hex for input. You’ll learn more about this very soon.
The Rescue macro simply makes it easier to rescue a character during a cutscene.
CameraOff makes it so that the camera doesn’t follow movement and unit loading all over the place. CameraOn undoes this by turning the camera back on (obvious, huh? XD).
The Ally(Char) etc. codes just change the allegiance of a character to whatever you want.
BlackOff is used A) when the chapter fades to black to start (you can change this setting in the Chapter Data Eidtor), and B) in a turn 1 scene when battle preps are set on, it is needed for reasons I can’t explain. Pretty much, whenever you have battle preps, make a scene on turn 1 and include this code at the beginning of it.
QuintessenceEffect does the quintessence sucking red wavy crap. You have to see it to know it.
LynModeEnding makes the game go to the Lyn’s mode endings.
UnitInvisible makes units invisible, supposedly. I got this code from NL, so…
Rumble is just a rumbling effect…
MainCharPromote promotes the main character (depends on the mode, idk if it works in Lyn’s mode).
DarkenScreen is quite obvious.
MapColorChange changes the color of the screen to whatever you input (has to be hex) and does it with the speed you input. Don’t know what to input? Experiment and find out.
MapColorReturn returns the screen to its normal colors.
LightningStrike makes lightning strike (it’s used in a very late chapter in FE7 by Limstella). The positioning would normally be controlled by 0xC0 and 0xF0, AKA (13,15), but it’s tricky. Do what you want with it, but I don’t like having to deal with tricky special effects.
DefeatAllEnemies and DefeatBossGoal are ways of making said goal conditions. They go in the Misc_events section. Of course, you have to input a pointer for them to go to. This is redundant because Nintenlord already made macros for them included in the EA’s standard library. XP
IfPlayerUnitsOnly checks to see if the current character is an allied/player unit. The shortened verison is IPUO.
LoadLynsModeFallenText does exactly what it says. When a character is injured, text is typically loaded at the end of the chapter. It’s supposedly done using this code.
GUARD "0x03,0x03,0x09,0x20" is a shortcut for entering the guard AI. At the end of unit data I could put “…… [Javelin,Vulnerary] [GUARD]” and the unit would stay in his one spot, attacking whoever he can while staying still. It beats typing out the hex. Arch has some other useful AI macros you can use (see the Fire Emblem Shrine or Fire Emblem Universe for them—check the documentation sections).
If any of the macros don’t work, don’t get frustrated at me. The solution is simple: don’t use them. I’m being nice and sharing, so be nice and accept what gifts are offered to you. :P You can always contact me too so I can fix them. That works.
Now that we know all about the codes used in events, we have to actually construct our chapter by putting everything together.
Chapter 52: Event Construction
I’m going to make this chapter easy on myself. You look at a bunch of events and recognize all the codes used (because I explained most of them). Then you are like “oh, this makes sense” and you get a feel of how actually using the codes to build your events work. Right, I’ve explained enough about events, so you’ll have to work it out on your own by looking at this chapter of mine from Tactics Universe. If you still need more help constructing your events, please look at Arch’s tutorial, found here-- http://serenesforest.net/forums/index.php?showtopic=21165
#include EAstdlib.event
//#include NewMacros.event – this would load my custom macros. You can add a line like this
//to load your own macro file, which can contain your own macros and macros by others.
//I suggest you download Arch’s and my macros from the FEShrine as they are very useful.
org 0xC9C9C8+(4*0x5A) // - tells the game where the pointer to this chapter’s events is
POIN Pointers // - makes the pointer
org 0xCB2000 // - tells where to insert data
Pointers: // label name
POIN Turn_events // makes a pointer to turn events, same for others but different events
POIN CharacterTalk
POIN Location_events
POIN Misc_events
POIN Ballista_events Ballista_events
POIN BadEN BadEH BadEN BadEH
POIN GoodEN GoodEH GoodEN GoodEH
POIN Opening_event Ending_event
Turn_events: // name of turn events. Look how it matches with the POIN to the top.
TURN 0x00 PreBattle [01,01] 0x00 0x00 // - creates a turn scene on turn 1 on the ally phase
CODE 0x00 // ends structure events
PreBattle: // the actual turn scene that is referenced in the turn event. be careful with //capitalization and spelling always!
BlackOff // custom macro used to fade out of a black screen at the beginning of a chapter or // after battle preps
ENDA // ends the scenic event
CharacterTalk: // for character talks, most commonly recruitment conversations
CODE 0x00 // ends structure events
Location_events:
Village(0x07,Village1,3,2) // creates a village with event ID 0x07
Village(0x08,Village2,3,8) // creates a village whose scene is “Village2”
Village(0x09,Village3,2,11) // creates a village with co-ordinates (2,11)
Village(0x00,Village4,1,14) // village that can be visited repetitively due to 0x00 as event ID
Door(9,14) // allows a door to be opened at 9,14
Door(10,14)
Armory(WeaponShop,6,16) // creates an armory at (6,16)
Vendor(ItemShop,9,17) // creates a shop with a list of weapons called ItemShop
CODE 0x00 // ends location events/structural events
Village1:
Text(0x0D,0x970) // text macro that loads background 0x0D and text 0x970
ITGV KnightsCrest // gives a KnightsCrest to the active unit visiting the village
REMA // removes graphics/returns to map
ENDA // end scenic event
Village2:
Text(0x01,0x971)
MONE 0x00 5000 // gives 5,000 gold to player, for villages (cutscene would be 0x01, not 0x00)
REMA
ENDA
Village3:
Text(0x0D,0x972)
ITGV 0xA5 // gives item/weapon 0xA5 to current unit
ENDA
Village4:
Text(0x01,0x973)
REMA
ENDA
WeaponShop:
SHLI IronSword SteelSword IronSpear SteelSpear Javelin IronAxe SteelAxe HandAxe IronBow SteelBow // list of weapons available at weapon shop
CODE 0x00 // data separator
ItemShop: // same structure as weaponshop
SHLI Heal Mend Fire Thunder Lightning Shine Vulnerary Antitoxin
CODE 0x00
Misc_events: // miscellaneous events, triggered events
ALIGN 4 // prevents misalignment from shops
CauseGameOverIfLordDies // when event 0x65 is triggered, game over screen will occur
DefeatAll(Ending_event) // when all enemies are defeated, the game goes to “Ending_event”
AREA 0x14 ItemFind [9,13] [12,14] // area event with event ID 0x14 called “ItemFind”.
//Item can be found by waiting anywhere between [9,13] or [12,14]
CODE 0x00
ItemFind:
ITGV DoorKey // gives a doorkey
REMA
ENDA
Ballista_events:
CODE 0x00
Opening_event:
ALIGN 4 // prevents misalignment from ballista data
CameraOff // custom macro that turns the camera off so it doesn’t follow unit movement
CAM1 [0,0] // moves camera to position [0,0]
UnitClear // custom macro that clears all units from the field (redundant, no units loaded yet)
BlackOff // custom macro that removes black screen
CAM1 [0,0]
ENUN // waits for event to finish/camera to move
LOU1 Allies // loads unit group “Allies”
ENUN // waits for units to move
CAM1 [3,10]
STAL 40 // stalls the game for time of ‘40’, a short pause that helps the flow of events
CAM1 [6,14]
STAL 40
CAM1 [14,14]
LOU1 Kelik // loads unit group “Kelik” (NOT necessarily the character “Kelik”)
ENUN
STAL 40
CURF [14,15] // flashes the cursor on (14,15)
FADI 0x10 // fades in with speed of 0x10
BACG 0x0A // loads background 0x0A
FADU 0x10 // fades out with speed of 0x10
TEX1 0x967 // loads text
REMA // clears text and returns to map
STAL 0x10 // stall, but with hex input
ENDB // goes to battlepreps, one can alternatively use a macro
Allies: // name of unit group/event label
UNIT Sain 0x00 0x00 Level(1,Ally,False) [6,16] [6,16] [0x00] [00000000] // loads character “Sain”
UNIT Lyn 0x00 0x00 Level(1,Ally,False) [3,12] [3,12] [0x00] [00000000] // class “0x00”
// the game knows to load Lyn’s class as Lyn is already an allied unit in the save data
UNIT 0x49 Myrmidon 0x00 Level(15,NPC,False) [14,15] [14,15] [0x00] [00000000]
// loads level 15 NPC without autoleveling (automatically adding stats)
UNIT Empty // unit separator to prevent glitches
Kelik:
UNIT 0x02 0x00 0x00 Level(1,Ally,False) [16,14] [16,15] [0x00] [00000000]
UNIT Empty
Ending_event:
MUEN 0x05 // fades out of music at speed 0x05
FADI 0x10
BACG 0x0A
MUS1 0x0038 // loads music 0x0038
FADU 0x10
TEX1 0x968
MNCH 0x17 // goes to chapter 0x17 (not exactly chapter 17, but the 0x17th chapter in the data)
ENDA
GoodEN: // allied units, controls positioning and # allowed in battle preps
UNIT 0x02 0x00 0x00 Level(1,Ally,False) [16,10] [16,10] [0x00] [00000000]
UNIT Sain 0x00 0x00 Level(1,Ally,False) [8,12] [8,12] [0x00] [00000000]
UNIT Lyn 0x00 0x00 Level(1,Ally,False) [16,4] [16,4] [0x00] [00000000]
UNIT Empty
GoodEH: // allied units in hard mode (you can limit the # allowed in battle preps)
UNIT 0x02 0x00 0x00 Level(1,Ally,False) [16,10] [16,10] [0x00] [00000000]
UNIT Sain 0x00 0x00 Level(1,Ally,False) [8,12] [8,12] [0x00] [00000000]
UNIT Lyn 0x00 0x00 Level(1,Ally,False) [3,4] [3,4] [0x00] [00000000]
UNIT Empty
BadEN: // normal mode enemy units
UNIT 0x49 Myrmidon 0x00 Level(15,Enemy,False) [16,2] [16,2] [0x9C] [0x00, 0x03, 0x09, 0x00]
UNIT 0xB3 Archer 0x00 Level(10,Enemy,True) [14,15] [14,15] [ShortBow,IronBow,Vulnerary] [0x00, 0x03, 0x09, 0x00] // loads inventory of ShortBow etc.
UNIT 0xB3 Pirate 0x00 Level(10,Enemy,True) [18,13] [18,13] [SteelAxe,HandAxe] [0x00, 0x03, 0x09, 0x00] // unit has AI of “attack in range” (00030900)
UNIT 0xB3 Pirate 0x00 Level(10,Enemy,True) [2,12] [2,12] [PoisonAxe,Vulnerary] [0x00, 0x03, 0x09, 0x00] // unit DOES autolevel (set to true)
UNIT 0xB3 Pirate 0x00 Level(10,Enemy,True) [10,6] [10,6] [IronAxe,HandAxe] [0x00, 0x03, 0x09, 0x00]
UNIT 0xB3 Pirate 0x00 Level(10,Enemy,True) [6,7] [6,7] [HandAxe,Vulnerary] [0x00, 0x03, 0x09, 0x00]
UNIT 0xB3 Fighter 0x00 Level(10,Enemy,True) [15,6] [15,6] [SteelAxe,HandAxe] [0x00, 0x03, 0x09, 0x00]
UNIT 0xB3 Mercenary 0x00 Level(10,Enemy,True) [7,3] [7,3] [SteelSword] [0x00, 0x03, 0x09, 0x00]
UNIT 0xB3 Mercenary 0x00 Level(10,Enemy,True) [12,10] [12,10] [PoisonSword,Antitoxin] [0x00, 0x03, 0x09, 0x00]
UNIT Empty
BadEH: // for hard mode units
UNIT 0x49 Myrmidon 0x00 Level(15,Enemy,False) [16,2] [16,2] [0x9C] [00000000]
UNIT 0xB3 Archer 0x00 Level(12,Enemy,True) [14,15] [14,15] [ShortBow,Longbow,Vulnerary] [00000000]
UNIT 0xB3 Pirate 0x00 Level(12,Enemy,True) [18,13] [18,13] [SteelAxe,HandAxe] [00000000]
UNIT 0xB3 Pirate 0x00 Level(12,Enemy,True) [2,12] [2,12] [PoisonAxe,Vulnerary] [00000000]
UNIT 0xB3 Pirate 0x00 Level(12,Enemy,True) [10,6] [10,6] [IronAxe,HandAxe] [00000000]
UNIT 0xB3 Pirate 0x00 Level(12,Enemy,True) [6,7] [6,7] [HandAxe,Vulnerary] [00000000]
UNIT 0xB3 Fighter 0x00 Level(12,Enemy,True) [15,6] [15,6] [SteelAxe,HandAxe] [00000000]
UNIT 0xB3 Mercenary 0x00 Level(12,Enemy,True) [7,3] [7,3] [SteelBlade,Vulnerary] [00000000]
UNIT 0xB3 Mercenary 0x00 Level(12,Enemy,True) [12,10] [12,10] [PoisonSword,Antitoxin] [00000000]
UNIT Empty
org 0xC9C9C8+(4*0x59) // - Pointer to tile map changes
POIN TileChanges // repoints tile changes
org 0xCB1F00 // puts data at offset 0xCB1F00
TileChanges: // list of tile changes
TileMap(0x00,0x03,0x02,0x01,0x01,VillageGate) // tile change #0 (0x00)
TileMap(0x01,0x03,0x08,0x01,0x01,VillageGate) // top-left tile of change is [0x03,0x08] or [3,8]
TileMap(0x02,0x02,0x0B,0x01,0x01,VillageGate) // [0x02,0x0B] = [2,11] – convert to hex
TileMap(0x03,0x01,0x0E,0x01,0x01,VillageGate) // w/ your head or a calculator
TileMap(0x04,0x09,0x0E,0x02,0x01,TownGate) // tile area is 2 tiles horizontal, 1 tile vertical
CODE $FF // terminates tile changes
CODE $00 // above
CODE $00 // above
VillageGate: // name of tile data group
CODE 0x80 0x00 0x00 0x00 // one tile [0x80,0x00] – use reference tilesets to obtain hex
TownGate:
CODE 0x24 0x08 0x28 0x08
CODE 0x00 // separator to prevent mixing of data
Hopefully you’re on your way to making your own chapter with all the knowledge you have. All that’s left is some finishing touches—first, I’m going to cover tile changes in detail, and then we’ll work on the finishing touches (using the Chapter Data Editor to finish your chapter construction).
Chapter 53: Map Tile Changes
THIS WAY OF DOING TILE CHANGES IS OUTDATED! I have kept it here for reference, but please use this better method instead!
http://serenesforest.net/forums/index.php?showtopic=26486
Here’s another tutorial that covers the same thing:
http://www.serenesforest.net/forums/index.php?showtopic=35944
Sorry but I don’t actually know how to used Tiled yet as I haven’t really needed to do so, and these tutorials seem to do a fine job of explaining it… so this is all I can offer. Best of luck! XP
----------------
Here’s the run-down of how I set up tile map changes to work in the EA. Although I’m sure NL could work this out much better than I have, here’s something that works and doesn’t require you to do it in hex, but together with the events in the EA.
org 0xC9C9C8+(4*0x??) // - Pointer to tile map changes
POIN TileChanges
org 0x????????
This repoints the tilechanges to your new tile changes and sets them to be at offset 0x???????? (you have to put in the offset, of course).
TileChanges:
TileMap(0x00,X,Y,XL,YL,TilePointer)
CODE $FF
CODE $00
CODE $00
Creates a label called ‘TileChanges’ which contains data for the tile changes. TileMap(blob) is a macro. The first byte in the blob is a sequential byte—it starts with 0x00 and goes up. Co-ordinates must be in hex (sorry) and are from the top-left of the map, as always. (X,Y) is the top left tile of the area that changes. XL and YL are the lengths in tiles to go horizontally (XL) and vertically (YL). “TilePointer” is the name of a label with the data for the tiles that it will change to. For example, if you have a 2 by 2 room that changes and the top left tile is (18,10) you’d do TileMap(0x00,0x12,0x0A,0x02,0x02,Room).
TilePointer:
CODE (Tile hex)
CODE $00
CODE (Tile hex) is the hex of the tiles. You write out the hex of the tiles from left to right (and then going down the rows). So if my tiles were 0xD0 0x04, 0xD4 0x0C, 0xD8 0x04, and 0x5C 0x07, for example (I just chose random tiles), I’d do:
Room:
CODE 0xD0 0x04 0xD4 0x0C
CODE 0xD8 0x04 0x5C 0x07
CODE $00
To know which tiles to use, you need to have the “co-ordinates” of the tiles. You need something to reference—that’s where there are reference tilesets. Unfortunately they are only for FE7, which is the bad part. You can find FE7 Reference tilesets in the documentation part of my website (yes, in the doc part, I know). Here’s what one looks like:
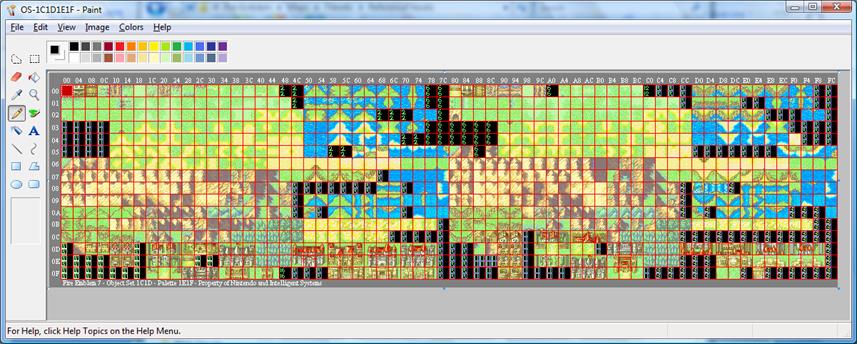
You can’t see it very clearly in my image because mine is resized, but at the top and to the left there are numbers. If I wanted say, the open chest tile, I’d use 0x04 0x00. That is, I use the column it is in (the numbers at the top), and then use the row it is in (numbers to the left).
The #define stuff is just the definition for the Tilemap macro. I wouldn’t edit it if I were you.
Now if that wasn’t good enough for you, you can check out Icy Toast’s old tutorial on tile map changes in hex. You can find it here- http://www.feshrine.net/hacking/downloads/icy_map_guide.txt (you have to go down the page to find the part on tile changes though).
Chapter 54: Chapter Creation Finishing Touches
Before we’re totally finished we should fix up some of the stuff in the Chapter Data Editor. It’ll help out with our chapter creation—we already have the maps and events, so now it’s onto the other stuff.
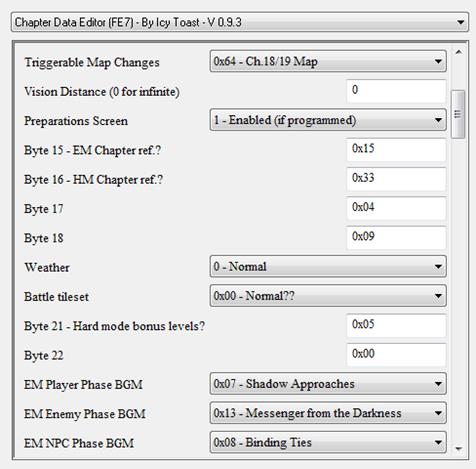
I’ve already been through what all this does, but anyhow… the triggerable map changes byte should be the one for your chapter and it should match the byte in the Tile Map Changes part of your events.
If the Preparations Screen is turned off and you try and load battle preps (ENDB), it won’t work. If it’s ON and you don’t load battle preps, idk what’ll happen, but it could screw up as well. Just make sure that the events match the setting in the CDE. If you used ENDB/GotoPrepScreen at the end of your opening scene, the game will try and go to the battle preps, but only if it is enabled. And, of course, if preparation screens are on, remember to have an event on turn 1 with the BlackOff code (for FE7, anyhow…).
Make sure your weather and battle tileset match your map/what you want them to be. Change the map music around as well if you want.
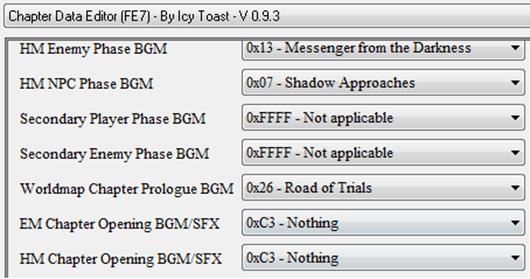
Just showing some more music you can change. It’s better to use the “Chapter Opening BGM” thing instead of your own event code to load the music at the beginning of the chapter. (I use 0xC3 “Nothing” in this screenshot, but I actually have custom music inserted over it, so it actually does play a song, mind you…)
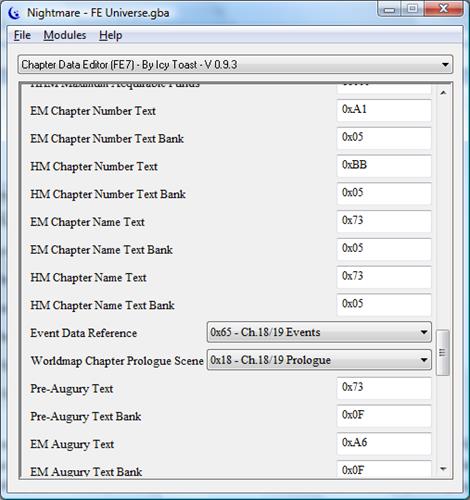
Changing your chapter name/number text is a good idea. Again, make sure your event data reference byte is right, and if you don’t want a worldmap chapter prologue scene, set that byte to 0x00. Also, take care of the augury text if needed (on later chapters in Eliwood’s mode Hannah or whatever her name is will appear and the augury option will be turned on).
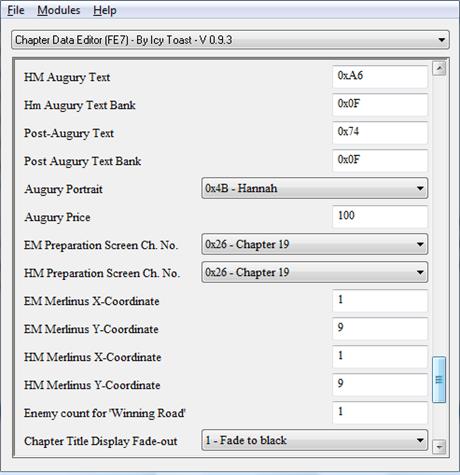
More augury text and the portrait and the price, obvious stuff. The Preparation Screen Ch. No. only has to be worried about if you have battle preps on. It’s what it displays as the chapter at the top.
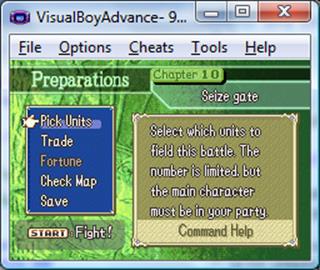
See where it says “Chapter 10”? That’s what I’m referring to.
Anyway, the Merlinus co-ordinates are easy, as is the Winning Road byte. The chapter title display fade-out is somewhat important because it dictates how your chapter starts off. If it’s ‘fade to black’, you need to use the black off code to fade out of the black and onto the map, IIRC. *alternatively you could TRY the FADU or REMA code, but I can’t say it’ll work*
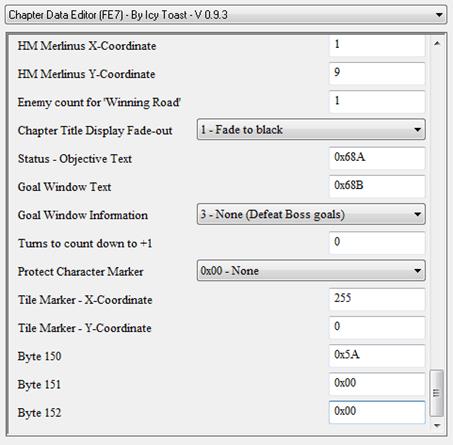
Just a few more things we might want to take care of. You’ll probably need to change your objective/goal text, and possibly the goal window information. If you are doing a defend or timed chapter of some sort, a turn count would be nice. For the protect character marker, see the original chapter on Chapter Data editing. The tile marker would be used in like an escape chapter to specify where the unit should escape to. XP
Now save any changes in the Chapter Data Editor and exit. Assemble your events (I say how in like the first chapter on Event Assembly—you just input the text, output the ROM, hit the game you are assembling for on the right, and hit “Assemble”) and fix any problems there are. Test your events out as well. There are many, many places you could make errors in, even if the Event Assembler doesn’t report an error in your events. (It only reports stuff that it can’t properly interpret—it doesn’t say whether the event will turn out like you actually want it to in-game, it doesn’t know that much.)
Here are some things to check if you’re having errors:
- Names of definitions. If you use say “IronLance” and it doesn’t work, that’s because the weapon is defined as “IronSpear”. The EA is case-sensitive. IIRC sometimes weapons like “Armorslayer” are spelled “Armourslayer” (although I could be wrong about this specific case).
- If you aren’t sure what a macro, definition, or code is, look it up. If you aren’t sure what a code does, see if I explain it, and if it’s one of the few codes I didn’t cover, ask a question about it on a forum or something.
- If the game says that certain things aren’t word-aligned, look at where the error starts. That is if it says “Opening_scene:” and everything beyond isn’t word-aligned, then look BEFORE that for something that might somehow mis-align it. The code ALIGN 4 should help realign stuff afterwards, by the way.
- If you can’t load even up to the main menu, it’s very possible that your chapter name is too long or something. Try changing it.
- If the game screen goes black after starting the chapter, you may need the BlackOff code. Otherwise, try changing the Chapter Title Display thing in the Chapter Data Editor (I will reference this as the CDE from now on).
- Always double-check your pointers in Nightmare and the such. Don’t forget about adding 0x08000000 to your offset.
- If it says “X is an invalid name” it’s likely because you didn’t actually make a scenic event, but you made the base event for it (an event that points to said event).
- If it says some code isn’t supported, check the format. This is likely to happen in Unit Data if you forget a byte or make a typo or something.
- Remember, use FADI code to fade into black, run some ‘background events’—stuff the players don’t need to/shouldn’t see happen, and then use FADU to fade out to either the map, a dialog background, or CG.
- If battle preparations aren’t loading, check the Battle Preps byte in the CDE, or check to see if you used ENDB (for FE7) or GotoPrepScreen (for FE7 and FE8, maybe FE6, idk for sure).
- It IS possible that the EA isn’t working properly somewhere. Make sure it’s not your own mistake first and then report it and see if a problem is the EA’s fault. The EA is pretty well done, but it’s easy to make a small error somewhere.
- When asking for help on events, post your script! Knowing how to ask questions is imperative. Post a script, a patch, and a savestate. That way people have the information to help you. Sometimes screenshots and videos are useful too.
- Don’t forget CODE 0x00, ENDA, or UNIT Empty at the end of a group/label/event. CODE 0x00 is for the main framework events (turn, character, location, misc, and ballista events), ENDA is for scenic events, and UNIT Empty is for units, if you forgot.
- If your map isn’t loading, there are various reasons why it may not load. It’s probably a pointer problem though. If it loads but looks weird, either your map is corrupted or you are using the wrong tileset. See the map chapter(s) for more information.
- Sometimes if you forget the ‘BlackOff’ code units may not load or move properly. There are many weird glitches that come along with not using this code, for whatever reason, so beware.
- There are many, many codes and macros that can be used. See if one of them can fit whatever you need. If it happens in the original game, it can probably happen in your hack too, so sometimes analyzing other events by disassembling is useful.
That’s all I have to say to help you for now. With that, I hope your custom chapters are success!
Chapter 55: Importing Tilesets
Ever wanted
to use a tileset from another game? This tutorial will teach you how. It’s
actually a very simple concept—locate the data in the game that has the tileset
you want, copy it, and repoint it. That’s it.
In this
example I’ll import the Valni tileset into FE7. First I load Nightmare, an FE8
ROM, and the event table editor. I locate the tile config, object, and palette
I want to use. In addition, I’m going to transfer a map, just so I can test
that the imported tileset works without having to make my own map.
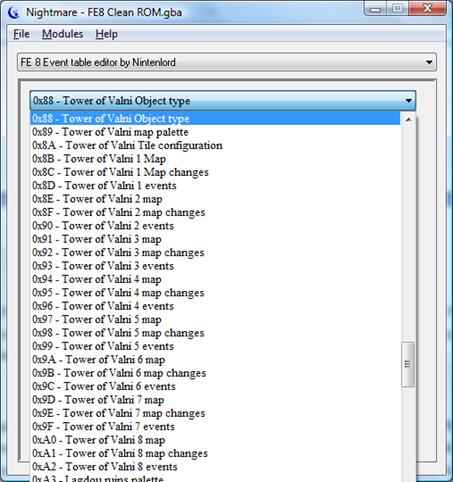
Wow, I sure
am lucky! All the offsets I need are right next to each other! I’ll start with
the object type. This is what it looks like:
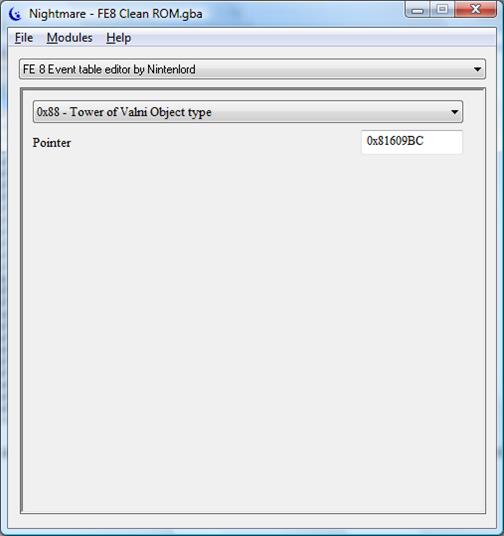
I have to go
to this offset and copy the data there. But how do I know to stop? Well, I have
to know by finding the offset of the object type that comes before it. This is
object type 10.
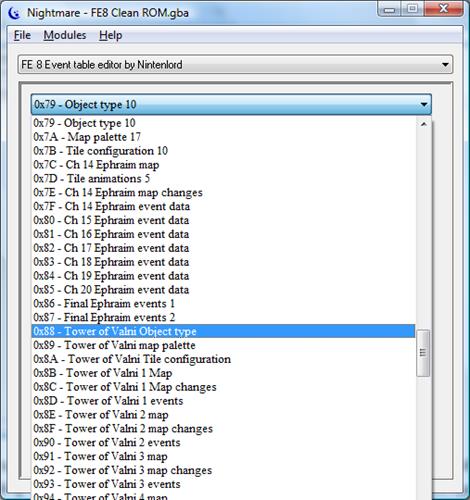
I go to
object type 10 and see the offset 0x8165F7C. So the Tower of Valni object type
ends at 0x165F7C. So I go to the offset 0x1609BC and copy the data from there
to 0x165F7C using a hex editor. Pic below:
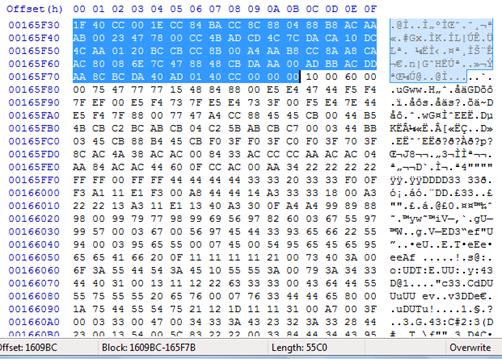
Then I paste
it into some free space in the game I am importing to. I will use 0x1040000 in
this example/for this tutorial.
Now I have
to do the same thing for all of the other data I am importing. Actually,
importing most data (aside from ASM, animations, and data that has pointers
inside of it) works like this, so importing a tileset is nothing special. =O
Once I’m
done copying the data from one game and pasting it into another, I have to
repoint the data in the other game. Since I am importing into FE7, I open
nightmare and load the Event Reference Module. I can replace an existing
tileset and repoint the old pointers to the new tileset info.

(This just
shows me repointing the Dragon’s Gate tileset to something else. You can also
replace other entries besids tileset entries but you have to edit the Chapter
Data Editor dropdowns to let you select said bytes, and you have to know what
you are doing in general… it’s too complex for me to explain it, sorry.)
Anyway, as
said, do that with each part of the tileset (and the map as well) and then
enter the bytes into the Chapter Data Editor per normal.
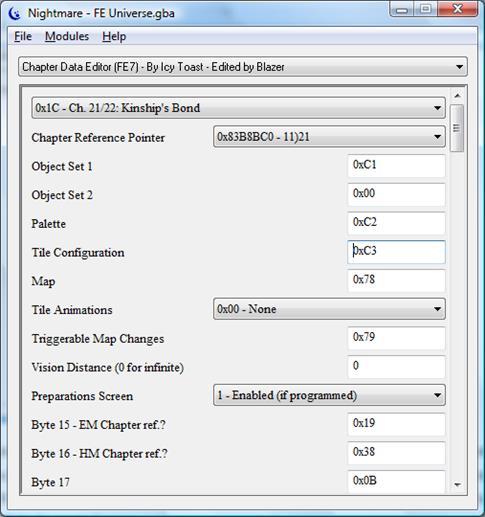
Err, you’ll
notice my thing is sort of kinda uh… “hacked” so that
there aren’t any dropdowns. This is because having dropdowns is often times
limiting because I can’t enter any value I want to. D=
Anyway, once
that’s done, load up your ROM, test your map, and enjoy your imported tileset
Chapter 56: Animation Importation
Chapter 57: Custom Battle Animations
– Frames
Okay, now
this is one cool aspect of Fire Emblem hacking, in my opinion. In fact, if you
want to have a good hack, you need at least a couple of these. In my opinion,
of course.
Part 1: Briefing
A custom
battle animation is just what it says. When you play Fire Emblem and you have
animations on and you use say, Eliwood, to attack a bandit, you see a
red-haired guy with blue armor stab a shirtless dude with an axe. Each of those
characters has their own ‘animation’. An animation, in case you don’t know, is
like a bunch of pictures shown right after each other to give the appearance of
movement. You can google for more details.
So yes, we
can have our own animations. That is some great stuff. But, you have to make
the sprites—the little guys who do the moving—as well as format the sprites,
which I will cover in this tutorial, and then script the sprites.
Where do you
get sprites? Well, you can always make your own battle sprites. You could also
use other games’ sprites, assuming they are 16 colors or less, because battle
animations must be 16 colors or less—and I mean the ENTIRE sheet must use the
SAME 16 colors THROUGHOUT—you can’t have each sprite use a different set of 16
colors. Usenti is a great way to reduce colors as it has a Palette
option called “Requantize” which will forcibly reduce colors, and it also has a
palette box to the right which can be used to manually edit colors.
You could
also request someone to make a sheet (collection) of sprites for you, AKA an
animation. But getting the sprites is YOUR problem. I can edit existing Fire
Emblem battle sprites myself, which is an important skill, because most of the
time in hacking, you have to be able to supply yourself with the things needed
to hack.
Part 2: The First Frame
Anyway, onto
actually making the animation. What we are going to do is create individual
still images of each part of the animation. Each image is called a frame.

That right
there is my first frame of Kelik, an original character of mine. He’s standing.
I call it my standing frame, AKA an idle frame. He’s not doing anything. He’ll
be in this position at the beginning and end of battles, as well as when he
gets hit, and just while he isn’t doing anything. It’s also the base frame I
use for every other frame. So it’s important.
How did I
get this frame? Well, I do everything in MS Paint, personally. To start, you
need a 248x160 image. 248x160 means the width is 248 and the height is 160. The
reason why is because the GBA screen is 240x160 pixels. The extra 8 pixels in
the width is where you can put your battle palette.
So I open MS
Paint and make my image with dimensions 248x160.
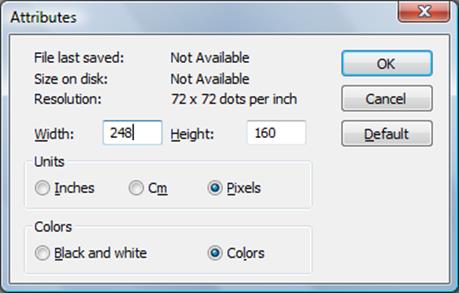
Then, I fill
in my image some color that has a very, very low chance of being a color in my
battle palette. Since Kelik is not green, I’ll put in green.

Okay, that’s
really all you should have now. Next, we put in our sprite. Now, we want our
sprite to fit in with the battle background, platforms, template, and other
animation. So we want to make sure its feet are at the right level.
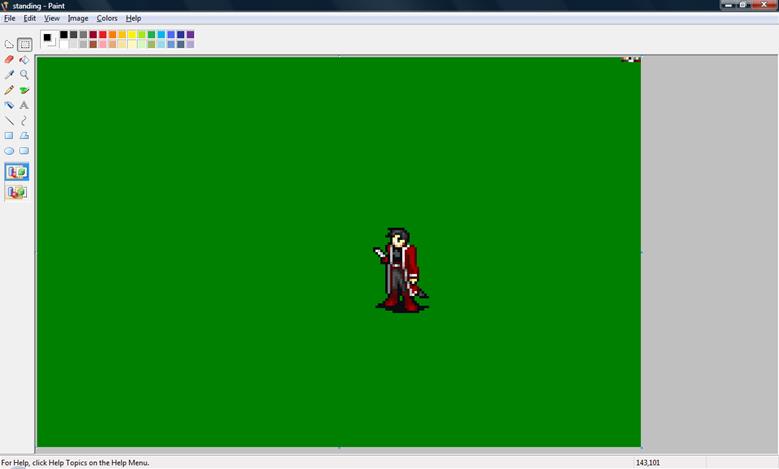
It’s hard to
see, but at the bottom-right it shows the co-ordinates of the pixel I am
hovering over (which you also can’t see, but my invisible cursor is at the
bottom-left of his left foot, our point of view). It says “143,101”, which is
about right. The near foot should be about 100 pixels down. The body should
start showing up about 140 pixels to the right. Granted, if you have a bigger
sprite, you might need to make some adjustments.
What you
must do is paste your sprite and then position it in that general area to get a
good alignment. Generally if the left foot is at about (142,100) you should be
good, but there’s no specific rule.
By the way,
an important feature you should know how to use is the opacity/transparent
control feature of MS Paint, which is to the left. When using the select tool,
you can make a color transparent, or see-through. The default color to be
see-through is white; however, you can right-click any color on the image and
make that the transparent color. You’ll know it’s the transparent color because
it’ll show up as the other color at the far-left of the color box at the top of
MS Paint. For example, if I right-clicked green (which is the background, so it
should be transparent), the color box would look like this:
The transparent color is circled in orange.
However,
your toolbox must also have the appropriate setting on for that color to be
transparent:

Do you see
the blue-highlighted box at the bottom? The top one will make the background
color (green) opaque, as in, it won’t be transparent. If you click the bottom
box, the color WILL be transparent. It’s that simple.
Anyway, back
to making the frame. You should have something like this, but with your own
sprite:
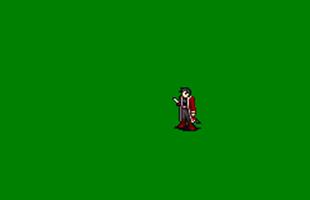
Next is an
optional part. I highly suggest you do it. I call it palette preparing. You
see, FEditor Adv can automatically detect your 16 color palette for you, but
sometimes, it just kinda acts silly and messes up. Other times, you may want to
have a specific order to your palette, e.g., if the animation you are inserting
is a Pegasus knight with axes, and you want it to be compatible (palette-wise)
with the lance Pegasus Knight animation. If you don’t
care for this, you can skip it, but don’t blame me if your palette acts weird later.
Part 1B: Palette Preparing
So, what you
are going to do is place all 16 colors of your palette in the top-right corner.
The very top-right color must be the background/transparent color, and the
colors after that can be in any order you desire. How to get the colors? You
can either manually use the eye-dropper tool and select each color and then
place one pixel of it in the top-right corner, or you can use the “Usenti
method”, which I invented.
To do the
Usenti method of palette preparing, you must first download and open Usenti. It
should look like this:
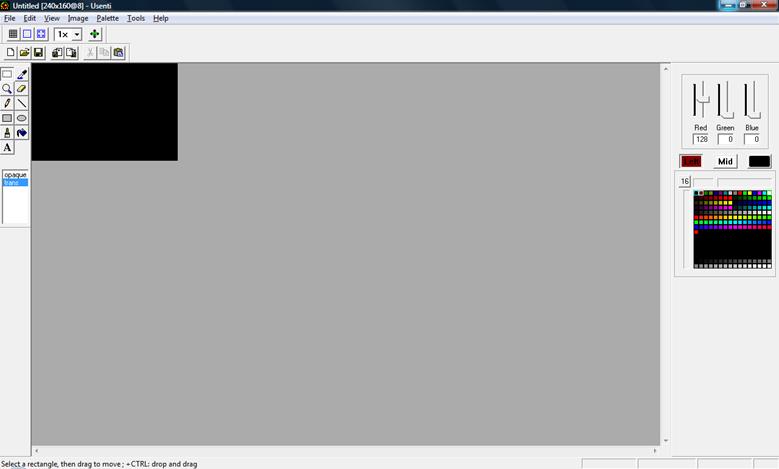
Then, drag
your image (standing frame) onto Usenti (or use File->open to open your
standing frame).
At the right
is a palette box. It has a list of all the colors used in that image. Because
battle sprites must be 16 colors or less, your palette should be no more than
16 colors. (Having more than 16 colors is a spriting issue, so if it IS more
than 16 colors, ask some spriter how to get rid of colors.)
Here is my
palette box:
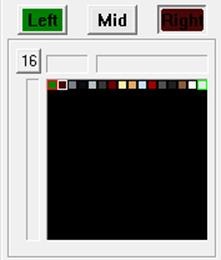
As you can
see, there is one row, or 16 colors. Now what you must do is take a screenshot
of Usenti by pressing the screenshot button on your computer. Then, open up a
new window of MS Paint, and paste your screenshot into that window. Then, using
the select tool, find the 16 colors in your palette box, select them, and copy
them. This is what I’m talking about:
![]()
Then, paste
that bar into your standing frame image, near the top-right, and zoom in, like
so:
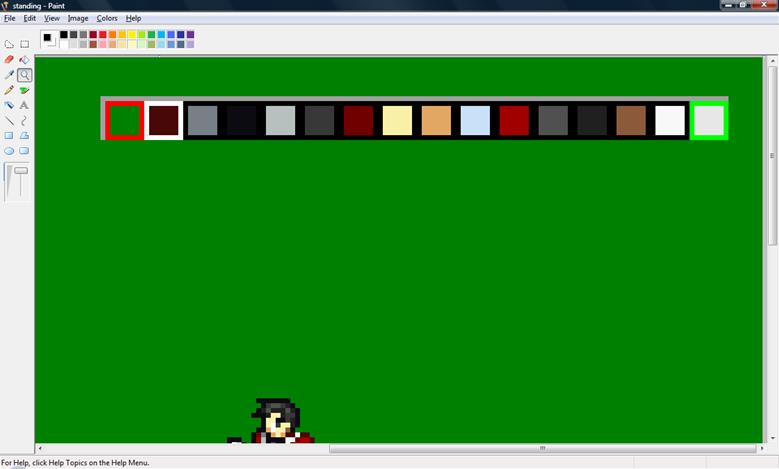
Now we have
some colors here that aren’t actually apart of the palette. I’m talking about
the red, white, and green outline, as well as the black stuff in between, and
the grey outline. We need to get rid of all that, which can quickly be done by
usingt he bucket tool and making all those dumb colors into the transparent/background
color (dark green in this case).
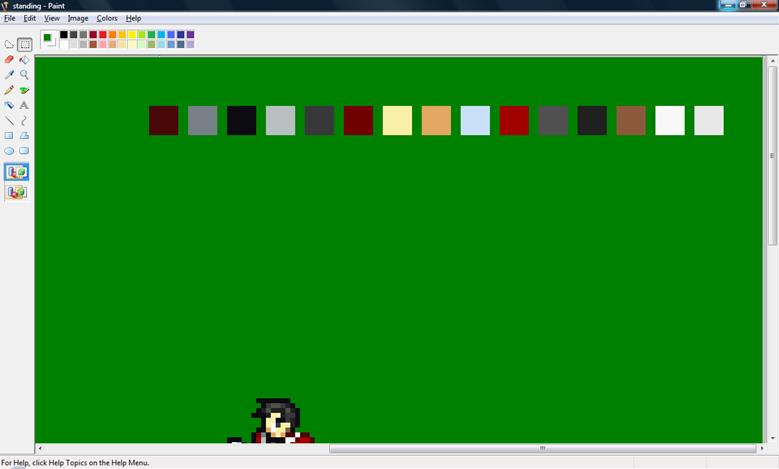
Great, we
have what we need. Now we use the eyedropper tool to select each color and put
one pixel of it in the top-right corner. Watch.

Do you see
the colors at the top-right? The very top-right pixel is the dark green
background color, with the rest of the colors to the left and below that. Just
make that the area of the palette space is 8x2 pixels (8 times 2 = 16 colors),
i.e. one row should only have 8 colors. If you by some chance don’t have 16
colors and have like, 14 colors, just make the rest of the area dark green
(transparent color).
Now, delete
the big squares of colors, and save your image, which should look something
like this:
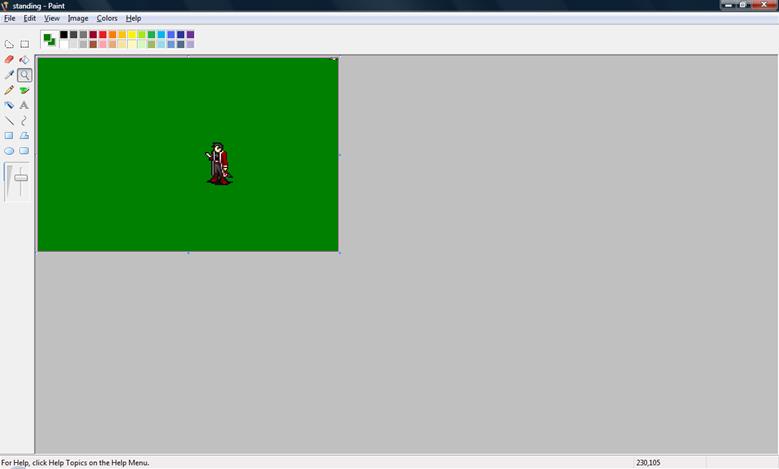
(Note: I’m
zoomed in at 2x or 200%)
Part 2: Testing the Foundation to Your
Animation
You now have
one frame. Wooh, that may have seemed like a lot of
work. In fact, your first time, it probably will be, especially since you have
to read my long, detailed explanations of how to do everything. But once you
know what you’re doing, it should only take 5 minutes, if that.
Now that we
have one frame, we can base every single other frame off of this one, because
the palette is set-up (well, maybe it is). However, to be safe, we are first
going to test your animation, to make sure that the first frame was made right.
WHAT?!
WE ONLY HAVE
ONE FRAME?!
Yes, but
that one frame will be the basis for every other frame, so it better work
right!
We’ll just
make a simple animation script. It starts with a text file, a simple notepad
file ending in .txt. Since my guy is named Kelik and his class is “Legend” and
he uses a sword, I appropriately called him Kelik Legend (Sword).txt.
Since I’m
nice, I’ll give you guys a template script. As long as you have one frame
called “standing.png”, it should work. Which reminds me—ALWAYS SAVE YOUR FRAMES
AS PNG’S. Why? Because BMP’s take up a lot of space, and I always use PNG’s, so
it’ll be easier to follow this tutorial if you do too. Plus, if I remember
correctly, FEditor Adv only accepts 24bit bitmaps, and I could explain that to
you, but I really don’t want to.
------------------------
/// - Mode 1
C03 -
C07 -
3 p- standing.png
/// - Attack
Frames
C04
C1A
C1F
/// - Frames
after hitting but before stopping to wait for HP depletion
C01
/// - RETURN
TO BASE
3 p- standing.png
C06
C0D
~~~ -
/// - Mode 3
C03 -
C07 -
3 p- standing.png
/// -
Critical Frames
C04
C08
C1F
/// - Frames
after hitting but before stopping to wait for HP depletion
C01
/// - RETURN
TO BASE
3 p- standing.png
C06
C0D
~~~ - Mode 5
C03 -
C07 -
5 p- standing.PNG
C05
4 p- standing.PNG
C01
4 p- standing.PNG
C06
3 p- standing.png
C0D
~~~ - Mode 6
C03 -
C07 -
5 p- standing.PNG
C05
4 p- standing.PNG
C01
4 p- standing.PNG
C06
3 p- standing.png
C0D
~~~ - Mode 7
C02
2 p- standing.PNG
C0E
3 p- standing.PNG
C01
2 p- standing.PNG
C06
2 p- standing.png
C0D
~~~ - Mode 8
C02
2 p- standing.PNG
C0E
3 p- standing.PNG
C01
2 p- standing.PNG
C06
2 p- standing.png
C0D
~~~ - Mode 9
3 p-
standing.png
C01 -
~~~ - Mode
10
3 p-
standing.png
C01 -
~~~ - Mode
11
3 p-
standing.png
C01 -
~~~ - Mode
12
C03 -
C07 -
3 p- standing.png
/// -
Attack-That-Will-Miss Frames
C04
C1F
/// - Frames
after hitting but before stopping to wait for HP depletion
C01
/// - RETURN
TO BASE
3 p- standing.png
C06
C0D
~~~ - End
Animation Data
-------------
Everything
between the dashed lines is part of the template script, so copy and paste it
into your text file. Then save it.
You now have
a working script. You don’t know what it does though, because I haven’t taught
that, and I don’t plan on teaching it. Ever. In this chapter. :P
In all
seriousness, all it does is show the standing frame for literally every single
animation mode. But that’s cool enough for us. Let’s crank up FEditor Adv with
our ROM so we can insert this bad boy.
Oh, but
quickly, a review of what we have:
-
one
frame called ‘standing.png’ with the sprite and the palette at the top-right
that we spent forever making
-
a
script that we gave a nice name to with the codes I provided you
That’s it.
And both items are in the same folder, because I said so (hint: put them in the
same folder).
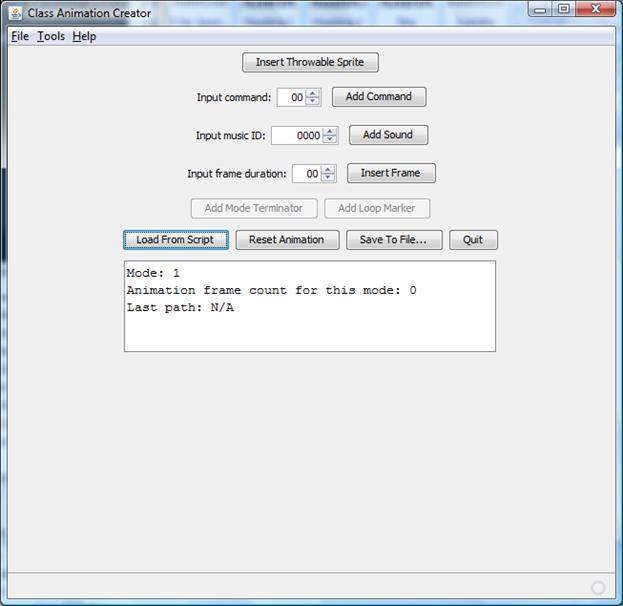
OSHI- IT’S FEDITOR ADV
Yes it is.
This is the “Class Animation Creator”. What you want to do is hit the “Load
from Script” button. Then, select your .txt file animation script. FEditor Adv
will run through it and stuff. If your script is error-free and so is your
image, nothing will come up. If some error does, here’s what you should check:
-
size
of image (should be 248x160)
-
file
type of image (PNG? if that somehow doesn’t work, try a 24bpp bitmap)
-
palette (if you didn’t prepare the palette,
try doing that. If you did, make sure it’s less than 16 colors!)
-
script
is .txt file with what I gave you
-
Blazer
(check to make sure he isn’t being dumb and didn’t forget something or mess up something?
if it’s none of the above it might be this… >_>)
At the end, in the small dialog box at the bottom, it should
say “Mode: Complete” if it’s all done.
NOTE: IF IT GIVES IN AN
ERROR YOU MUST HIT “RESET ANIMATION” BEFORE YOU TRY TO INSERT THE ANIMATION
AGAIN. I ALSO SUGGEST HITTING “QUIT” AND RELOADING THE EDITOR IF FEDITOR ADV IS
GIVING YOU PROBLEMS. (If you’re wondering why I bolded that, I got
an e-mail saying that someone got stuck for 1-hour because they didn’t; and
admittedly it’s not the most obvious thing in the world and I should have
mentioned it, so yeah, here it is.)
Here’s the dumb part. You have to save the animation by
clicking “save to file…”. I usually make a new folder
called “Animation Data” within the folder where I am keeping all my frames and
the animation script, and I save it in there. Just name it something logical
and then go to the Class Animation Manager in FEditor Adv.
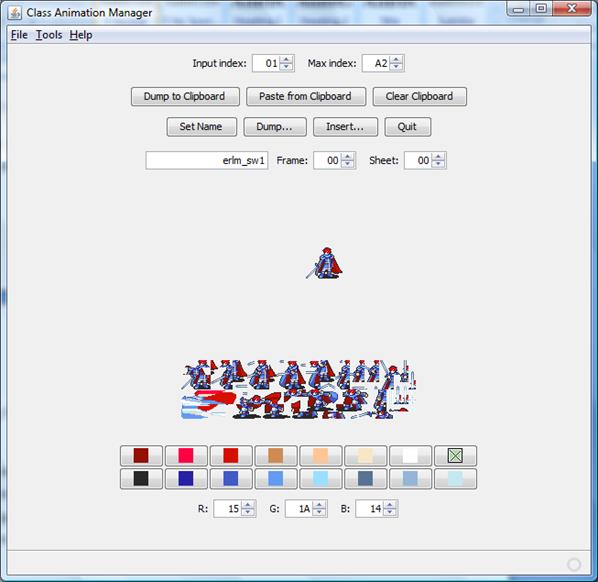
Okay, so now you have to find the animation you want to
insert over. You type in a new number into the “Input Index”, which neatly
corresponds to the animation list supplied in the folders of Nightmare Modules.
Once you find the animation you want to replace, you hit
“Insert” and find that one file you just saved with the “Class Animation
Creator” part of FEditor Adv. Let FEditor Adv do it’s
shit, then save your ROM with FEditor adv.
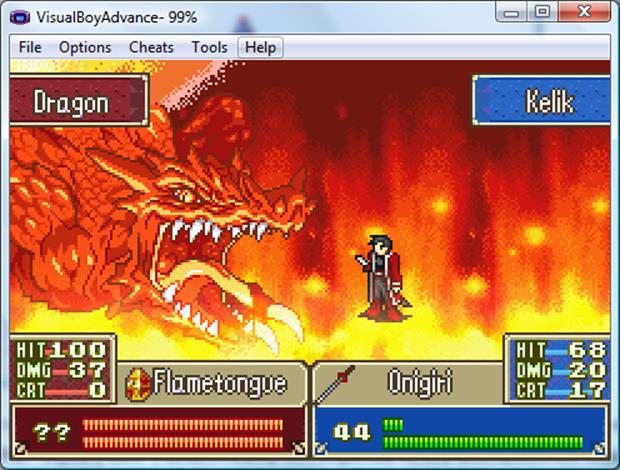
If all goes well, your guy should be standing, kinda like
this.
And that’s all the sprite should be doing, because you only have one
frame. If it’s just doing that, and it’s looking hella boring, that’s great
news. We can now go on and make every other frame. If there are some issues, we
gotta fix them.
The main issue that comes to mind with this is the palette
issue. You see, a custom battle animation has its own palette. You can force a
character to use that class’s battle animation’s palette by setting their
palette in the character editor to “0x00”. Look:
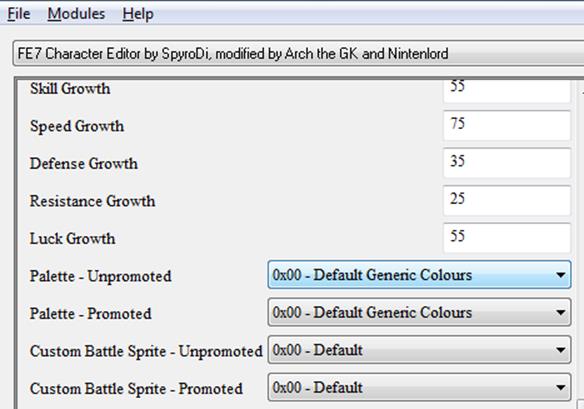
You see the blue box? It’s set to “0x00” because this
character has a custom animation. The animation we are inserting has the
palette for us, so we don’t need to assign the character another palette. This
may or may not be the case for your animation.
If it’s another problem, I can’t be a psychic and predict and
address it here, so I suggest posting on a forum or something to get some help
with it. Make sure to post your animation script and the frame (and possibly a
patch that lets one test the animation quickly or a screenshot showing what it
looks like) or else there’s no way to really tell what the might problem be.
Anyway, back to the ideal situation—everything works. Now we
exit out of FEditor and Nightmare and go back to that standing frame in MS
Paint.
Part 3: Making the Rest
of Your Frames
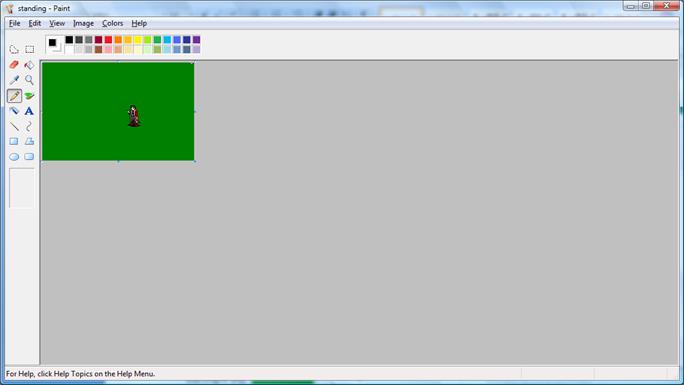
Looking
good, kinda. Now, we have to make the rest of the frames. You can start with
whatever mode you want—attack, critical, range, range critical, or dodge, but
ultimately, every time you do a new animation mode (a part of the animation),
you should start with the standing image.
Now, if you
already know how to animate images, this is going to be a piece of cake. If
not, well, it’ll take some practice and tweaking to get right, but have
patience.
You need to
copy the sprite from your sprite sheet and paste it onto MS Paint. Using the
transparency feature of MS Paint which I explained a while ago is quite useful.
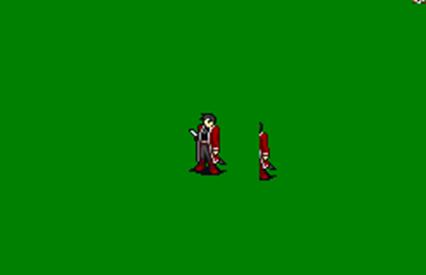
Can you see
how the selection of Kelik I copied over has some green, and that green is
covering over the old Kelik? It’s really hard to position my new pose over the
old pose like that. So I turn on transparency, and wala:
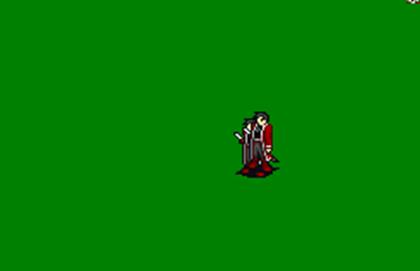
Now I can
drag him around until I get him to align with the last sprite. In this case,
he’s only supposed to move his chest/head while dodging (because he’s slick
like that). Since his feet aren’t moving, I can position the feet of this new
pose over the feet of his old pose.

Wait, I can
still see his old pose hiding behind there! Yeah, that’s a problem. That’s why
once you align the new sprite/new pose over the old one, you can change the
transparency mode to make it un-transparent, which will get rid of the old
sprite. You should see what I mean:

(Notice how
transparency is turned off using the box on the left toolbar)
Okay, we
have another frame set-up. But it’s still called “standing”.png. That’s a
problem. Using file->save as, save it as something else. Since this pose
happens to be a dodge pose, I’ll call it “dodge1.png”. Thankfully, I’m lazy and
I only made one dodge sprite, so there isn’t even a “dodge2.png”. Haha.
Now that I’m
done with that animation mode (that was quick), I’ll do another one.
Doing the
range mode frames is pretty easy, because chances are, your character won’t
have to move much. That is, you don’t have to worry about whether a weapon will
actually hit an enemy, and there probably won’t be much feet movement, or
jumping, either. My point is, I don’t really have to cover that too much—just
put the frames and know that the game will take care of showing the actual
spell animation (for example, when the ice tornado forms and the ice block
shatters in Fimbulvetr—the game will
take care of that for you).
Physical attacks, however, are a bit harder.
If you’re a mage, your attack animation and ranged animation are the same. If
you’re like Kelik, and you’re a swordsman, your ranged animation is only used
for ranged swords, while your attack animation is used for melee (close-up)
attacks, so it’s different.
What makes
physical attacks harder is just keeping track of the sprite’s movement. You
don’t want it too high or too low. Remember, foot level is about 100 pixels
down (it’s not some difficult number like 126.38 so no complaining). Your guy’s
sprite should start about 140 pixels to the right. And the enemy’s center is
typically at about (90,85) so that is where a weapon
should slash through or whatever, approximately.
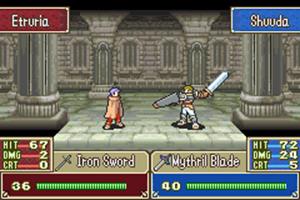
If you look
at an actual screenshot of a game (even though this is a hack), you can see
that there really isn’t too much space between the two enemies, so keep that in
mind.
Here’s a
screenshot of one of my attack frames. This is when the enemy is actually being
hit.
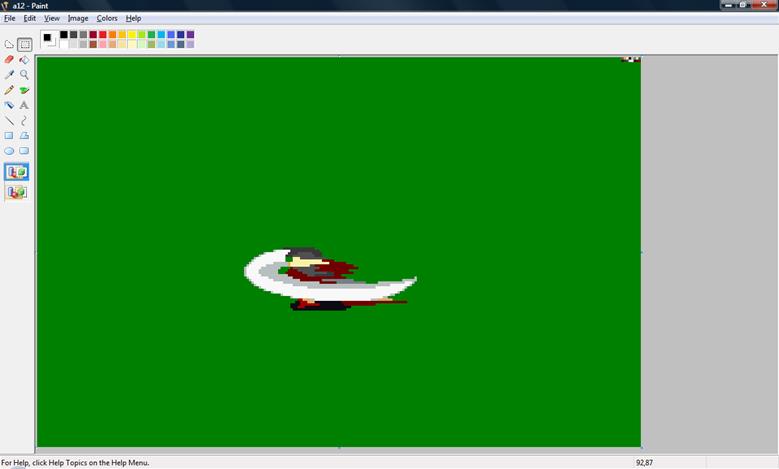
It’s hard to
see as usual, but at the bottom-right is the co-ordinate (92,87),
which is ALMOST at what I suggested (the co-ordinate (90,85)). You could check
the feet too and see that it’s at about 100 pixels down.
What is the
significance of all this info? Why am I telling you? Well, during your attacks,
you have to make sure the sprite will actually reach the enemy, but not have
its sprite go too far into the enemy, or make it look like your character’s
weapon is just BARELY hitting the enemy. Not only that, but you need to make
sure that when your character moves back to his/her starting position, they are
at the right place—which is why you always use your standing frame as a base to
make sure your animation flows smoothly and that all other frames are aligned.
Now, we’re
ALMOST done learning about making frames. I know, we haven’t even gotten to the
coding, but thankfully coding is easier than this, or at least not as
time-consuming.
One
important thing I must show you how to do is piercing frames. The first example that comes to mind is a Knight.
When he stabs an enemy with his lance, the lance doesn’t just appear right over
the enemy sprite. It kinda actually looks like the lance is going through them,
even if there is no blood.
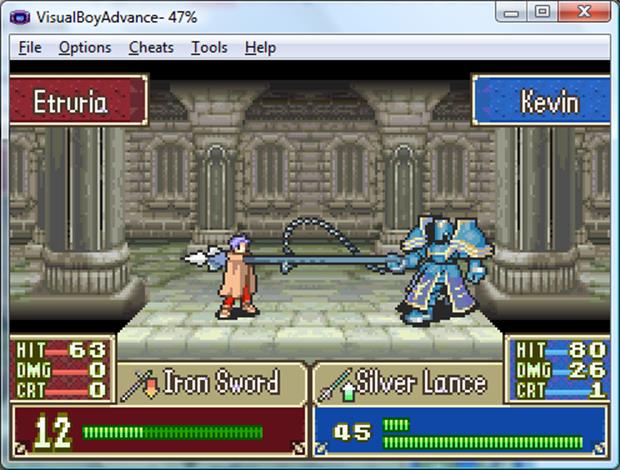
This is not
the example I was talking about, but whatever—you can see that the thief sprite
somewhat covers the General’s spear a little, the point being it looks like the
weapon’s going through him. Well, you have to make a special version of a frame
for this effect.
This new
frame will have a size of 488x160. You may have guessed already: the frame
consists of 2 screens, each being 240x160, side-by-side, for a (240x2)x160 or
480x160 image, with an 8 pixel column for the palette, just like before.
Now, I’m
gonna have to be a bad kid and switch my example animation to another one,
because Kelik, the red-jacketed sword guy I’ve been showing, doesn’t use
piercing frames (he slices, doesn’t pierce).
First, this:
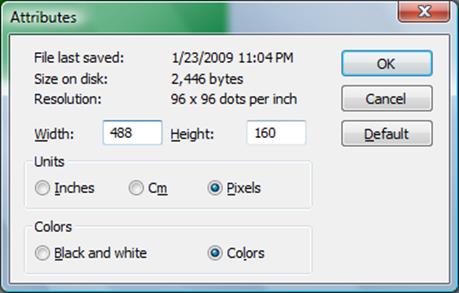
Then, this:
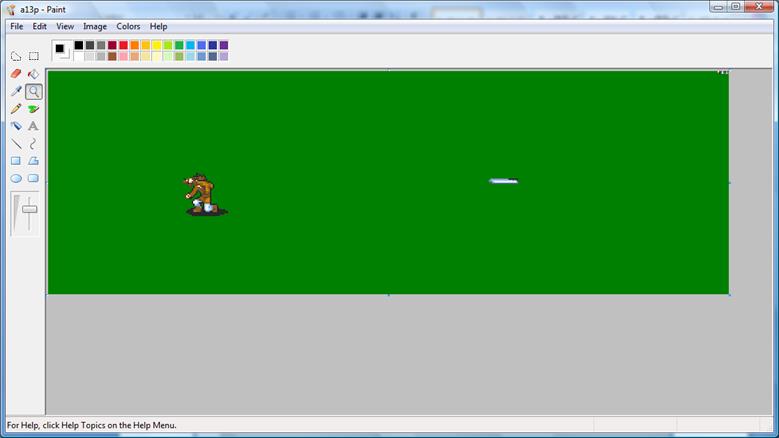
(Note: the
name ‘a13p’ stands for ‘attack13pierce’, as in, attack frame #13, which is a
piercing frame.)
This is
actually a very easy-to-do maneuver. The left portion of this frame is
everything that DOESN’T pierce. It’s the 240x160 image of everything but the
weapon. And the right portion of this frame is the sword; it pierces. If there
is an enemy there, the enemy’s sprite will have priority over the sword, making
it so that the enemy sprite/body covers the sword. Making it look like the
sword went through the sprite… in short, piercing.
Once you set
that up, you’re good to go. With piercing frames out of the way, you should now
know how to make all your frames for your animation. I need you to do that, so
we can FINALLY head on to the next chapter, which will cover animation scripts,
and how the game will receive your animation.
Chapter 58: Custom Battle Animations
– Scripts
Oh my. In
the previous chapter, you made your animation frames. Now, we have to code
them. That little template script I gave you will be the basis for that, but
your REAL animation script won’t be that simple.
First, you
need to go to FEditor Adv’s doc and find the very important list of 0x85
commands to use. I could explain the significance of the name, but it won’t
help you with your hacking. In case you can’t find it on your own, it’s in the
“Battle Animations” folder, which is in the “doc” folder, which is in the main
folder of FEditor Adv. It’s called “0x85 Command Usage”.
Now go, read
it. Yes. Read the ****ing doc.
I just
pulled a Xeld. Had to do that at least once in this tutorial.
Okay, I will
now go ahead and explain the template animation script I gave you, since you
read the doc and you have some background on a few things, maybe.
First, there
are 12 animation modes. Each mode needs its own codes and has its own significance,
except for modes 2 and 4. I’ll explain each in order, so I’ll get to modes 2
and 4 very shortly.
Mode 1 is
the attack mode. It’s the main attack that hits and does damage. But it’s not a
critical, and it’s only used in melee (close-up) fights.
Mode 2 is
the above, but its sprites are layered BEHIND the enemy. This is how piercing
is done: in the piercing example in the previous chapter, the piercing sprites
are put behind the enemy, if need be. It’s automatically coded for you based
off of the frames and mode 1, so no worries.
Mode 3 is
the critical attack. It works the same as mode 1, but activates with a
critical.
Mode 4 works
the same as mode 2, but applies to mode 3. Consider it the piercing mode for
critical.
Mode 5 is
for ranged attacks. This means attacks that load spell animations, but don’t
actually hit themselves.
Mode 6 is
the above, but for critical ranged animations.
Mode 7 is
the melee dodge. Close-range dodge. Enough said.
Mode 8 is
the ranged dodge, for ranged attacks. Kay?
Mode 9 is
the standing animation. It’s just for standing. Yes, you can have an animation
for standing guys, but good luck getting it to work right.
Mode 10 is
another standing animation. Or so the doc says. If I knew what the difference
between mode 9 and mode 10 was, I forgot, or else I’d tell you.
Mode 11 is
the last standing animation, for ranged attacks. If by some chance your
character stands differently when he’s farther away from an enemy, then by all
means use this mode to make your character stand differently.
Mode 12 is
the missed-attack animation. It’s what happens when an attack misses. It’s
usually very similar to the normal attack animation.
Okay, now
that we know that, I’ll cover how to actually code each mode. To be honest,
once I teach you the first mode, the attack mode, the rest will be a piece of
cake, because the key to doing each mode is using 0x85 commands to spice up
your animation.
0x85
commands can add sounds, special effects, and other stuff. But mainly sounds
and special effects.
In mode 1
for the template, we have:
/// - Mode 1
C03 -
C07 -
3 p- standing.png
/// denotes
a comment. So “- Mode 1” is ignored
C03 and C07
are important codes. Just keep them. (NOOO!!! DELETION!!! EVARRRRR!!!!!!)
3 p- standing.png is important. It’s the
graphic-loading code. So it’s very important.
“3” is the
time for the frame to be shown. “3” isn’t very long. When you test your
animation, you’ll see for yourself. It’s hard to tell you how long “3” is, so
you’ll just have to play around and test different values and find out what
looks good. Just know that the time must be a positive integer greater than 1
(e.g. 1, 2, 3, 4, 5… etc… why am I counting?).
“p” is just part of the code.
“standing.png”
is the name of the frame to use. Make sure the frame is in the same directory/folder
as the script, or else you’ll have problems.
Now, onto
explaining the rest of the script:
-------------------------
/// - Attack
Frames
C04
C1A
C1F
/// - Frames
after hitting but before stopping to wait for HP depletion
C01
/// - RETURN
TO BASE
3 p- standing.png
C06
C0D
---------------
C04 is just
what the doc says. It starts HP depletion. Keep it always when there is a hit.
C1A is the
normal hit code. Just keep it next to C04, please. Oh, and you can only have one of these.
C1F is the
hit sound. It actually changes depending on whether the attack is a critical or
not and stuff.
C01 is the
code that says “wait for HP to deplete completely before continuing the
animation”. Whatever frame is right before that is the frame that will show
until the HP is done depleting.
C06 says
“start enemies animation sequence”. And C0D ends the
animation. So logically, you will most likely just want them next to each
other.
That’s the
basis to the attack animation. It’s quite simple, no? You can add lots of frames
(although if you have too many frames in an animation, the game won’t be able
to take it, and problems that I cannot help you with will ensue), and you can
also use other codes listed in the doc (0x85 command usage text file).
For example,
the doc says “0x1B Play quick "heavy step" SFE”. How do you use that?
Simply put a “C” in front of the hex and give it its own line. Like so:
C1B
That’s it.
Then it will play that sound (which happens to be a stepping sound, which you
will probably use in animations that move).
If you don’t
know what a sound sounds like, just test it out with your animation and find
out. Experiment with the codes if you need to.
Oh, there’s
one thing the doc might have missed out on though. There is a special code that
works like this: “S####”. ‘S’ stands for ‘sound’. It’s a sound code. Xeld made
a special hack that made a new code that will play any sound. “####” is the hex
of the sound. Oh, and it can play music, too. If you need to know the hex of
the song or sound or whatever, just look it up in a music list that comes with
Nightmare Modules.
Last
thing—if your attack has multiple hits, you CAN’T USE C1A. So you have to use
C51, which is like a ‘fake hit’. It makes the screen flash white, but it
doesn’t add those blue things. But oh well—it’s still cool. Using C51 and C1F
in conjunction will give the illusion that the enemy is being hit. The idea is
like so:
ATTACK FRAME
ATTACK FRAME
C51
C1F
JUMP FRAME
RAISE SWORD
UP
SWING DOWN
FOR THE BIG FINAL CRUSH
C04
C1A
C1F
Where the
“C04 / C1A / C1F” is the final hit, where the HP finally depletes.
Now that
mode 1 is done, comes explaining the rest of the modes, which will be easy.
Mode 2 will
be done for you.
Mode 3 works
the same as the critical, except instead of C1A, it uses any value from C08 to
C0C. I usually just use C08 because I know it works and while I don’t know what
the other ones do, I am guessing that it is just a difference in the color of
the critical hit effect.
Mode 4 will
be done for you by FEditor Adv as well.
Mode 5 is
the ranged mode, as we know. Instead of a hit with C04 / C1A / C1F, you put
“C05”, which loads the spell animation. And that’s all there is to it—C05 will
take care of the spell/ranged weapon or whatever.
Mode 6 is
the above, but the critical. You know how to put frames together and add in
codes to make it look and sound cooler, so go do that.
Mode 7 and 8
will probably be the same, since they are dodges, and most people don’t really
care to make their dodges different. Put the actual dodging frames after C0E,
and the return-to-standing frames after C01. Remember that the frame before the
C01 will be the frame that the sprite stays on until the move is “completely
dodged”… if that doesn’t make sense, don’t worry about it. Heheh…
Modes 9
through 11 can be some animation, but just know that the animation is just the
idle frames, so it shouldn’t be anything special. I usually just keep it as my
standing frame, which makes 3 modes automatically done, because all the
template does is use standing frames in the first place.
Mode 12 can
just be a copy/paste of mode 1, but with the attacks taken out. Meaning that,
if you have multiple attacks, you need to put the C04, which will make the
enemy do their dodge, during the first attack, or else it’ll look like *slash
slash slash* *dodge the final slash, no damage* and it’ll just be wtf.
So if your
animation looked like:
C03
C07
ATTACK
FRAMES
C51
C1F
MORE ATTACK
FRAMES
C04
C1A
C1F
OTHER ATTACK
FRAMES
C01
RETURN TO
BASE
C06
C0D
----------
It’d turn
into
----------
C03
C07
ATTACK FRAMES
C04
MORE ATTACK
FRAMES
C01
RETURN TO
BASE
C06
C0D
-----------
If you
didn’t notice, I moved the C04 back to BEFORE the first attack (remember, an
attack can also be C51 / C1F), and I got rid of the hit sounds and hit effects,
or else it’d look and sound like they were being attacked even though they
dodged.
With mode 12
done, your animation script is done! Save everything and check for errors. You
may have written something and forgot to comment it out, or you may have
accidentally forgot to press enter and might have something like “C51C1F” on
one line instead of two lines. You may have also typed “c23” instead of “C23”,
which matters—the “C” in commands MUST BE CAPITALIZED. Also make sure you typed
in all the file names for your frames right.
With the
proofreading done, you can now insert your animation, which you already know
how to do, because you once tested the very basic animation in the previous
chapter. Insert it, and test it, and see how it is.
Is it too
fast? Make the timings larger. Is it choppy? Well, you’d have to add more
frames, so that’s a spriting issue. Do the sounds work right, and how well are
they timed? Try playing around with the order and timings of things to fix
that. Are there too many effects, or not enough? Delete/add commands as need
be—the 0x85 command usage list found in FEditor Adv’s doc IS YOUR FRIEND.
Lastly, are the frames aligned well? If not, go back to the frames in MS Paint
and try and figure out what’s wrong.
Touch-up
your animation and make sure it’s looking nice and spiffy. Be sure to test out
the attack, critical, dodge, ranged, and ranged-critical animations, and
anything else that might need testing.
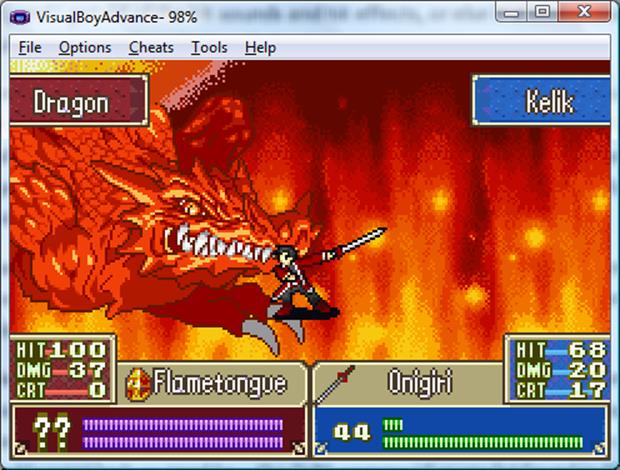
Mine looks
pretty nifty. He looks like he’s having a staring contest with the Dragon! D=
Wait!
There’s ONE LAST THING!
Your
animation needs a disarmed animation. I’ll just tell you how to do it—now that
you’ve done the main animation, you already have more than enough skills to
code the disarmed. Simply make the disarmed frames based off of the standing
frames, and then keep the bear bones to every mode, while replacing all
standing frames with the disarmed standing frames, and making sure to remake
the dodge frames into the disarmed dodge frames. Since there are no attacks,
you’ll save yourself trouble if you just make the attack modes just have one
frame of your character standing there disarmed—no one will know, and it saves
space and time (since FEditor Adv doesn’t have to process all the attack frames
and codes).
That’s all
there is to it. I know I say that and you’re like “that’s all? that took forever!” but once
again, even a complex animation with 50 frames could only take a few hours once
you know how to do it. I’ve probably (I never timed myself) done animations in
less than 30 minutes, or even quicker, for short ones that only have a dozen or
so frames—so it’s really not that bad, and in the end, it’s worth it, because
there’s nothing like enjoying your awesome animation in-game and sharing it
with others who play your hack. ^_^
Chapter 59: Custom Spell Animations
Oh my.
Custom spells. It is one of the hardest things to do in hacking, and one of the
most mysterious aspects of hacking. Very few people have done custom spells
successfully, and very few know much of anything about this.
Of course,
this is where this chapter comes in. This is actually the very final chapter I
am writing for this tutorial, despite the order. Every other chapter has been
completed as far as I know (there are so many I can’t be sure). This is also
going to be one of the lengthiest chapters, despite the fact that I am going to
try and be concise and straight-forward as much as possible. Before you
advance, please make sure of the following:
-
You
are able to insert your own custom battle animations. Many of the aspects of
battle animations are very similar to spell animations. If you cannot do the
former, you have little hope of doing the latter.
-
You
have a lot of free time and patience.
-
You
should have some basic knowledge of the following terms: opaque, transparency,
background, foreground, object, translucent, frame. Knowing the definitions and
understanding them should be sufficient.
-
You
have some spell sprites to work with. I of course cannot supply you with those.
It is up to you to make or find them.
Alright. Let us begin.
Before we
start, we must check the spell sprites you have. The spell sheet as a whole
does not have to be 16 colors, but each individual frame has to be 16 colors.
Thus we will not be quantizing colors to change images to 16 colors (if they
aren’t already) until we have made the individual image first.
You will
need FEditor Adv and an image editing program. I suggest Usenti if your
computer supports it as that is what this tutorial will use. It has the ability
to reduce colors and do basic graphic operations in a simplistic manner. It was
also intended for GBA use, if you didn’t already know, and so it’s just perfect
for GBA hacking. If Usenti does not work for you you either A) need to know how
to do the same things with a program like Photoshop, PSP, or Gimp or B) are
screwed. This is why I always stick to Windows, that and all the other reasons.
But anyway
before I get e-mails about how Macs are better (>________> longface)
let’s get on with the show.
Create a
folder for all your spell frames. Include everything in there—reference videos,
the spell sheet, the README, and a blank text file named “[Spell Name] Script”
where you will code your spell script. In my case I am actually doing the
entire process for this tutorial (not just faking it) and am inserting a spell
called Shaver. The spell frames are ripped from Fire Emblem: New Mystery of the
Emblem ~Heroes of Light and Shadow~, and thus they have more colors than the
GBA supports. They are also not in the perfect format for GBAFE. Thus the
process will be thorough and I may do something that aren’t necessary for you
but may be necessary for certain spell animations.
tl;dr I’m
trying to covering everything.
There are
two main layers for spells: the object and the background. The object is always
opaque. The background can be set to be translucent. The level of translucency
is decided by the script. Thus you won’t be doing any fancy photo-shopping to
create translucency. It will all be done by the game.
You must
divide your spell sheet into these two layers. This is up to you as this is a
spriting matter. Decide which is which.
To start,
we’ll want to test a very basic spell script. Start with two blank frames. One
will be a blank object frame, and the other will be a blank background frame.
To do this you must know the dimensions of the frames. The documentation on
spells that comes with FEditor Adv will help with this (and possibly other
things) so take note of this.
Object: 
Background: 
I named mine
“blank” and “blankbg” respectively for sake of ease. You may just want to name
yours something even shorter like “bo” (blank object) and “bbg” (blank
background). I’m too lazy to rename mine though.
If you’re
using the doc version of this tutorial you may be able to just copy the images
into an image program and save them. If you’re using the HTML version (online)
you should be able to right-click them and hit “save image as…” to save them.
If you’re using the PDF version all I can do is suggest you try another version
or simply make an image knowing the dimensions, 488x160 and 264x64
respectively. The background color does not particularly manner but I suggest
making it something that will not clash with any of the spell frames (or
perhaps it should clash to standout and rather not blend in with any of the spell frames) and something that will most
obviously be the background color.
When you
have those two frames copy this into your spell script text file (just a
standard .txt file):
/// - Start
Animation
C00
C00
C00
C00
C00
C00
C00
C000040
O p- blank.PNG
B p- blankbg.PNG
1
C00001A
C1F
~~~
O p- blank.PNG
B p- blankbg.PNG
1
/// - End
Animation
Noting that
“blank.PNG” and “blankbg.PNG” change depending on the filename and extension of
the blank object and blank background files respectively.
Now open up
FEditor Adv with your ROM. I always use a testing ROM for my animations and
back-up the test ROM so that if something screws up, nothing bad that I can’t
fix will result. I always perfect it in a test ROM and if your hack gets messed
up because you tried to do this straight on your real hack, don’t blame me.
Though you can’t blame me for any of this as this is just a profit-free guide
to hacking and you’re using it out of your own will with no responsibility or
liability on me.
ANYWAY…
Open up the
scary spell animation inserter under tools. Should look like this:
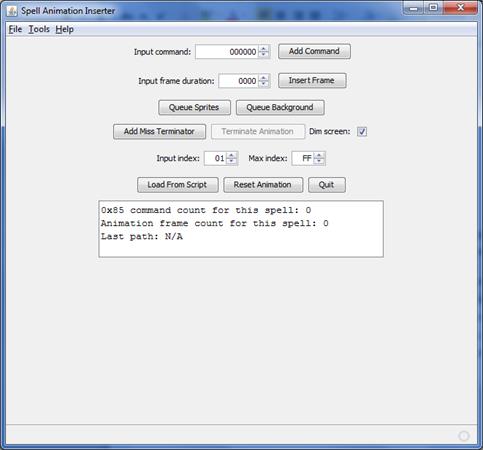
Don’t freak out. Most
everything on the top half is for manually making spells. We are using a script
so this is not necessary. Scripts are much, much better—much more convenient,
much easier to use, much easier to fix, much easier to share. So just forget
about everything before the “Add Miss Terminator” button, including that
button.
“Max index” refers to the max
# of spells you can have, which you can change to increase the amount of spells
you can have. (Derp)
Input index refers to the
spell animation hex… that is, which animation you’re replacing. You should be
able to find a list with any spell association editor, that is the nightmare
module named so, though I believe it’s oddly called the Custom Item Animation
List module for FE8—regardless here’s an excerpt from the FE8 list (named
Ranged Attack Animations.txt)
74
0x00 -
Nothing
0x01 - Hand
Axe
0x02 - Arrow
0x03 -
Javelin #1
0x04 -
Javelin #2
0x05 -
Javelin #3
0x06 -
Javelin #4
0x07 -
Javelin #5
0x08 -
Javelin #6
0x09 -
Javelin #7
0x0A -
Javelin #8
0x0B -
Javelin #9
0x0C -
Javelin #10
0x0D -
Javelin #11
0x0E -
Dance/Play (Regular)
0x0F -
Dance/Play (Regular)
0x10 -
Ballista (Glitchy Arrow)
0x11 -
Nothing (Stalls Battle Screen)
0x12 - Sword
of Seals Fire
0x13 -
Flametongue
0x14 - Fa's
Holy Dragon Stone (BGM/SFX-kill)
0x15 -
Iodun's Dark Dragon Stone (Mirrored)
0x16 - Fire
0x17 -
Elfire
0x18 –
Nothing
As you can
see the hex is on the left with the name of the spell animation on the right.
If you didn’t already know, anything that is a projectile is considered a
spell, including javelins, arrows, and hand axes-it doesn’t have to actually be
magic. This is just to simplify the naming of things, it’s easier to refer to
everything as spells.
I am going
to replace 0x16, Fire, because it is very easy to just get a mage unit to use
Fire. In fact, my animation testing ROM has a save state with a mage (with a
custom battle animation nonetheless) using Fire, so this is totally perfect.
*wink*
Regardless
of whatever you replace you’ll likely need to use Nightmare to get a situation
where you can actually test the spell animation. I also suggest upping the
critical a little bit and keeping Nightmare handy so that you can ROM hack the
character or weapon’s stats as to force misses, hits, criticals, etc., to test
various different situations. If you know how to RAM hack to change those stats
on the spot, that’s even better, but I won’t teach that here.
Back to
FEditor Adv, type in the input index and load your script using the obvious
button. There should be no errors unless you somehow got the wrong image or
typed in the wrong path in the script. When it’s done the log at the bottom
will show some stuff but not much else will happen. You have to hit “terminate
animation” to finish the spell insertion and insert it to the input index. In
the case that you’ve messed up, be sure to hit “reset animation” before loading
a script again, or you’ll load over an existing script.
Lastly if you want to dim the screen you can
click that box. For things like arrows and javelins you probably won’t want
that but actual magic spells will probably want the screen dimmed to make it
more authentic as most if not all spells do so.
When it’s
inserted the spell animation hit “quit” and save with FEditor Adv. If you need
to, setup a mage or something to use the spell (using Nightmare or the Event
Assembler or whatever is needed) and test the animation. Just be sure to close
FEditor Adv after you’re done so that you don’t end up overwriting changes (see
the chapter on how to have good hacking habits, wherever that one is, and why
you shouldn’t have FEditor Adv and Nightmare opened up simultaneously).
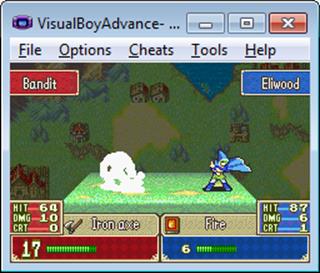
Congrats! You’ve inserted
your first spell animation! It’s especially bland and should just involve a
basic hit and a quick screen dimming. That’s the point though—to make sure you
know how to insert it. Now all we have to do is add in actual sprites and spice
it up with some codes.
Easier said than done thuogh.
Now we’re off to making
frames. I’m going to start with the object frames first because I feel they are
easier. The image is divided into 3 parts: a 240x160 section, another 240x160
section, and an 8x160 section.
The first section is the
foreground. I think. It’s the sprite that shows up in front of the battle
animations. The second 240x160 section (P.S., 240x160 is the size of the GBA
screen, which you should know from the battle animation tutorial) is the
background. It’s what appears BEHIND the battle animations. All you have to do
is copy/paste your spell sprite to the appropriate section depending on what
you want. As for actually knowing where to put it, that is an animation issue,
which is more of an artistic thing. I suggest taking a screenshot of the GBA
game and finding where you want your spell to start, then taking the pixel
co-ordinates of that point, doing that as you animate the frames. Again, the
battle animation tutorial teaches this so I will NOT go through this in detail.
If the frames are already fit
to be 240x160 and animated for GBAFE, then that is absolutely awesome. Just one
more reminder: the spell should assume that the screen is NOT shifted. The
screen’s view sliding/shifting is a trick of the game, a code in the script.
The final portion is for the
palette. You can enter in a palette like you did battle animations but it’s
tedious and mostly pointless so I suggest leaving it as the transparent color
and FEditor Adv + the game will handle the rest. Hextator did a good job of
making this convenient, no? Props to him. XP
Believe it or not this Shaver
spell I am inserting does not have ANY object frames; everything is translucent
and thus I have to use the background frames. However here is an example.

I suggest
saving each frame as a new file numbered in the order they appear. Take note
that you load an object frame and background frame at the same time so one
sprite may appear simultaneously with another. Oh, the beauty of spell
animations.
The object
frames are a bit more of a pain in the butt. They are 264x64. Yes, only 64
height, when the screen is 160 pixels. You see, these frames only use a
specific portion of the screen. 160-128=32. They ignore 32 pixels. 16 on the
top of the screen, 16 on the bottom. Why is it 64 height? The image is resized
to be half. Why? Hextator (the creator of FEditor Adv and the CSA system) had
to do this in coding the new spell animation format. He actually made a
completely new system for spell animations. That’s why everything’s so
different. And he worked hard on this. I would know. I was there. So live with
what you get and don’t be a whiner. ^_^
The actual
width of the actual image here is 256x64. The last 8x64 portion is of course
for the optional forced palette. The image is 256x64 because you have to
remember that the screen can slide here in which case the range of the spell
can become more than just 240 pixels, if you get what I mean… (if you don’t get it, don’t worry about it; act like
everything’s normal).
Time to do
this. For my spell animation, my ripped frame starts off looking like this,
though I happened to pick a frame in the middle just for a first frame test
(once we make our first background frame, along with the object frame we
learned to do earlier, we’re going to do another spell insertion test).

Oooh, shiny.
However, that won’t do for insertion. Gonna take off the bottom half first,
then resize it to 240x160.

Well it
still looks pretty good to me. So let’s remove 16 pixels off the top and bottom
then since this part of the spell only takes part in the middle area…

All that’s
left is to resize it to half again:

Add the
24x64 portion to the right to make it 264x64:

Aaaaand make
it 16 colors. Oh wait, how do we do that? Well, I use Usenti (found on google).
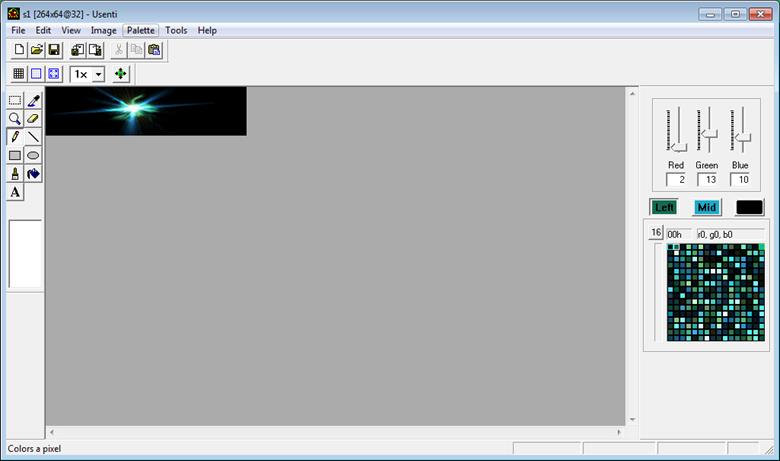
Palette
-> Requantize -> #colors = 16, “OK”
Result:

Thoughts: Blegh.
The quality has gone down.
Even if the image will ultimately be stretched back to 240x128 height like it
should be (that’s just how these frames work, has to do with the transparency),
the post-resized result won’t be as good as the original and now that it onlny
has 16 colors it doesn’t look nearly as shiny or cool.
And what can we do?
Not much.
That’s hacking for you.
Especially on the GBA system. There are limitations. You can’t always get what
you want, definitely not get it to be perfect. If you get it even close you
should consider yourself lucky.
So we suck it up, save the
frame, and go to our script to add it in there:
To do that though, you have
to learn about the format of scripts. Before I go through a script though, I
suggest you open up the 0x85 command list for spells (found in FEditor
Adv\doc\Custom Spell Animations) and readup on that a little. Just a little,
for old Blazer here. Then you can read my explanation of each code below.
/// - Start Animation –
always at beginning
C00 – buffer code. Stalls.
Needed. If you encounter random looking graphic or palette errors you probably
need some of these. Sometimes if the spell progresses too fast it loads the
wrong palette or other data in the VRAM or elsewhere interferes with the spell.
In short, just add these and take it easy.
C00
C00
C00
C00
C00
C00
C000040 – makes the screen
slide. Always have it, and early.
O p- blank.PNG – object frame, followed by the
path. This code must be proceeded by the next two codes, they are all jumbled up
together, you can’t load one frame by itself. Or if you can you couldn’t back
in the day. :P
B p- blankbg.PNG – the background frame. Same
deal.
1 – the length of the frame.
1 is the shortest. Has to be a whole number. 3 is like slow. Most frames will probably
be 1-3. This is more of an animating thing, but you can test different times
yourself to get a feel for it.
C00001A – hit code, must have
C1F – hit sound, recommended
~~~ - miss terminator. This
makes it so that the animation stops if a miss occurs. Stupidly enough this HAS
to be after hit code, meaning you can’t have an animation miss before it would
have hit. It has to miss after it would have hit. Yeah, I know. Silly and
inconvenient. That’s life.
O p- blank.PNG – another frame loading code identical
to the one above. Nothing special here.
B p- blankbg.PNG
1
/// - End Animation - ends loading code from the animation script
Now that
that’s explained, let me go through the command list:
0x00 through
0x13 (except 0x08) - Ignored/unused – self-explanatory
0x08 Attack
(becomes critical automatically) with HP stealing – never used this before but
I believe you use it either instead of C00001A or after C00001A. Find out for
yourself if you’re really curious.
0x14 through
0x28 - passed to attacker's animation; it is recommended that all possible
caster/
spell
animation combinations are considered such that no combination conflicts – this
means that using a code with one of these command values is like using a code
for the battle animation user, not for the spell. You’d have to see the 0x85
command list for battle animations to know what codes C14-C28 would do.
0x29 Set
brightness and opacity levels for the background. – opacity
refers to the translucency (the opposite in a way)
Argument XX is the brightness level
from 0 to 100% (0x0 through 0x10) – 0x00 = 0, 0x10 = 100%, values in the middle
reflect a percent in the middle
Argument YY is the opacity level
from 100% to 50% (0x0 through 0x10) – 0x00 = 100% opacity (can see everything),
0x10=50% opacity (is translucent and you can see halfway through). As above,
values in the middle reflect a percent in the middle.
0x2A Sets whether maps 2 and 3 of the GBA screen should be
visible.
Argument YY is the boolean for whether to display those two maps:
The value 0 means
"false to display"; all other values mean "true". – thus C00002A would stop maps 2 and 3 from being visible,
C00YY2A where YY is any value but zero would mean it shows. This is used to
make parts of the screen black.
0x2B through
0x3F - passed to attacker's animation; see note above – see my own note above,
heheh
0x40 Scrolls
the screen from being centered on the attacker to being centered on the
defender.
This should not be used more than
once per animation. – has been used/explained before
0x41 through
0x47 - passed to attacker's animation; see note above – see my own note above…
again. teehee
0x48 Plays sound or music whose ID corresponds to those
documented in Music List.txt of the Nightmare module packages. - very awesome code, used for almost all sounds. Is pretty
much explained enough already.
Argument XXYY is a 16 bit music ID.
0x49 through
0x52 - passed to attacker's animation; see note above for commands 0x14 through
0x28 – bla bla bla, see above
0x53 through
0xFF - Ignored/unused – derp
Okay, now
that I’ve broken down the format of and the possible codes used in spell
animations, we can start adding in some own frames and codes. Here’s the bulk
of my script for my next test:
C000040
C100D29 –
Set brightness to 0x10 = 100%, and opacity to 0x0D—given that 100%-50%=50% =
range of opacity change, and 0x10 = 16 values, 50/16=3.125 meaning each
increase in 0x01 is equal to a little bit more than a 3% decrease in opacity.
0x0D =13 x 3.125% = 40.625% opacity decrease. 100%-40.625%=59.375% opacity
level. That’s some math for you. =D
O p- blank.PNG – this frame load here is
just a buffer blank frame load that’s good to have
B p- blankbg.PNG
2
C02F948 –
this is command 48, loading sound 02F9, which happens to be a swishy sound I’m
testing out (to see if it fits Shaver).
O p- blank.PNG
B p- s1.PNG – another frame load but
this time I’m loading frame s1, the new background frame I made. Since I
applied an opacity change code it should appear somewhat translucent.
10 – the length is 10 to make sure I can see it clearly, since
this is just a test of one frame.
C00001A
(after this the rest of the script continues on)
Wooh.
Alright, time to save our script and test it. Here goes nothing!
Oops! An
error! How do we figure out what went wrong? Well, thankfully we’re early on so
we only have a few frames to check and a few codes to check. Sometimes it’ll
say that an image’s dimensions are wrong, in which case you must of course
check that. Other times FEditor Adv might be a bit more cryptic and say:
Great, I
could have told myself that. Thankfully the log can help us a little. We can
look at the last frame it attempted to load and check that frame and the codes
around it for any errors.
“…\Shaver
(DS)\s1.PNG”
Okay,
s1.PNG. Wait, that’s the new frame I did! What’s wrong?
After a look
at my programs, I realized I never saved my 16color version (yes, this actually
happened to me, haha, and it was a perfect chance to write about it). If it
were a code problem I could have looked at this information:
0x85 command
count for this spell: 10
Animation
frame count for this spell: 1
To see how
many codes and frames were loaded to see how far the program was into the
script before it crashed, and then search that area of the script because the
error would HAVE to be there.
Once the
error is fixed, just hit “reset animation” and load the script again. Terminate
it, quit the spell inserter, save, and test. Hopefully the frame works out—if
not, try changing the settings or positioning of things around as needed.
Granted it’s just the first REAL test frame so there shouldn’t be too many
quirks.
Once that’s
done, you’ve all the knowledge you need to go ahead and start making all the
spell frames you need. If you forget how to do something, just look back—you’ve
already learned the whole process, you’ve just yet to do it. After all, if you
can make one frame, you can make a million of’m.
Oh and
here’s my frame as a little farewell present:
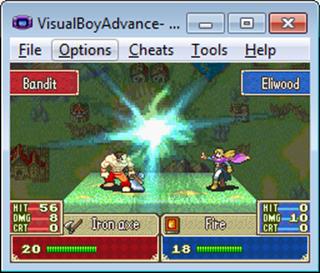
It’s true! It did work! It’s
still very much a work in progress, as you can see, but the point is we got he
test frame working. The rest just takes time, patience, and the attitude that
YOU CAN DO IT!
^That there was my real final
present. A spell.
A spell…
Of confidence!
Good luck! And make awesome
spells! Ones that will shock the world! I’m done here—this was the final
chapter I wrote! So… goodbye, my friend!
~ Blazer
Chapter 60: Weapon Icons
Ah, weapon
icons. For the custom items and weapons you make to ever be complete, you’ll
need custom weapon icons. Even if you don’t have them, you may just want to
make the old icons look better. You may even want to edit some other icons
besides weapon icons. In any of these cases, you’ll need to be able to edit the
icon graphics.
Before I get
started, I am just going to let you know that while this is called “Weapon Icon
Editing”, not everything you edit is a weapon. It’s just simply easier to refer
to them all as weapon icons than “weapon, item, and miscellaneous icons”.
Hopefully you can tell why. ^_^
There are
several ways to go about this process but I am only going to teach the best way
that I know: thus if you have learned the TLP method or another method and want
to know more about that, I am not going to help you here, as I have no
intention of endorsing completely inferior (IMO) ways of editing weapon icons.
To start,
you’re going to need GBA Graphics Editor, a graphics editing program by
Nintenlord that you have hopefully acquainted yourself with. If you haven’t,
you may want to check out chapter 45, “Working with GBAGE” (GBAGE is the
abbreviation for GBA Graphics Editor which I will henceforth use to refer to
the program).
Open the program and your ROM. Immediately
switch the graphic type to uncompressed graphics, as weapon icon graphics in
all games are uncompressed graphics. Then proceed to enter in a graphics offset
and palette offset according to which game you are using:
FE6 Weapon Icon Graphics: F9D80
FE6 Weapon Icon Palette: FED80
FE7 Weapon Icon Graphics: C5EA4
FE7 Weapon Icon Palette: CBEA4
FE8 Weapon Icon Graphics: 5926F4
FE8 Weapon Icon Palette: 5996F4
Thanks for
the offsets goes to the people who originally found them, whoever they were.
They are much appreciated.
Once you do
that (my example is FE7)…
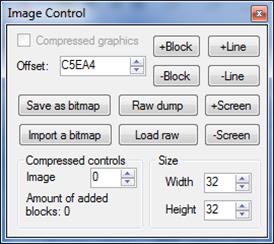
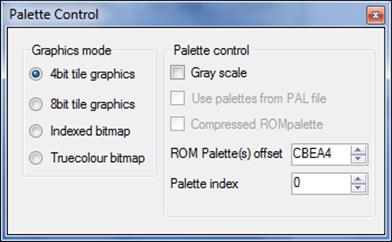
You should see this:

Or something similar dependning on your game. Note that my ROM is hacked
and thus I have some different weapon icons; however, it should generally look
quite similar.
If you did, you are successful. Despite the odd format of the icons, you
have spotted them, and that is what is most important, in my honest opinion.
However, to make it look better, you can change the width to 2—and I
suggest you do this as it aligns the weapon icons perfectly. Now you have the
height issue—at a width of 2, the height controls how many weapon icons show
up. First of all, it should definitely be an even number. After that, it’s up
to you—you can just have one icon show up by making the height 2, or have a
bulk amount show up (noting that GBAGE has a limit to the height so you can’t
make them all show up at once at width 2). For bulk amounts, I suggest a height
of 64. This gives you many weapon icons in one column and also makes it easy to
remember the offsets of the next set. Look: with these settings,
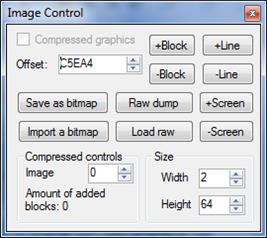
I have this show up:
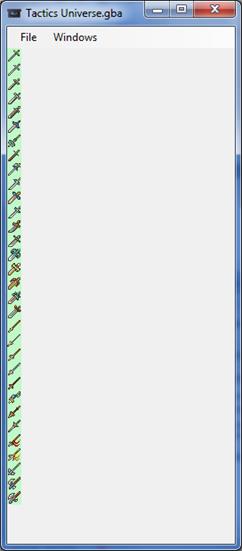
Where the bottom icon is the steel axe icon. As you may already know, the
icon after the steel axe is the silver axe. Well, if I just add 0x1000 to my
offset of 0xC5EA4, I get 0xC6EA4, which is the start of the next “set”,
starting with Silver Axe. Looky:
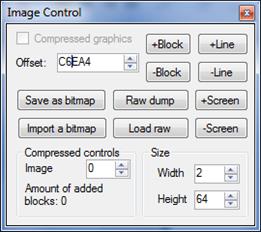
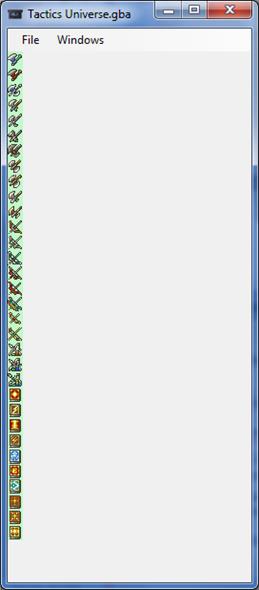
Sorry for the really tall images, but I’m trying to make a point here. I
personally save each set as a bitmap using the “Save as bitmap” option, naming
the image after the offset I can find it at in GBAGE. After that, it’s time to
edit the image.
However, we have to worry about the palette, which we cannot, or rather,
should not, disrupt. Most importantly you must use the same 16 colors for all
the weapon icons, and nothing more than those colors; and if you wish to
replace those colors, edit the palette using a hex editor, NOT with GBAGE, as
it is much safer to use a hex editor. You may be able to edit the image in MS
paint or an equivalent image editing program (hopefully something better) and
get away with it, but I personally suggest googling and downloading the
paint-look-alike Usenti if your computer supports it. It is very good at
keeping palettes in tact in the exact order you save the image as.
You see, when you save the bitmap, the palette comes with it. To prevent
not only the colors but the order from getting mixed up, well, I’m not sure,
but I know that if you use Usenti to copy or edit the image, the palette will
rarely ever mess up. Thus when you import the bitmap, the same 16 colors in the
same order will be there and your image’s palette won’t screw up—and trust me,
it’ll be VERY obvious when it screws up. I still screw up sometimes.
Another suggestion is that you save the image as PNG. There are reasons
for this but mainly it makes life easier as PNG is just the easiest image
format to work with in my honest opinion, and it’s easier not to complicate
your minds with more knowledge that likely won’t benefit you.
When you DO import the new edited bitmap when you’re done editing the
weapon icons, you’ll want to have it insert to the same offset you ripped at,
which is why it’s very useful to note offsets, or do it like I do and name the
image after the offset so you can’t forget it and don’t have to go looking for
your doc on what graphic is where. You’ll want to import the graphics and check
the “abort bla bla bla” but don’t import the palette or anything else, just
keep the palette offset at whatever it was at.
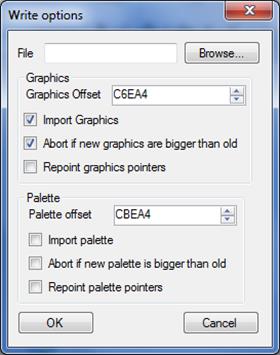
It should look something like that. Because the graphics are uncompressed
they should always take up the same amount of space as they used to, so if you
did everything right you should never run into a space error. Despite this,
there IS a limit to the number of actual weapon icons you can have unless you
repoint the data.
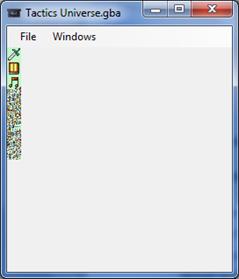
You can see after the red musical note that there is a bunch of pixels
that doesn’t look like graphics at all. They are actually other data but the
program interprets all hex as a graphical form in uncompressed mode and so
that’s what the data looks like if you tried to view it. My point is that it’s
NOT stuff you can just replace, it’s important data and your game will likely
screw up badly if you mess with it. This is why if you run out of weapon icons
to replace, you’ll need to repoint. For FE7, you may need to apply the Item
Icon Bug Fix patch by Xeld/Hextator/Obviam which can be found with FEditor Adv
in this directory: “FEditor Adv\asm\Fire Emblem 7\Item Icon Bug Fix”. See the
IPS patching or JFP patching tutorials on how to do that. I don’t know about
there being any problems with this in FE6 or FE8.
There’s one last thing I want you
to know, and it’s about the other icons in there. What icons? These ones:
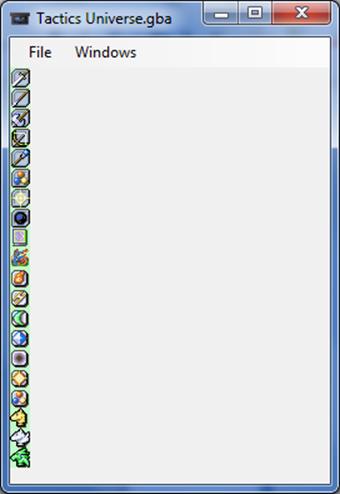
Woah how’d I get them to show the right palette? Well, the palette for
these should be the one right after the palette for the weapon/item icons. Thus
all you have to do is click up on the palette index once and you should get it.
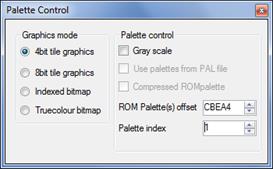
Like above, where it says “Palette index”.
With that, you’ve the knowledge to make your complete custom weapons, so
congratulations!
And in the case that you need to add more weapon icons, you’ll have to
repoint the data—but there’s a slight glitch with repointing it (at least in
FE7, I’m not sure about the other games) so you may need to apply FEditor Adv’s
item-icon bug fix patch, located in the asm folder of FEditor Adv (it is in
multiple patch formats which you can find out how to use in the later chapters
that cover patching formats).
Chapter 61: Map Sprites
Before you
get started on learning how to edit map sprites, I suggest you read:
-
Chapter
45, Working with GBAGE
-
Chapter
60, Weapon Icon Editing
As they
prepare you for use with using GBA Graphics Editor and I am not going to
explain things as detailed here as I have done in previous chapters.
First you
must find the location of the graphics. You can either:
A)
Scroll
through GBAGE until you find the map sprites (I suggest using greyscale width 2
as it will make it much easier to recognize them).
B)
Use
the offsets from a map sprite module, if one exists for your ROM—I don’t think
one exists for FE6.
In the case
of A, open up GBAGE, open your ROM, and scroll through
until you find them. They will be compressed and they will all be bunched
together so feel free to skip sections of the ROM that you know they won’t be
in (for example, if you start seeing spell animations, skip past them, the map
sprites won’t be in between spell animations). They are likely in the first
half of the ROM (though I don’t guarantee anything).
In the case
of B, you’ll need to open up Nightmare and take the offsets from the map sprite
modules. The standing one is for idle poses, the other one is for moving poses—yes,
they are separate images.

You’ll want
the “animation pointer” (which should really be labeled graphics pointer, as
the “another pointer” is really the animation data… heheh). Stick that into
GBAGE. If you are using the other module (for standing sprites), use the
“Pointer to graphics”.
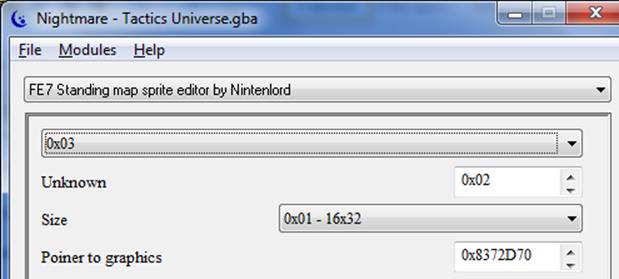
Note that
the size should change depending on the size of the image. A width of 1 is
equal to 8 pixels; thus a width of 2 is equal to 16, and 4 is equal to 32. The
height does not matter much as the data is compressed so GBAGE will only show
as much data as there is. I just keep my height at 32 and set the width to 2 or
4, usually 2, depending on what is needed. This is important in viewing the
image properly.
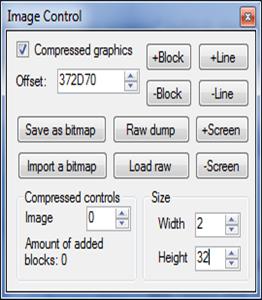
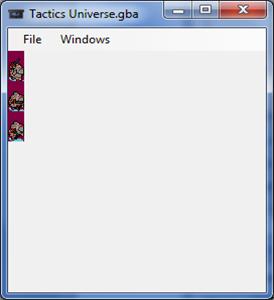
We now need an appropriate palette. Depending on the game, type in or
copy/paste the map sprite palette to the palette offset slot.
FE6: 0x100968
FE7: 0x194594
FE8: 0x59EE20
After
applying the palette the image should look nice. If it isn’t aligned change the
width/height accordingly. If the palette is still messed up double-check you
did the right offset.

For different palettes (allegiances, greyed out, and secret ones), press
up on the palette index. You can get various different palettes. For example,
this one:
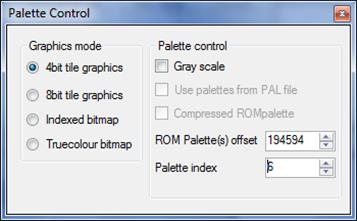
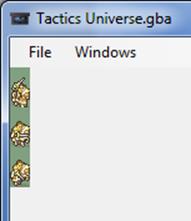
To edit the image or save it to import it elsewhere, use save as bitmap
and preferably save it as a PNG. I suggest using a program like Usenti that
will maintain the colors and order of the palette so that when you re-insert
the image, the palette does not screw up (see weapon icon tutorial for a more
length talk about this issue). When you import a bitmap you’ll want to check
the following:

As usual a palette menu will come up, hit okay and it should insert.
However, if it does not, this means the old graphics take up more space than
the new ones (and for the record, this may happen even if the size is the same
or the image is less complex, so do not freak out). In this case you must
repoint the graphics by typing in a new graphics offset to free space and
checking “repoint graphics pointers” on the above menu, then reinserting.
That is all
there is to it. Good luck! With your custom classes!
Chapter 62: Proper Betatesting
There’s a
proper way to do most things in life, and that includes beta testing. You might
think it’s not a big deal—just play the game and look for glitches—but if you
want a professional hack, you need it professionally tested, or the next
closest thing, which is what I’m going to detail in this chapter.
To start, a
beta patch may or may not come with a README and other files. If the betatest
is one that is practically meant to be released to the public (has patching
instructions, readme, etc., along with the patch, of course) you’re going to
want to make sure that all the files are clear and it is not confusing as to
what is what and how one should go about playing the game.
Once you
actually start playing the game, it’s time to analyze everything you can while
playing the game. For example, if there are different modes (normal, hard)
you’re going to want to play both (or at least test it out, maybe use cheats to
expedite the betatesting process if you don’t have time). You want to check out
the balance of the game, the graphics, and of course TRY and cause glitches,
because it’s better that a betatester encounters it when they are testing than
when an ordinary person is playing the game.
This chapter
is/is going to be (I just know as I’m writing this that it’s going to be) text
heavy. But to make it easier (wall of texts get boring quickly) I’m just going
to write 50 things you should know about betatesting a game, and call it a day.
50 Things to Know About Betatesting
- Make sure that the download isn’t confusing, nor
is extracting files or patching the game.
- Watch all the scenes in a game. Don’t even skip
the opening, even if the creator of the patch hasn’t altered it—it might
have been accidentally edited.
- Check for spelling everywhere. If you’re not a
good speller, have a spell-checker nearby for words that you think might
be spelled wrong.
- Check for grammar everywhere. I guess in part to
be qualified as a good betatester, you kind of need good grammar. Simple
stuff like “your” and “you’re” is given, but also run-on sentences and
stuff. Of course, if the author intends to use bad grammar in dialog as a
means of one’s personal type of speech, or if the game leans toward bad
grammar for humorous purposes (or some other obscure purpose), you might
want to just ignore the grammar part. But in general, good grammar = good
game.
- Press buttons. Just try pressing random buttons,
and see if something odd happens.
- Check all modes of the game in the main menu to
see that they are working properly.
- In games like Fire Emblem, you may need to check
help menus. In Fire Emblem, this is done by pressing “R”, and may also
give character or class descriptions, which hackers often forget to
change.
- Listen to all the songs in the sound room (if
there is one).
- If you hear a song play in game, make sure it
also appears in the sound room (applicable only to some games).
- When you hear a song in game and it’s custom, have it loop at least once if possible,
not only to make sure it loops, but to make sure that the whole song plays
without any problems. Songs from the original game are less likely to be
glitchy (and if they are, they’ll probably be obvious).
- On games with maps (like Fire Emblem, of course)
check all the tiles on the map. Sometimes tiles may act funny (you may
move onto non-existant tiles, or tiles may appear crossable but not be, or
something else weird).
- In dialog, make sure that there are pauses in
between to let the player read the text. This may mean having to press a
button to continue, or just having text go slowly.
- Always look for weird pixels or graphics that
might show up somewhere.
- If you do encounter a problem, take screenshots
and videos to show where it is.
- If a problem occurs, it is very helpful to take a
savestate (shift+F1-F10, then press the ‘F#’ button to reload a savestate
slot) and then give that savestate to the author of the hack so s/he can
access the glitch without having to play through the game.
- Use all characters in the game at least once.
- Keep animations on to ensure that you see that
battle sprite are working and are colored properly, amongst other things.
- Look at stats to make sure that they aren’t
working weird either (crazy high stats, stats that change on their own, “--“ stats, etc…).
- Also test animations off to make sure map sprites
are working right.
- Listen to sounds—make sure the right sound
effects are being played at the right time.
- Look for balance in enemy numbers and your
numbers. In a game like Fire Emblem, you typically don’t want 20 allied
units and only 10 enemy units.
- Look for balance in unit strength. One of your
units shouldn’t be so broken that they can solo an entire chapter (barring
the first few chapters, where there are usually only a few units on the
entire map…). Similarly, the enemies shouldn’t be so hard that they’re
better than your own units, or so weak that they have a 30% chance of
doing only 2 damage, or something as ridiculous as that.
- Analyze the map. Boring maps with a simple path
to the area one is trying to go to are boring and should be edited. The
terrain should be as diverse as possible while still adhering to the plot
(if the characters are in a desert region, there’s typically not going to
be a lot of grass or trees or civilization, of course…).
- Pay attention to consistency in the plot. This
includes names, characteristics, and plot details in general.
- Visit all
villages and other places on a map you can possibly go to. This includes
looking for secret shops.
- Analyze the plot to see which characters can be
recruited or perhaps check for character relations. Also check for
gaiden/secret chapters and how they might be reached.
- Think to yourself “if I weren’t a very smart
person”, and question how confusing the plot may or may not be? Is there
something that doesn’t make sense, or perhaps a character doesn’t get
enough time to develop themselves?
- Check for repetitiveness. If every enemy has the
same inventory, or only 1 or 2 classes are used for all the enemies on a
map, or the same reinforcements constantly come, players won’t feel very
excited to play on the map. These things may detract from the enjoyability
of the game.
- Always try both paths. Try killing off units to
check their death quotes, or losing to get game overs. It’s possible
someone forgot to code in a game over event!
- Look for suspicious areas on the map. Sometimes
there may be hidden secrets on tiles you don’t expect.
- Check enemy inventories to see if there are any
weapons that they have, but can’t be used, as well as droppable items.
It’s possible a hacker meant to make an item droppable but didn’t, so
question it, even if it’s meant to be stolen by a thief.
- Question things that might be right, because they
might be wrong. If some unit has lethality as a skill, it might have just
been a test. A weapon might accidentally have 100 critical because the
player was testing a critical!
- If there are custom animations, test all
different aspects of the animation. This includes dodge, magic swords (if
applicable), close and far range, etc.; and the
same thing applies to custom spell animations.
- Check to see if something is missing in a game.
If one of the characters mentions that “the enemy has ballista” but you
don’t see ballista on the map, the hacker likely forgot it, and it’s your
job as a betatester to let them know.
- Expanding on the “multiple path” idea, use
savestates to test out possible split choices. A chapter may have two ways
to beat it—try both. You may be given a choice to do X or X. Use a
savestate, try one, go back , and try the other.
Do this every chance you get to make sure things turn out right.
- Custom cutscenes are often full of problems. For
instance, the camera may not follow a person, or may jump around if multiple
people are loaded. It might even glitch up sometimes while not glitch
other times. One thing is that cutscenes sometimes glitch up if you watch
the scene, get to the battle preparations, save, and then restart the
chapter, so try it out to see if there’s some major problem.
- If a certain weapon is broken, suggest to the
author that they tone it down.
- Make sure PRF weapons are actually limited to a
certain character (or maybe class) and aren’t apocryphal.
- Check to see that custom classes behave as they
should—for example, a class on horse will need the “move again” ability,
and will need the “knight” icon. A custom flying unit will need the
movement ability to flow over mountains.
- Always look for unedited text and other aspects
of the game that should probably be edited. This is tricky because it’s
not a glitch or a bug as much as it is something the author simply didn’t
do. Sometimes character/class/item descriptions, death quotes, battle
quotes, or even certain dialog may have been forgotten to be edited.
Someone may have left a support of two characters who aren’t supposed to
support anymore, or have left an enemy with a weapon that has been edited
to be a customized weapon enemies aren’t supposed to have.
- Try all the different menus in the game. For
example, a hacker may have edited a background somewhere, and that same
background may be shared in the
‘Options’ menu, but they may have forgotten to edit the palette (coloring)
of the background, and so it may look weird. If you don’t check that menu,
you won’t know!
- The game shouldn’t be too difficult or too easy
in most cases (unless that is the purpose of the hack). Take into thought
that you may be a better player at a game than most other people, and so
the game might be too difficult for the average person.
- Actually test a little bit of hard mode to make
sure that it’s working right not just in theory, but in actuality and that
hard mode itself isn’t harder or easier than the hacker may have intended.
In this case it’s best to just comment on the difficulty level in general
rather than say whether it is too high or low.
- Check for weird occurrences when you suspend and
resume the game. For instance, there was this one glitch where certain
stats would increase if the game was suspended and resumed (I won’t get
into it, but the point is, check).
- Check for portrait colors (consistency and
general appearance). Portraits shouldn’t be a mixture of FE7 and FE8
colors if it can be avoided. Also, really bright colors can hurt the eyes,
so make sure the hacker doesn’t give reason for anyone to be blinded.
- Don’t forget to promote all the units you can
too! Savestates are quite useful here. One promotion item can be used to
promote units of all classes. You may need to abuse arenas to level units
up to level 10, play the game multiple times, or hack the game to help
with this, but it’s necessary, because it’s possible the author forgot to
do every single promoted battle palette.
- When you are actually betatesting, write down
everything nice and neat, in bullet or numbered form, in a word or notepad
file or something. Do it WHILE you are playing the game, not after—because
you’ll probably miss something if you just keep it in your head.
- While writing your report, be detailed and
include specifications as to where things are and when they might occur.
As said before, use screenshots, videos, and savestates as necessary. It
might be helpful to organize your comments into different categories, like
“Text”, “Forgotten Things”, and “Glitches”, because it helps them tackle down
all the problems in one category at a time. It also helps because
“glitches” are usually a priority of beta-fixing.
- Don’t be too harsh or bias with your betatesting.
You don’t want to anger the hacker and make them not want to fix
something, or give your opinion on something they don’t care about, like
“this portrait looks really ugly, whoever made it sucks at spriting”, or
“the plot is really bland, it needs a complete overhaul…”.
- Enjoy your time betatesting, because if you don’t
play normally, it’ll be more of a job than it is a special privilege!
Chapter 63: VBA’s Tools
I’m going to
(relatively quickly) cover the various tools in VBA’s “Tools” dropdown menu.
Disassemble: this lets you disassemble ARM or
THUMB assembly. If you don’t know ASM, it won’t prove very useful to you. If
you do, it can prove very useful.
Logging: I’m no expert on this, but to my
knowledge, logging lets you keep track of various functions and operations
whose purposes I do not know.
I/O
Viewer: This viewer
enables you to view the input/output area of the RAM and even edit the values
here to some extent, in real time.
Map
Viewer: The map
viewer is one of the more useful tools for average hackers that lets you see
backgrounds, as well as information such as their size and # of colors. FYI,
“stretch to fit” stretches the background in the viewing window so that it fits
the window, and “auto update” makes it so that the background is automatically
updated as it changes in-game. (The latter applies to other viewers as well).
On the bottom left you can select a square/color (which is selected by clicking
on a place in the window) and see it’s RGB.
Memory
Viewer: The memory
viewer lets you view the game’s RAM (memory) in real time (if you click
“automatic update”) and save it as a memory dump (which you can load later) or
edit it (although the game might change it by itself right back anyway,
depending on what you’re editing). To edit, just click on a byte and type in
the new value. Type in an offset in the “Go” box to go to a specific offset.
OAM
Viewer: Essentially
the same thing as the map viewer, this lets you view sprites, which are
essentially smaller “object” graphics that are on top of the backgrounds.
Palette
Viewer: The palette
viewer is one of the most useful tools in VBA as it lets you find a palette and
view any of the colors in the palette. It gives you the RGB and hex value and
can let you save either the background (BG) or sprite (OBJ) part of the palette
viewer as a .PAL file. It’s very useful for finding palettes in a hex editor as
one can search the values of colors to find and edit them.
Tile
Viewer: This last
viewer lets you view graphics as 16bpp or 256bpp (depending on which it’s meant
for—likely the former) as well as scroll through a selection of palettes (as
different palettes fit with different tiles in the viewing window). Its other
functions are much like the Map Viewer’s own functions.
Well,
there’s nothing else of major interest I want to talk about in this dropdown
just yet. There is the ability to record videos and sound, but that is for a
future chapter. ^_^
Chapter 64: Other VBA Options
In this
chapter I’m going to detail some of VBA’s semi-obscure but not totally obscure
options. Knowing how to use VBA will help you test your game in various ways.
The file
menu has many options, most of which you should be familiar with. Pause
obviously pauses the game (and also unpauses it) and ‘reset’ restarts the came
(but doesn’t reload the cartridge, meaning if you hack the ROM and hit ‘reset’
in VBA, IIRC the changes won’t show up).
The Recent
tab lets you load a recently played ROM. “Import” lets you import gameshark
code files, battery saves (the “main” saves), and gameshark snapshots. Battery
files and gameshark snapshots can be exported with the export tab, of course.
“Screen
capture” takes a PNG screenshot and saves it to your computer, which is very
useful.
“Rom
information” gives very basic information of the ROM based off of the header
and some other crap, and “close” simply closes the ROM without loading another
one or exiting the program.
Now the more
interesting and less basic stuff is in the “Options” menu at the top. There are
a bunch of categories/tabs with lots of options, some with even more tabs. I’ll
go through whatever I know well enough to teach. Haha.
“Frame skip”
lets you skip frames, like you’d imagine. Lowering the frame rate makes each
frame play—making it higher skips a lot of frames, which will make everything
seem kinda laggy. Just try ‘9’ and try moving your cursor on a map in Fire
Emblem, for example, and you should notice the difference. “Automatic” sets the
frame skip to whatever VBA thinks is best.
Throttling
forces the game to go at a certain speed (or close to said speed). Thus you can
speed the game or slow the game down (of course, you can always speed the game
up to max speed by pressing the spacebar too). 100% is normal speed, 25% is 1/4th
said speed, and 200% is twice as fast as normal. You can also set your own
emulation speed via the “Other…” (just enter a number
in the dialog box).
The “video”
tab affects the graphics display. There are a bunch of rendering options that I
don’t care about, an ‘x1, x2’ etc. with zoom options (you can force the screen
to be twice its normal size all the time, or just manually drag the screen
yourself if you want), and most importantly, you can set which layers are
on/off, which is useful for more advanced graphical hacking to see which
graphical aspects are on the same graphic layer, as well as ripping graphics
(because you turn the layers you don’t want to rip off).
The
“emulator” tab has a lot of stuff that I don’t care about, even if I know what
it does. The most relevant things to hacking are the automatic IPS feature
(just keep it checked—all it does is have IPS patches with the same name as the
ROM automatically be soft patched when you play the ROM-will cover in detail in
the IPS patch chapter), and the PNG/BMP format which is for taking screenshots,
which should be checked to PNG, of course, because BMP’s take up a ton of
space.
In the sound
menu you can turn sound off (which speeds up the game because it doesn’t have
to load sound), mute it (which doesn’t speed up the game), or just have it on
(…). The various channels (which should all be checked) control which… ‘layers’ (not terminologically savy) of sound are playing. So
if you turn some channels off, you won’t hear certain music/sound. You can also
edit the sound… type (again, terms = fail), with the 11khz,
22khz, etc., and adjust the emulator’s volume (not sure why you’d do that with
the computer’s own volume changer though… lol).
The gameboy
category doesn’t have anything I want to talk about. The end. Neither does
priority.
So next is
filtering, which is used for when your emulator is zoomed in. Filters edit the
way zoomed in pixels are “interpreted” and displayed. You can make the game
look like fine lines, smoothen things out, add motion blur, whatever, but the
window has to be more than 1x zoomed in. Try out the filters yourself and see
what you like. Here’s an example:
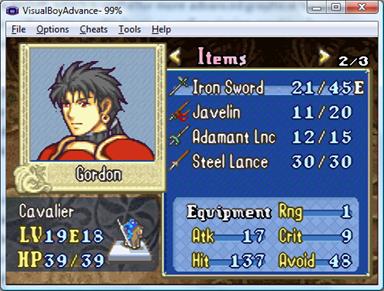
(This one is
kinda smoothier than normal, if you can tell).
Joypad and
Language also don’t have any interesting (to me) features, so I’m not gonna go
over those… which means that, we’re done!
Chapter 65: Recording Videos &
Sound
VisualBoyAdvance
has two great features that separate it even more from most emulators. It can
record both video and sound (even though video has a desync problem which will
be covered in the next chapter). You can find these amazing features near the
bottom of the “Tools” menu in VBA.
If you go to
the ‘record’ tab and hit ‘start sound recording’, you’ll be prompted to type in
the name for a .WAV file, which is an uncompressed file with recorded sound
that can be played by a program like Windows Media Player. They tend to be big
though, so watch out.
When you’re
done recording the sound, you go back to the ‘record’ tab and hit ‘stop sound
recording’, and then enjoy your file. Bam.
In a similar
manner, one can record an AVI file, which is an uncompressed video file. Like
the WAV, it tends to be huge, except that since it’s
video and contains graphics, it will be even larger than you might imagine.
Depending on how long the video is, it can definitely get over 100MB as an AVI.
No worries, though, I’ll cover how to save space and make uploading such a huge
file quicker in the next chapter.
The only
difference between this and sound is that you have to select a basic video
compression.
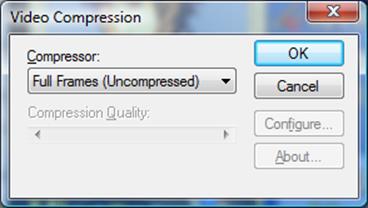
“Full Frames
(Uncompressed)” is completely uncompressed. All the other options will compress
the files, but with different features and quality. So I kinda lied about AVI’s
not being compressed, it’s just that they aren’t compressed nearly as well as
MP4’s… XP.
I typically
use “Microsoft Video 1” as it doesn’t really change the quality of the video
but gets the job done, and it shouldn’t lag like “Full Frames” does (that
records every single frame—it’ll be huge and unless your computer is super
uber, it’ll be slow). Other codecs may also be installed into the system due to
installation of other programs (or you’re just an extremely competent video
renderer), but those aren’t necessary or anything.
Finally, you
can record a “movie”, which is not for sharing with others. A movie is a clip
of the game that you can play (using the play tab) which shows you part of the
game that you played. If you ever use the movie feature, savestate before, then
do it.
As you can
see, none of that is really any hard or anything, which is why it’s more
convenient (and results in better quality!) to use VBA to record stuff from
your hack than it is an external program!
Chapter 66: Fixing the Desync with
VirtualDubMod & Video Rendering
In the last
chapter, I mentioned a desync… an audio desync, to be
exact. The video frame rate and audio frame rate don’t match up. As a result,
the audio starts to lag behind, and after a couple of minutes, when the audio
and video don’t match up, it can get really bad.
This is
solved by a program called VirtualDubMod. The program and the method to fix the desync were introduced to me by Shadow of Chaos, who was
introduced to it by some youtube video, IIRC.
Download and
install virtual dub mod (I won’t tell you how though, it’s just installing a
program. >_>). Load it up and hit Ctrl+O (or file->open video file)
and load the AVI that VBA produced.
Now, since
I’m really nice, I created a file that loads settings that automatically fix
the frame rate issue and set the program to quickly but efficiently recompress
the AVI. You can download it below.
http://www.feshrine.net/hacking/downloads/GBASettings.vcf
Hit ctrl+L
or file-> load processing settings and load the file I just linked to above
(make sure you do that AFTER the video is loaded, though). Then hit “save as”
under the file menu and save the AVI again. It’ll take a little bit to render,
but once it’s done, you may be done for good, as the file may be small enough
that you can just upload it as it is and be happy.
If you
aren’t happy, you can try recompressing it, while also making it youtube friendly,
with a program called Free Zune Converter (yes it’s free). Download that and
extract it or whatever and when you open it, you should see this:
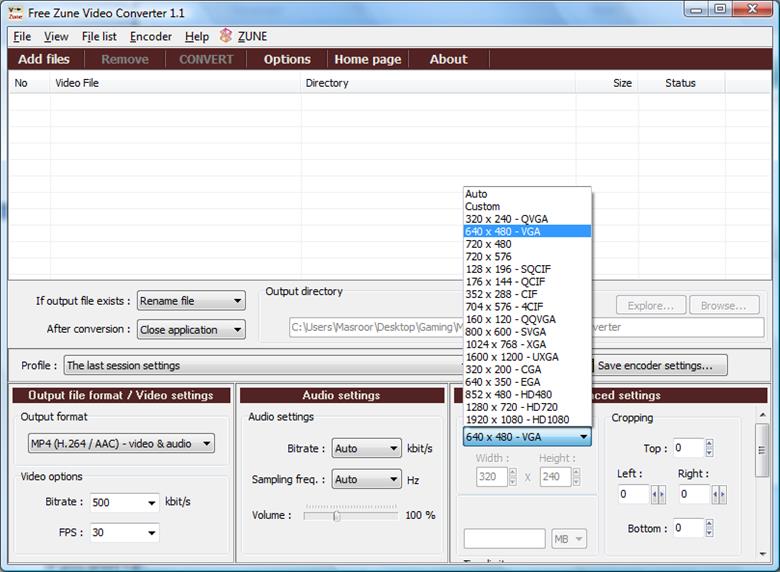
Those are
the settings I have, which youtube doesn’t complain about. You can change the
resolution which will affect the various quality settings youtube and possibly
other sites offer. 1280x720 is for 720p [HD], 1920x1080 is for 1080p [HD], and
the one I have hightlighted, 640x480, is for HQ (480p). Granted, if you save it
as an HD file, the game will not only be stretched and kinda appear as awesome
HD (GBA was never meant for HD resolution though XD), but the file will be
large, so keep that in mind.
You can mess
with some of the other settings if you want, but once I pick the resolution and
the output format (which is always the same for me), I’m done, which means I
just drag my videos onto the program and hit “convert”, and it’ll create a new
MP4 file from the AVI file I got from VirtualDubMod which I got from VBA.
All of this
may seem like a long process, but it’s necessary for an awesome video, and once
you learn how to do it, the actual work isn’t long—you just have to wait for
the videos to render, and everything else pretty much takes 5 minutes.
But yes,
that’s the basics of rendering videos. With that, there’s no excuse for crappy
youtube videos of hacks (unless the hacks are crappy, but that’s what the REST
of this tutorial is for!).
Chapter 67: IPS Patching &
General Patching Information
Ah, IPS
patching, one of the oldest types of patching. What is patching? Why, it’s
applying a patch—like you know, a fix or an update—to something. In the case of
ROM Hacking, it means applying the edited parts of a hack to an un-hacked ROM.
Why do we do
this when we can just share ROMs? Well, sharing ROMs is mostly taboo on the
internet, at least on most forums. However, by sharing only the changes, which
is what sharing a patch is, you kind of avoid being attacked by this taboo.
Furthermore, patches only include the changes… I know I just said this, but the
point is that they are MUCH smaller files than entire ROMs, which includes
everything. Thus it’s easier to share patches (though now as technology
advances, patches are becoming a little more obsolete in that you can download
larger files super-fast, and space is rarely an issue).
There are
two things you can do with most patchers: apply a patch and create a patch. I
am going to mostly teach these things. I am NOT going to cover how patchers
work, I am only going to explain the practical use of patchers.
Back to IPS
patching—this is the most basic patch format. IPS patches cannot add data to
the ROM. They can only change the values at already existent places. Thus let’s
say you’re hacking FE7 which is 16MB. If your edited ROM is 18MB, you can’t use
IPS patching because it won’t support it as the files aren’t the same size.
The best IPS
patcher I know of is Lunar IPS, AKA LIPS, so google that and download it and
extract it, then open it up.
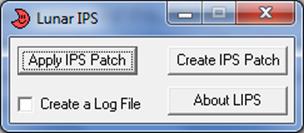
“Create a Log File” really isn’t necessary. “About LIPS” is pretty self-explanatory.
So let’s do “Create IPS Patch”.
You’ll want
to navigate to the folder where your original, unedited ROM is. I made things
easy on myself and put the clean ROM next to the Edited ROM so that I don’t
have to go searching very far.
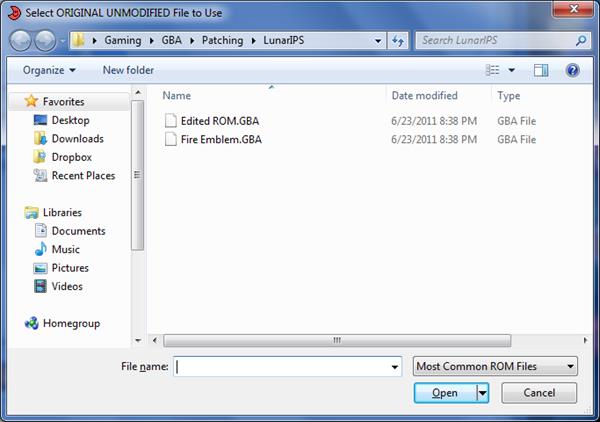
Double-click/open
the unedited ROM. For me that’s “Fire Emblem.gba” (named so because it’s the
original copy of FE7). Then it’ll ask you to select the new modified file, so
do so:
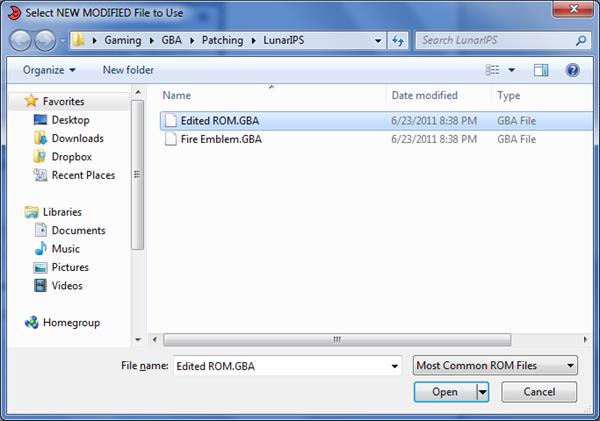
And then you type in a name
for your patch that it will create.
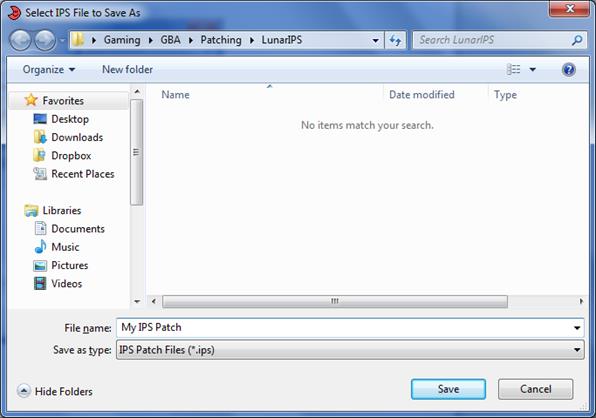
Hit save and it should tell
you you were successful. Wala, you’ve just made an IPS patch. Now let’s apply it.
Hit “Apply IPS Patch” in the
“main menu”. This time, you select your IPS patch you just made (hint: it ends
in .ips) followed by a clean, unedited ROM (hint: it’s not the hack). It should
say “The file was successfully patched”, in which case you have successfully
learned how to deal with IPS patching.
Chapter 68: UPS Patching
I suggest
you read the IPS patching tutorial (at least the beginning) if you haven’t done
so as I will not be as thorough with this chapter as I was the previous.
UPS patching
was revolutionary as it allowed patches between two differently sized files.
The UPS patch would simply have all the extra data attached to it. It’s better
in other ways too but I won’t get into that.
The best UPS
patcher, the one I want you to download, is called NUPS. However, if you search
that on google, you actually probably won’t be too successful in finding it.
Thus I suggest searching “Nintenlord’s UPS Patcher” and go through some forums
and you should find a download. You’ll need the latest version of .NET
Framework or the Mono equivalent if you aren’t running Windows (see google to
find these) for this to work as it is one of Nintenlord’s programs and all of
his programs have this requirement as far as I know.
Extract the
files, open it up and you should see this:
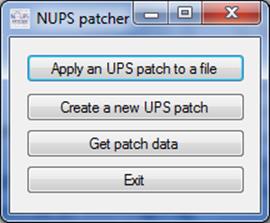
Shiny. “Exit” is
self-explanatory. The rest isn’t as much. Let’s create a new UPS patch.
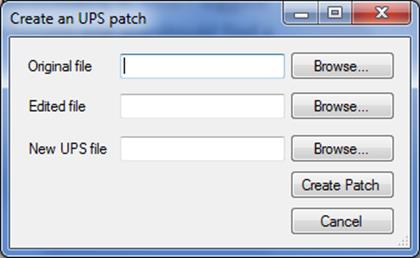
Here you have a nice menu.
You hit “Browse…” and select the file you want, which is labeled on the left.
Thus the first entry should be the unedited, original, clean ROM. The second
entry should be the hacked ROM. The 3rd entry should be the UPS file
you are going to create—just name it something and save it somewhere you’ll
find it. Once you’re done, hit “create patch” and NUPS should create a patch
with the differences, then take you back to the main menu.
In an extremely similar
manner you can apply patches. Take a look.
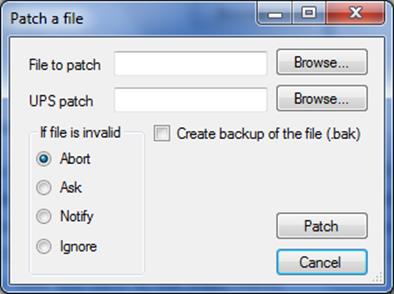
The file to patch is the
clean ROM you want to patch. The UPS patch is any UPS patch—for testing
purposes use the one you just made.
Where it says “create backup
of the file”, this is in case you aren’t sure if the UPS patching will work. It
will make a back-up that you can go back to if the patch screws up your ROM.
Pretty useful.
Another safety check is the
“If file is invalid”. If a patch is applied to a file that wasn’t the same file
the patch was based off of—i.e. the clean ROM—then NUPS will take an action
depending on what you have selected. It will either abort it and not patch it,
ask if you want it patched, notify you that the files don’t match (meaning your
ROM isn’t clean/unedited), or ignore it as a whole and patch anyway as if
though nothing odd happened. Take your choice and hit “patch” to apply the
patch.
Lastly, we have a brand new
feature not seen in IPS patching: “Get patch data”. What you do here is browse
for a UPS file and hit “Check” and NUPS will tell you the offset of any data
that was changed and the length of bytes changed at that offset.
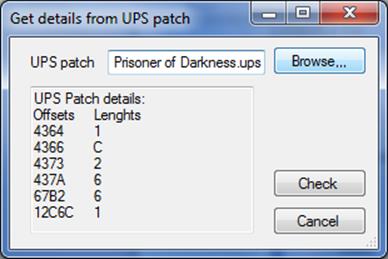
Like so, where the offset
tells where and the length (misspelled as “lenghts”) tells how long. You might
think “this is so pointless” or something like that, but it’s actually useful
for more advanced hackers. It tells you what data was changed, and where—you
can use this to track what data was changed in small fix patches or ASM
patches. If by some chance you don’t want part of a patch’s data, you could use
this to help you find out where the part you don’t want is, and revert it back
to normal, or vice-versa if you only want a specific part. There are many other
uses for this feature but they are rather specific so I won’t get into them,
but this feature has definitely saved me in a few instances by helping me solve
my own bugs/glitches. Thus I’d keep it in mind for the future.
And with that, you can now
use all of NUPS features!
Chapter 69: JFP Patching
WARNING:
This chapter will not be as detailed as the others/assume you know little to
nothing. Rather, it assumes you are familiar with the basics of patching. If
you are new to patching as a whole, I suggest learning IPS and UPS patching
first.
First of
all, JFP patching was invented by Hextator as a better patch format than UPS.
It has its advantages but I can’t think of them all now—I’m pretty sure that it
uses a better format for checksums, is more compatible with FEditor Adv, and
allows you to save the patched file separately from the unpatched file.
Second of
all, you need the latest version of Java for this to work, so get that installed
if you don’t have it already (chances are if Xeld’s other programs are working,
you have it). Then extract the files (you’ll need WinRAR or 7zip probably, the
archive will probably be a .7z) and go into the “Java Implementation” folder. Double-click
on the “Drive” batch file which will load up a command prompt and then ask you:
“Are you
creating a patch instead of applying one?”
Hit “yes” to
create a patch, where you select the original file, edited file, and the path
for the .jfp patch, in that order. Hit “no” to apply a patch, where you select
the JFP patch, a clean ROM, and a path to save the new patched ROM (it does not
apply the patch to the original file, but saves it as a separate file).
…And that’s
all I have to say about that. It’s relatively easy and not complex even if it
doesn’t have the greatest GUI. At least now you can deal with JFP patches
without freaking out, right?
Chapter 70: XDelta Patching
This type of
patching is unique in that it results in very small files and can be used for
NDS hacking, though the latter is irrelevant for this tutorial.
There are
two methods I will teach here: one with GUI, one without GUI. The one with GUI
is nice and all, but the one without GUI is easier for the “final user”, the
person who will ultimately play the patch, as it results in a simple
drag-and-drop patching method. And what’s easier than a drag-and-drop patch?
Not much. The downside is that non-Windows users won’t find Delta Patching very
fun or easy.
First
Method: Formal Program with GUI
First, download
this:
http://www.romhacking.net/utilities/704/
The download
link is at the bottom.
Extract the
files as usual. There are two programs here: DeltaPatcher and DeltaPatcher
Lite. The difference is that the DeltaPatcher Lite can only apply patches. Thus
it was intended to be included with the patch download so that people could
apply patches without having to worry about the feature of creating one. To be
honest, both are pretty easy to use, and if you can use the main one, you can
use the Lite one, so I’m just going to teach the main
one.
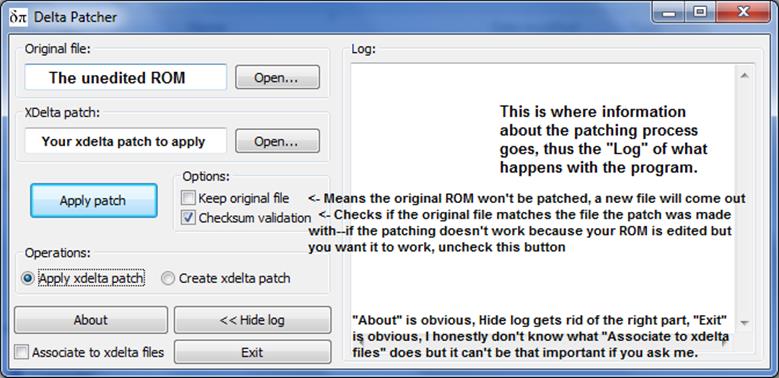
Boom, I
explained most everything there. When you’re ready to apply the patch, hit
“apply patch” (duh) and you’re all done.
To create a
patch, you need to hit “Create xdelta patch”, which will change the top left
area a little bit.
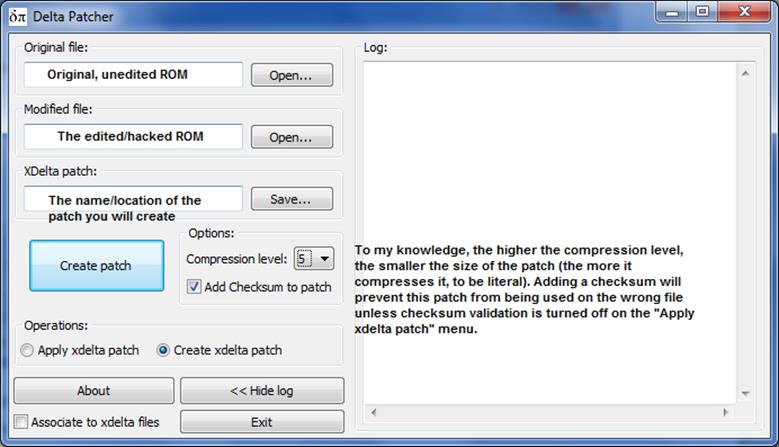
If you’ve
been following the other patching tutorials this is all a complete, obvious
piece of cake, except the compression level dropdown, which I explained above.
Just hit “create patch” and you’re all done, and that’s method one. (Teehee, I
rhymed)
Second
Method: Batch File Editing, without GUI
This is not
for the weak-hearted. The main purpose of this patch format is to make it so
that the people who patch files only have to drag and drop the file to patch
it.
Download
this version of XDelta from my site:
http://www.feshrine.net/hacking/downloads/XDelta.zip
Extract it
and you should see 3 files: Patch Creator, Patch Applyer, and xdelta itself. To
start, never rename “xdelta” to anything else. Ever. Just don’t do it and
you’ll be safe. I realize that people who know how this works can get away with
renaming it to something else, but if you’re reading this tutorial you
shouldn’t know how this works, or else you shouldn’t be reading this tutorial. :P
The other 2
files are batch files. Scary? Not really. You can edit them in any old text
editor. I just right-click it and edit it with Notepad++, you can do something
similar with Textpad or plain old Notepad or something. But don’t try Microsoft
Word or Wordpad, those programs probably won’t work. You want something simple.
First, open
the patch creator. Boom.
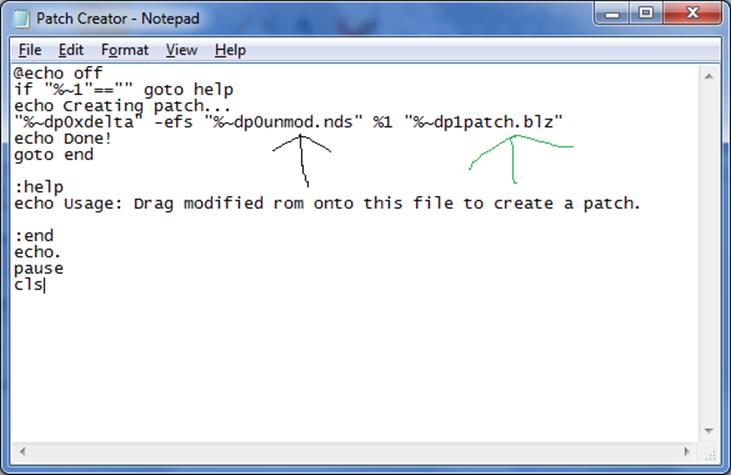
The black
line points to the name of the original, clean, unedited file/ROM. In this case
it’s “unmod.nds”, change it to whatever you want though, like “original.gba” or
something. The green line points to the name of the patch file. This can be
whatever you want, under any extension. To make life simple, keep everything
lowercase and without spaces. If you didn’t already notice, the “.blz”
extension is for “blazer” as I used this patch creator for my own patches.
Heheh. =P
Once you’re
done renaming that stuff, you need to actually put the unedited ROM there. So
in my case I’d put “unmod.nds” in the folder. To make the patch, you simply
drag the edited/hacked ROM onto the patch creator file, and a file called
“patch.blz”, or whatever the heck you named it, will pop out.
Now, how do
we use this patch? We use the patch applier. To setup the patch applier, edit
it like you did the patch creator.
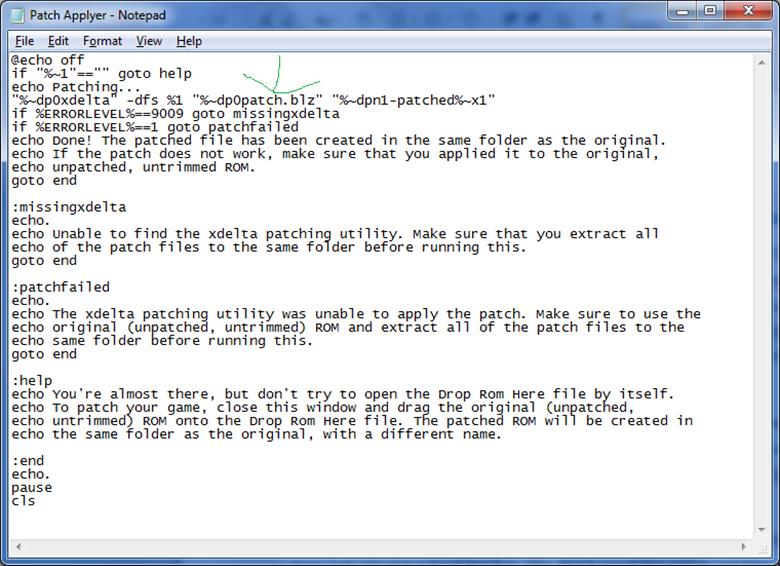
I realize
this can be pretty intimidating at first but you really don’t have to do
anything but change the “patch.blz” to whatever you named your patch to.
Remember, it has to match what’s in the file!
Save it and
close it. Test your patcher by dragging a clean ROM onto “Patch Applyer” (which
I now realize should be spelled “Patch Applier”).
A new ROM called “bla-patched.bla” should appear, where the “bla’s” are the
name of the file and the extension of the file respectively. The point is,
it’ll end in ‘-patched’, so you can’t not know which file is patched and which
isn’t. Unless you’re dumb. But if you’re reading this I’d like to think you’re
not dumb.
That’s that,
for the most part. But let’s imagine we’re some internet guys just playing a
hack for fun. We don’t need the patch creator, just xdelta, the patch applier,
and the patch itself. Thus if you want to share a patch with someone easily,
just include the patch applier, xdelta, and the xdelta patch file you made. The
player just has to get a clean ROM and drag it onto the patch applier file and
they’re done patching. It LITERALLY takes 1 second to drop it, maybe 3 seconds
to make the patch if they’re unlucky, and maybe 6 seconds to find the ROM and
get it to the right folder if they’re having a bad day. And if they can’t do
that 10 second process successfully then they PROBABLY aren’t meant to play the
hack.
And I can’t
write a tutorial on THAT.
Chapter 71: Nightmare Module Format
At some
point in your hacking career it may have occurred to you, or may occur to you,
that there has to be some format to nightmare modules, given all the people
that have made them, myself included. The truth is, there is, and making
Nightmare Modules is actually pretty easy. In fact, that’s why they were used
in the first place—Nightmare modules along with the Nightmare program serve to
make editing tables and arrays very, very easy. It divides a huge amount of
data into different entries and allows you to edit any of those entries and its
contents easily, helping by making the format of those entries match the data
type, and labeling what each entry is.
That may all
sound confusing but as we go through the nightmare format, you should find that
it’s actually relatively basic. To start, I’m going to post the nightmare
format documentation included with the original Nightmare download.
NIGHTMARE
MODULE FORMAT
-----------------------
Blank lines
are ignored, so you can use them to divide stuff up and make it
more
readable.
Lines
beginning with # are comments.
Numbers are
assumed to be decimal; to indicate hex, include a "0x" prefix.
You can even indicate octal with a
"0" prefix, if you're so inclined. :D
All numeric
values can be decimal or hex interchangably, with the exception
of table files - the
values there are assumed to be hex. (This allows
copying and pasting
from existing table files.)
THE MODULE
FORMAT
-----------------
The first
line holds the module file version. For this file, that's "1".
No decimal points or anything fancy.
The second
line is the module description, which appears on the title
bar when the module
is loaded.
The third
line is the root address of the data table.
The fourth
line is the number of table entries.
The fifth
line is the length of a single entry.
The sixth
line is a filename, indicating a list of names to be used by
the entry selector.
If "NULL", the entry selector will only use
numbers. If names
run out before numbers do, the selector will continue
with just numbers.
The seventh
line is also a filename, indicating the table file to be used
by TEXT entries.
Tables here can only be letter-matching, that is, of
the form XX=Y;
multiple bytes or multiple characters, such as XXYY=Z,
or XX=yz, are not
permitted. If "NULL", standard ASCII is assumed.
Here follow
entry-component handlers, until the end of the file.
It is
recommended (for reasons of readability by humans) that a newline
be placed
here, and also after each entry-component handler.
ENTRY-COMPONENT
HANDLER FORMAT
------------------------------
The first
line contains a textual description.
The second
line contains the offset from the start of the entry.
The third
line contains the number of bytes used by the component.
The fourth
line indicates type, which is one of the following:
TEXT - Text editbox
HEXA - Hex array (useful for indicating and
changing unknowns)
NEHU - Numeric editbox, hex unsigned
NEDS - Numeric editbox, decimal signed
NEDU - Numeric editbox, decimal unsigned
NDHU - Numeric dropbox, hex unsigned
NDDU - Numeric dropbox, decimal unsigned
Binary toggles should use NEHU with something
like "(binary)" in their
description, and an
explanation in comments within the module file.
Types are not case-sensitive.
The fifth
line is the parameter file, a name list for dropboxes. It
follows this format:
<number of
entries to follow>
<numeric
value> <written description>
<numeric
value> <written description>
...
<numeric
value> <written description>
The numeric value is displayed in the context
specified by Type
(hex or decimal, for
example). This value is what is written to the
rom when a dropbox
entry is selected and Save is used. This parameter
is
unused ("NULL") for editboxes.
That
information should be referenced frequently as I don’t want to have to
constantly reiterate myself about understood things, such as “#” denoting a
comment.
For me, the
easiest way to make a Nightmare module is to just copy someone else’s. After
all, it’s so much easier to just steal the format than to make it from scratch.
Thus it’s relatively harmless to use it as a basis for your own nightmare
module (granted if you use the same offsets and stuff or you’re just making an
update then you should give/leave credit to the original maker). I am going to
use the FE7 Item Editor for my explanation of the format.
1 – Always 1
FE7 Item
Editor by SpyroDi, updated by Nintenlord – the name. a
super long name might not fit.
0xBE222c –
the starting offset of the data. I can’t help you with finding this. When you
find an array of data and you want to make a nightmare module for it, you’ll
know the offset then.
159 – the number of entries, in decimal.
36 – the number of bytes in each entry, in decimal. Note that the
starting point of the last entry + its length should be this number.
FE7 Item
Editor.txt – the filename of a list of names to use for each entry. It must be
a text file in the same folder, and each name should have its own line.
NULL – don’t
worry about it
After the
header, we start breaking apart the data into different entries, like so:
Item Name
Pointer – the name of the entry. Should identify what it is
0 – the
starting point of that data entry, always starts at 0.
2 – the length of that entry, in bytes, in decimal.
NEHU – the
type of data it is.
NULL – a
dropdown list for dropdown data types, including the number of values, followed
by the values themselves, with the label for the value accompanying every
value. You’ll see for yourself in a minute.
Item
Description Pointer – name redux
2 – starting point. Note that the last entry started at 0 and
was 2 bytes, and 0+2=2.
2 - length
NEHU - type
NULL - text – NULL means that no dropdown
list is used.
The file
continues like this all the way to the bottom. And that’s all there is in broad
sight. However, I’ve yet to cover the different data types. The nightmare
format tells what each is but you may not understand that, so I will just use a
few more words to make it more clear:
TEXT - Text editbox – allows for there to be
a text parameter, meaning an ASCII text string. Let’s say a certain 8 bytes is
not like a statistic but an actual string of text, you’d use this to make it so
that Nightmare will let you edit the text as text and not numbers.
HEXA - Hex array (useful for indicating and
changing unknowns) – this lists the values out as individual bytes. Like its
description says, its mainly useful if you have a
bunch of unknown values that you want to compare between entries.
NEHU - Numeric editbox, hex unsigned – a
standard old edit box where you can type in the numeric value you want. Hex
means hexadecimal, you know the counting system we’ve been using since forever
in hacking, and unsigned means that the values aren’t signed, meaning… oh, I
guess I should teach that. If a value is signed, it means that it can change
sign—any value after 127, which is equal to 0x7F, becomes negative. That’s
right, you can have negative values. That’s how things like negative growths
come about. You can never have signed hex values though, hex values just aren’t
negative, ever—the whole point of the signed/unsigned system is to make it so
that hex values come out as signed in the decimal system.
NEDS - Numeric editbox, decimal signed – see
above, a standard edit box where the value is in decimal and is signed (can be
negative)
NEDU - Numeric editbox, decimal unsigned - a
standard edit box where the value is in decimal and is unsigned (cannot be
negative)
NDHU - Numeric dropbox, hex unsigned – a
dropbox entry, see NEHU for info about “hex unsigned”
NDDU - Numeric dropbox, decimal unsigned – a
dropbox entry, the values are in decimal and aren’t signed
Here are a
few examples:
Weapon
Ability 1 - name
8 – offset from start of entry (8)
1 – length of 1 byte
NDHU – type,
Numeric Dropbox Hex Unsigned, meaning it’s a dropbox where the values are in
hexadecimal and unsigned
Weapon
Ability 1.txt – the list of values possible to use, if it were NEHU instead of
NDHU this would have to be NULL since “NEHU” doesn’t use lists, the “E” being
for “editbox” and all, whereas the “D” in “NDHU” is for dropbox and all. And
all. :D
Here’s an
excerpt from a list:
256
0x00 None
0x01 Weapon
0x02 Magic
0x03
0x04 Staff
As you can
see, the top number is the number of entries, followed by a new line with the
hex and the name. If there is no label it still works fine though.
Just
remember the following:
-
You
can’t have an entry be outside the length of the nightmare module that is
specified in the header
-
The
difference between decimal, hexadecimal, signed, and unsigned
-
Test
small nightmare modules first and then build on them, or you may find yourself
with so many errors that you don’t know where they come from
-
Nightmare
modules are meant for simplifying tables. Not every little thing needs a nightmare
module! (Despite the fact that I made many small and near-pointless nightmare
modules, haha, I only did that to make it easy on people who don’t like hex
editors…)
-
There’s
this tutorial to help you at all times, so you can do it!
You’re on your way to helping the community, starting small,
but that’s how every normal person
starts. This is the final chapter dedicated to a specific teaching purpose; the
rest are very general or aren’t meant to teach anything about hacking. This
means that you have now completed learning most everything there is to being an
awesome Fire Emblem hacker, and now you can start contributing to the hacking
scene yourself in every way possible!
Chapter 72: Miscellaneous Information
Archive
This chapter
is an archive of sorts for information. It will include documentation, links to
help, instructions, anything I can think of that might not fit in a specific
chapter. Thus it may get longer and longer through time, or it may stay short.
I encourage people to submit knowledge to this section that may not fit into
any other category or may fit into too many categories.
Miscellaneous
Notes, Tips, etc.
-
First
of all, check out this thread dedicated to obscure hacking tips, as it has a
lot of random but useful information that you may just need to utilize at some
point! http://serenesforest.net/forums/index.php?showtopic=34117
-
There’s
some interesting ASM hacks that can be found in the FEditor Adv folder, as well
as documentation for much of the program within the doc folder.
-
You
can find source for most programs, hacks, etc. regarding Fire Emblem, so just
look around. Very useful if you ever plan to fully maximize the potential of
what’s around you or learn how various codes etc. work just by looking at
existing codes.
-
Playing
around, guess and check, etc. are great ways to learn!
-
Back-ups,
back-ups, back-ups. You always want to back-up, and keep notes of important
things you do, important offsets, etc., to make the process as easy for you as
possible, and to limit how much you have to go back and change if by some
chance you mess something up.
Battle
Animations
-
Did
you know you can load a spell animation even for physical units? In fact, the
final boss of my hack, The Last Promise, attacks with both a physical weapon
and a spell simultaneously, which makes for an epic duo effect (at least in my
opinion).
-
You
can actually dump the code for animations using a program Camtech made, located
here: http://serenesforest.net/forums/index.php?showtopic=33420.
It will only dump the code, though, and not the frames—but it’s still very
useful if you’re creating animations similar to existing ones, but with different
graphics, as you can copy the timings
amongst other things from the ripped code.
-
There’s
somewhat of a fix to looping battle animations covered briefly in this topic: http://serenesforest.net/forums/index.php?showtopic=34352
-
A
topic with a bunch of animations you can use in your hack (but always give
credit and if needed, ask for permission!) can be found here - http://serenesforest.net/forums/index.php?showtopic=34510
General
Graphics
-
There’s
this cool program called FERecolor which can help make recoloring sprites etc.
easier. You can find a tutorial on it (with a link to the actual program
included in the tutorial itself) here: http://serenesforest.net/forums/index.php?showtopic=27340
-
Making
custom battle frames (AKA battle templates) is difficult, but if you want to,
there’s a tutorial here: http://serenesforest.net/forums/index.php?showtopic=25045
-
There’s
another tutorial on how to find most palettes in the ROM located here: http://serenesforest.net/forums/index.php?showtopic=29625
-
Some
alternate tutorials on inserting map sprites and weapon icons can be found at http://serenesforest.net/forums/index.php?showtopic=24957
and http://serenesforest.net/forums/index.php?showtopic=25610
respectively.
-
Here
are a couple of tutorials on inserting tilesets - http://serenesforest.net/forums/index.php?showtopic=32071
and http://youtu.be/6phxEH9DKBQ
(video tutorial)
Music
-
The
FE7 native instrument map, located here http://serenesforest.net/forums/index.php?showtopic=27558,
lets you use the same instruments that the original Fire Emblem 7 did. The
selection isn’t perfect, but it’s nice as it does make the songs sound more
like they belong in Fire Emblem. Just copy the data in the .bin file to your
ROM and repoint the instrument map (the second word of the header of the song)
to the beginning of the instrument map; e.g. if your song header is at 0xD00000
and the instrument map is at 0xD20080, you’d type “80 00 D2 08” at 0xD00004.
-
A
guide on changing instruments mid-song is located here - http://serenesforest.net/forums/index.php?showtopic=32363
-
A
topic on GBAMusRiper can be found here - http://serenesforest.net/forums/index.php?showtopic=34297
-
And
a lot of information on how sound works can be found here - http://serenesforest.net/forums/index.php?showtopic=36157
Other
-
A
way to calculate average stats is here: http://serenesforest.net/forums/index.php?showtopic=10688
-
Some
thoughts on creating original plots and worlds can be found here - http://serenesforest.net/forums/index.php?showtopic=29699
-
A
workaround for multiple proof weapons can be found here - http://serenesforest.net/forums/index.php?showtopic=32113
-
If
you haven’t already seen it, a bunch of obscure hacking tips can be found here,
and a lot of them are pretty useful! http://serenesforest.net/forums/index.php?showtopic=34117
Chapter 73: Useful Links &
Websites
First, I
suggest you look at my website’s documentation page. Included on it is some of
my own documentation as well as lots of other documentation thanks to various
hackers across the internet. I also suggest googling Hextator’s Doc, a very thorough
compilation of all of a veteran FE hacker’s hacking stuff, which isn’t even
limited to Fire Emblem, but has a ton on Fire Emblem regardless… tl;dr it’s
important.
http://www.feshrine.net/hacking/doc.html
Some other
good hacking websites are:
Some decent
Fire Emblem websites are:
-
http://www.feshrine.net | http://forums.feshrine.net (My own
website, has lots of neat stuff if you ask me :P)
-
http://www.serenesforest.net | http://www.serenesforest.net/forums/
(Very good for everything, the biggest Fire Emblem fansite to exist really)
-
http://www.fireemblemempire.com (this
one just looks cool)
-
http://www.bwdyeti.com/cafe/forum/index.php
(has some miscellaneous resources)
Need a file
host? Here are some:
-
http://www.dropbox.com (more than just a file
uploader, also has direct links)
-
http://www.sendspace.com (deletes files for
inactivity)
-
http://www.fileden.com (deletes files for
inactivity and requires registration, but has 1GB of space and direct
downloads)
-
http://www.mediafire.com (people like this
one, but I don’t, especially due to ads)
Need an
image host or some way to upload images:
-
http://www.photobucket.com (registration
required, but many features and lots of space. DO NOT UPLOAD BMPs TO THIS WEBSITE, IT DISTORTS THEM)
-
http://gyazo.com/ (this is actually a program used
to take screenshots very quickly: usually works and is really neat, but not
great for all purposes)
Chapter 74: Bonus – Assembly Hacking
Okay… I
can’t believe I’m writing this.
If you want
to learn some basic assembly hacking for the GBA, more specifically how it
applies to FE7, then you’re in the right place, I suppose. Just don’t expect it
to be easy.
In fact,
before you read this chapter, please make sure you know a lot about modding
Fire Emblem. Like, you should have strong grasp over other topics because I am
going to assume you know a lot so that I don’t have to teach you a lot.
Assembly is a programming language and it’s even more obscure when you start
trying to make hacks of other people’s programming. You’re essentially going
into code that you haven’t written and the way you see it it’s mostly just
simple opcodes and numbers. You have to get a sense for what is what and what
does what on your own, which is why it’s so difficult. If video games were open
source (I’m pretty sure they don’t write them in raw Assembly…) this would
probably be a LOT easier.
Now, even if
you are prepared, there is no guarantee this will help you do what you want.
I’m not a great or highly experienced ASM hacker myself: I taught myself a
little, and I’m going to teach you what little I know. Often times, you’ll see
me saying “I don’t know what this does” or “you’ll have to play around” or
things like that. It’s a programming language: it requires you to have your own
logic and intuition. You WILL need trial and error. You will need to have
patience, persistence, and maybe some food to snack on. Personally, I get
dehydrated somewhat quickly, so having water next to me is essential.
…Seriously
though. I didn’t intend to have this in the Ultimate Tutorial, but here we go.
The bonus chapter—added after the initial completion of this tutorial.
Something that most people never even touch outside of just applying other
people’s assemblies hack.
Assembly hacking.
Preparations:
First, we
need to get you some materials.
-
http://nocash.emubase.de/gbatek.htm
– GBATek. Contains hardware information regarding the GBA and NDS. Yes, a lot
of what we’re learning applies to the Nintendo DS as well. Same programming
language and all. Of this huge resource, the THUMB and ARM instruction sets
will likely grab your attention more than anything else, at least at a basic
level.
-
http://re-eject.gbadev.org/files/thumbref.pdf
- Thumbref. For me, it’s even more useful than GBATek. It’s a very nice
reference used as a reminder as to how codes work in terms of what their name
is, their parameters, and other information. Note that it’s a
reference—something you use as a tool or guide, like a cheat sheet. It
won’t really teach you anything. Also, you may want to save this PDF to your
computer to make things easier.
-
http://sourceforge.net/projects/devkitpro/
- Necessary to actually compile your ASM routines into something you can use.
Sadly, we’re already at a point where I can do little to help you: I managed to
install this and get the necessary programs working after some magic that I
don’t remember, but people tend to have problems with it. For now, try
installing the program and once it’s done, restart your computer. We’ll worry
about actually making use of it later.
-
A
Windows computer. I won’t even bother trying to support Macs here. I’ve got no
clue. I’m all for convenience and compatibility, which is why I use Windows. I
wouldn’t even know where to start in terms of supporting Macs here, so I’m not
even going to try. :(
-
https://dl.dropbox.com/u/8875056/hacking/asm/Assemble%20ARM.zip
– Extract this ZIP and you should get a batch file that will help you compile
Assembly. If you edit it with a text editor, you should note that it requires
some files in the directory C:\devkitPro\devkitARM\bin\, which is why it’s
important to install devkitPro.
-
http://notepad-plus-plus.org/download/v6.3.1.html
- Notepad++. It’s just too good to pass up. Way better than writing in plain
old notepad. It’ll color code things and just help you with your
organization and general programming happiness. Use it, please.
Now that you’ve got some setup, let’s get into things. This is your last warning, by the way: I’m not going to be teaching this very easily where I go into unnecessary amounts of detail and explain every little thing, assuming you know hardly anything. You’ll be expected to know how events work, how to make changes using Nightmare, how to use a hex editor quickly and efficiently, lots of general hacking terms etc., and how to memory hack (here’s a short video: I suggest you fool around a little more than what I did there though, so you can learn more/master it a little) and use VBA as I’ve taught in previous chapters.
It’s assumed that if you’re continuing, you’re prepared, and you’re ready to put some effort and time into this. If you’re not happy, try finding another ASM tutorial out there that’s actually practical—I never could, so I spent dozens of hours teaching myself, having the hardest time just doing the most basic ASM hacks. I’m not trying to complain, I’m just trying to prevent you from complaining.
But alright, enough of that. Let’s get on with this. Assembly hacking might be tiring and difficult, but it’s also the pinnacle of hacking, letting you actually edit how the game works, and can some of the most rewarding hacking you will ever do. It’s also a programming language, meaning if you learn this well enough, you can write it on your résumé (though I’m not sure how impressive people would find it) and apply some of the basic concepts towards learning new programming languages, if this is your first one.
Part 1: Background Info
- Assembly, ASM hacking, whatever: I’ll likely just use terms loosely and call what we’re doing “ASM hacking”, meaning hacking assembly. We might sometimes actually write our own routines, in which case we’re doing less modding and more creating, but I’ll still call it an ASM hack, because whatever, proper terminology isn’t a huge deal to me.
- Assembly can be viewed in a hex editor, like anything else. In fact, certain nightmare modules, like the vulnerary editor, actually edit assembly itself. Also, assembly can be found in various parts through the game, but the core of it is found in the first… roughly a megabyte, though I think it’d be more accurate to say it goes around to somewhere in the 0x080C0000 section.
- Assembly codes, known as opcodes, usually take up 2 bytes. However, what it does is more dependent on the bits (review binary if you need to: I won’t explain it here). There are several exceptions in which case opcodes may take more than 2 bits or in the case of the ldr function, may have values stored at the end of a routine, as opposed to in the middle. This will make more sense later. (Also, function/code/opcode, it’s all the same to me, FYI.)
There are multiple ways to “hack the ASM”. You can edit it through a hex editor directly, but this is often too difficult because you would have to know what the hex for various opcodes are, and figuring them out can be a pain, to say the least. However, if you’re just editing a parameter, which may be one byte (e.g. 0x14, or 20, the level cap) then it’s probably much easier to just edit that parameter directly.
You can also write a text file that is usually saved as a .asm file and contains code for an assembly routine. FYI, an assembly routine is the generic term I use for any code of assembly that does something. It’s sort of like a script, except I might reference “the damage calculating routine”, which might in fact be part of many other routines, because the game WILL reuse code where relevant (for instance, the Random Number Generator code is used a lot).
Part 2: Inserting an
Assembly Hack
Before you go making your own, let’s get you familiar with how to insert some pre-existing ones.
https://dl.dropbox.com/u/8875056/hacking/asm/Hector%20Hard%20Mode%20Hack.zip – Here is a hack I made that forces the game mode to be Hector Hard Mode. It’s very simple and we’ll use it as an example.
First, put the Assemble ARM batch file in a folder where you’ll stick your ASM hacks. It’s good to be organized so I suggest making a folder for every ASM hack you make once you’re done with it, naming it appropriately and taking notes ALL THE TIME. Taking notes is super important, especially in finding bugs in your own code—and if you ever have to go back to edit code, you’ll be happy you took notes because it can be a serious pain to figure out what the heck you wrote a few months or even weeks ago.
Extract it and take the .asm file and drag it onto the “Assemble ARM”. If devkitPro was installed successfully and everything, it should work fine. If not… well, we have a problem. Try restarting and changing your installation method or other random stuff. I’m really not too sure how it works but people tend to have problems with this. Sadly, I’m really no help here—hey, I warned you earlier.
It should give you a dialog message in a command window like so:
It may occasionally mention
something about a “pipe”… I really don’t know what it means, but it doesn’t
really affect anything, so don’t worry.
Two files should be outputted
once it’s done: a .dmp file and .symbols file of the same name. The .symbols
file is, as far as I know, useless. I don’t know what it does because I didn’t
learn the programming language properly but I never needed it and I got pretty
far.
The .dmp file is super
important though. It contains the raw hex/binary (remember, it just depends on
whether you look at it through a hex, binary, or even text editor—utlimately,
the file is still the same).
To insert this ASM hack into
your ROM, find some free space, copy all the data from the .dmp file, and paste
it there. Note the offset.
Now the way this ASM hack
works is that you have to call it somehow. Sometimes you can call ASM routines
through events and other times you’ll want to insert your ASM into an already
existing routine meaning you have to find the routine first and then insert
over that routine or even expand the routine to branch elsewhere, put your code
there, and then tell the game to go back to after you branched at the original
point (meaning, where you were before you branched, but after the branch code
itself, or else you’d infinitely branch: we’ll get to this later).
This one is easy because you
can just write an event using the event assembler to activate it. You should
know the code already, but if not, it’s:
ASMC 0xOFFSET
There’s a catch here though.
0xOFFSET is the offset in hex, okay. You know this. But if you insert it to
say, 0xD50000, it won’t work. This is because the routine is written in THUMB
and there’s a difference in how things work between THUMB and ARM.
What the hell are THUMB and
ARM? Don’t ask me, I don’t really know. But we can use either THUMB or ARM to
write our programs and we’re going to use THUMB. To let the game know we’re
using THUMB, we’re going to make it start at an odd offset—meaning we add +1 to
the offset we inserted the routine at. Yes, that’s right—you would actually
type “ASMC 0xOFFSET+1”, or in our example, “ASMC 0xD50001” for it to load the
routine at 0xD50000.
Go ahead and test the event:
you probably won’t see anything happen because it’s such a simple event.
However, secretly, it forced the game to be hector hard mode. In fact, if you
beat the chapter you were on and save, you should be able to tell because in
FE7, Hector Hard Mode playthroughs have grey-colored chapter titles. Granted
you might have changed that in your hack, but that’s the default in vanilla
(non-edited) Fire Emblem 7.
If you’re not convinced/don’t
want to beat the chapter though, you can check the memory. Go to 0x0202BC13 in
VBA’s memory viewer and you should see “0x03” there. 0x01 = Lyn’s mode, 0x02 =
Eliwood’s mode, 0x03 = Hector’s mode. At 0x0202BC0C, you should see “0x40”.
0x40 is the value for hard mode (it’s likely a bit map though, meaning what
actually matters is the bits in the ‘4’ that act as the flag for hard mode…
anyhow, this hack FORCES it to be 0x40, so the other bits are set to 0 here).
Congratulations: you’ve now
inserted your first ASM hack. A couple notes: using “ASMC” runs the code once.
If you want to run it again, you use the code again. The program needs to… you
know, end, or else it’ll go into an infinite loop and freeze, so you can’t
“make the program loop” in that regards. Thus if you were trying to say, make
sure someone’s HP was always at max all the time, using an ASM hack like this
wouldn’t be a good idea because if it’s just constantly forcing that HP, it
can’t do anything else… as in like, you couldn’t play the game, because the
game runs on ASM. XP
Anyhow, next let’s figure out
what the ASM hack actually did.
Part 2: Breaking Down Your First ASM Hack
Before breaking them down,
make sure you can insert ASM hacks with little trouble. There are some ASM
hacks on the Fire Emblem Shrine Forums and Serenes Forest Forums: look for them
and try them out. Some might just ask you to edit hex directly, while others
might ask you to use a patcher of some sort or copy some data. Whatever it is,
be familiar with it: the more you know going into these things, the easier
it’ll be, because you’ll have less new things to learn, if that makes sense.
So, ASM hacks are written in
a .asm file, which is really just a text file with the extension .asm. Thus you
can just right-click the Hector Hard Mode Hack.asm text file and edit it in
Notepad++ and you’ll be off.
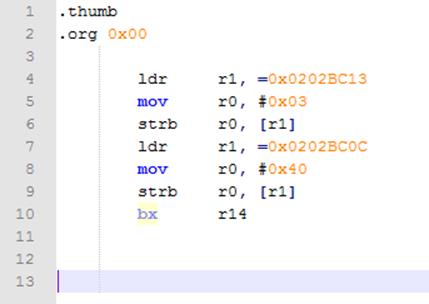
Oh gosh, what does THIS mean?
Don’t worry, I’ll teach you.
But again, I’m not going to go over things constantly and repeat myself a ton,
meaning once I teach what the .thumb code does, you’ll be expected to know it
henceforth. If you need to look back on things I taught, by all means, look
back—it’s not expected that you learn this all in one reading, on your first
time.
To start, every code starts
on a new line. There are two main types of codes here: a code that the
assembler uses in terms of like, writing the program, which are codes that
start with periods, and actual assembler codes, which will be inserted into the
ROM—they’re usually indented and don’t start with dots. You don’t have to
indent, but it’s nice for organization purposes to indent once or twice when
you write an opcode and also to keep all the parameters on the same level as
well. It makes scanning through code and the such easier. Good programming
habits can go a long way.
Now, let’s begin:
-
.thumb sets it so
that the instruction set use is THUMB. You’ll want this at the beginning of
your files pretty much all the time, unless you’re using ARM, which I am NOT
teaching here, because I am only teaching you what little I know about ASM
hacking.
-
.org sets the
offset. It’s just like the event assembler code, ORG—in fact, Nintenlord, the
maker of the Event Assembler, knows ASM, and borrowed a lot of the ideas in his
event assembler from knowing assembly and programming in general, I’m pretty
sure. I’d go into making comparisons and such, but it’s not really relevant. For
this example, we want the program to write to the offset 0x00, so we tell it
that. 0x00 is the same as 0x0000000000, FYI. Also, this code is totally
important, just like the .thumb code.
-
There is a blank
line at the end. Well, several, in this case, but in general, you just need
one. The assembler will complain if you don’t have one. Give it one. Don’t let
it complain.
Okay, we’re done for now.
Yeah, I totally just avoided the actual assembly there. Teehee. That’s next:
ldr: ldr is a very important code. It loads a word to a register. Oh man,
what’s a register?! Looks like I need to take a break already so I can
introduce registers:
Registers are like little slots where you can store
values. They’re like boxes, each one with their own value, up to a word long.
You can store information in them and load information from them, but they’re
just temporary—they don’t really do anything. However, they’re also variables.
What are variables? Study up
on’em, bud, the general idea is important—how it applies here is that when I
say “r1”, I’m really talking about whatever is in r1. We don’t know exactly
what it is because it depends, so we just reference it as a variable here.
Instead of saying “move the specific value ____ in box r1”, we just say “move
box r1”. It’s actually a lot simpler in practice than I’m explaining here, so
let’s just continue on.
ldr: ldr is
a very important code. It loads a word to a register. What the word is depends
on what comes after the comma. In this hack we have the code:
ldr
r1, =0x0202BC13
ldr tells us it’s loading a
word, or 4 bytes, into a register—the register r1 (technically the 2nd
register because there is an “r0” as well). The value we are loading is
designated by what is after the “=”, 0x0202BC13. In the ldr code, the equal
sign is needed so that it knows it’s loading that value. I don’t know the
specifics, but just use it. XP
Okay, so before I continue
introducing codes, I need to tell you something else. It’s a very good idea to
keep track of what register holds what. On that note, you may want to keep a
separate text file with notes (including what the heck that word “0x0202BC13”
is might be helpful too :P) but you may also want to add comments.
To add comments, just add the
@ sign, followed by a space (I’m actually not sure if the space after the “@”
sign is necessary, but I do it anyway because I was never taught formally so I
just copied what I saw, haha), followed by the comment. You can do this on a
new line or append it to a line of code. So we could type in
ldr
r1, =0x0202BC13 @ Loads the word 0x0202BC13 to r1
and it would have the same
effect as before. The @ sign and everything after it are ultimately ignored.
Furthermore, you may want to
keep track in general when you edit values in registers (which is pretty much
all the time) so that you know what register holds what. Often times you have
some intended operation you’re trying to do and when finding bugs/glitches,
it’s good to know what EXACTLY are the numbers going through the system.
Sometimes though, you’ll load a variable into the system, in which case you
just have to put in some example value and run through the program in your head
and test things to see how it turns out in various situations (you must always
test multiple situations once we get onto conditional branching, which says “if
this, do this, or else, do that”, a common theme in programming languages.
Oh boy, more rants and
information for you to absorb. I told you it wouldn’t be easy. I’m not even
giving lots of nice pictures to work with. Text, text, text, and more text.
By the way, it might seem
silly to keep track of all of this in your head—that’s why eventually, I’ll
teach you about using debuggers, which will let you run through the code
systematically, using a program, and really help you keep track of what’s
happening. It’ll also help with a lot of other things. But step-by-step—you’ve
got a while to go before we get to that point.
mov
r0, #0x03
The “mov” opcode does what
you might think—it “moves” values around. In this case, we are “moving” the
value 0x03 into register 0, r0. As for where we’re moving it FROM… don’t think
too much about that, alright? Think of it as just saying “r0 = 0x03” in this
case. We can also do something like mov r0, r1, which would say r0 = r1… which
is slightly confusing, because you might wonder “so does r1 become r0 or does
r0 become r1?” and the answer is “r1 becomes r0” because if mov r0, #0x03 makes
r0 = 0x03, then mov r0, r1 makes r0 = whatever value is in r1.
By the way, the “#” sign next
to 0x03 is key. It has to know it’s a numeric value. Don’t forget the # sign.
strb
r0, [r1]
We’re making progress! This
code sort of does the opposite of ldr—it stores values instead of loading them.
However, this code actually stores a byte,
not a word. How do we know? Because the opcode is “strb”, which stands for “store
byte”, where the “b” is for “byte”.
If there wasn’t a “b”, it would store a word. If there was an “h”, i.e. “strh”,
it’d store a half-word, or 2 bytes. Of course, the load function has similar
variations, though it also has two more variations. Let’s take a look at
thumbref:

LDR (okay, they capitalize
it, I don’t, big deal) loads a word into a register. We know this. Thumbref
tells us this too—the first column is the name or “mnemonic” of the opcode. The
second is a very short description of what it does. The third is a list of
possible formats you can use the code in—essentially, you have a little bit of
freedom as to how you use the code, i.e. what parameters you use. The fourth
column specifies what the variables are and the such—right now, they don’t make
too much sense, even to me, but thumbref
DOES give definitions of the symbols.
Let’s break down Rd = [Rn + Rm], which is under every row in the fourth column of that image I showed.
Rd = destination register, according to this. In other words, it’s the register that is being effected.
Rn = a register. “n” here is generic. We can put whatever we want. It’s just saying that it’s some register we choose.
Rm = another register, this time just called “Rm”.
+ means plus/add, meaning
we’re adding the register Rn and Rm together. I’m sure you guys can handle some
addition.
[ ] are brackets that… it’s
hard to explain, but it’s like instead of loading the value Rn + Rm, it loads
the value at the ADDRESS Rn + Rm. Essentially, it treats whatever is in the
bracket as an offset, instead of just some arbitrary value.
Anyhow, they’re important,
and they’re there because the opcode format expects it. Similarly, be sure that
you don’t forget it—thumbref is useful like this because you can always check
the code format to make sure you’re using it right, or using the variant that
you want to use. (The assembler will likely give an error if you use a code in
a completely wrong format, since it won’t know what to do with it.)
Some of the other symbols
we’ll get to later, and some of the others I still don’t really understand
myself, so yeah…
…
I digressed a lot, but back
to the point:
strb
r0, [r1]
So strb stores a byte. How
does this code work? Well, this one’s a bit tricky. We’re actually storing the
byte of r0 into r1. It’s been a while, but in this example, r0 = 0x03, and r1 =
0x0202BC13. Now that we know how to use thumbref, let’s see what it says about
this.
STRB Store Register (unsigned byte)
STRB Rd, [Rn, #] [Rn + (#<<2)] = Rd
STRB Rd, [Rn, Rm] [Rn + Rm] = Rd
No pic this time because
there’s this stupid grey line plaguing my thumbref and it looks ugly. So raw
text instead.
Anyhow, what we’re doing
doesn’t really match either of these formats. However, you can kind of think of
it as either one, except we’re ignoring a parameter. There is no extra # or
register we’re dealing with. Our code is just strb r0, [r1, #0x00] if you want
to think of it that way, though I wouldn’t write it that way.
So what it’s saying is that
it’s storing a byte from Rd into Rn. Which is odd, because we said “into Rn”,
and yet “Rd” is the destination register. Yeah, I don’t really understand it
myself, but that’s how it works. Back to the example, that means we are storing
r0, 0x03, into the OFFSET 0x0202BC13. Why offset? Because as I mentioned
earlier, brackets denote an offset, giving an actual meaning to the word
“0x0202BC13”.
Okay, so now we know
0x0202BC13 is an offset. What’s at this offset? We made it so that we changed
the value at 0x0202BC13 to 0x03. That’s what “strb” does. Well, what we did is
kind of like memory hacking—0x0202BC13 contains the value for the mode, which I
actually mentioned a while back. If it’s 0x03, the game reads it as “Hector’s
mode”. So what we did was changed the value so it’s 0x03. We essentially memory
hacked using assembly, except we did it FOR the player. Cool beans, huh?
Now, I’ve taught a lot, so
let’s do some practice. Well, just one little practice. I’m going to give you
something just like before and you’re going to tell me, to the best of your
capability, what it does.
ldr r1,
=0x0202BC0C
mov r0, #0x40
strb r0,
[r1]
…It’s actually the next part of the ASM hack
we’re looking at here. Look through it and try to figure out what it does.
Think about what value is stored in each register. Try to figure out what the
values “0x0202BC0C” and 0x40 do—I specify it a while back. Then, read on.
…
What it does is load
0x0202BC0C into r1, replacing the old value that was there. We don’t need
whatever was in r1 before, so we’re just overwriting it.
Then, it moves the number
0x40 into r0, meaning r0 is now equal to
0x40.
Lastly, it stores the value
0x40 at the offset (denoted by brackets) 0x0202BC0C.
From a practical stand point,
we “memory hacked” the offset 0x0202BC0C to be 0x40, which sets the mode to
“hard mode”.
If you understood all of
that, great job—if not, I suggest you review it before you move on. Remember
that there are other resources to make use of besides this tutorial. ^_^
Now, we only have one line
left. W00t! ALMOST THERE! It’s taken forever, but there was a lot to teach
besides just the opcodes. You’ve learned a lot. Let’s wrap this up.
bx
r14
Our shortest code yet, but
there will be another long explanation.
…You see, there are 16
registers. r0-r15. I think. (I know, I’m never sure of anything.)
But some registers have
special purposes. Generally speaking, r0-r7 are free for you to use. r8-r13, I
dunno, don’t ask. r14 and r15 are a bit special though. r14 contains the address
that the “game” or “processor” or whatever you want to call the “thing” that
runs through ASM was at before it last
branched. I think. Don’t quote me. On the other hand, r15 contains the
address of where you are right now.
Thus it’s a little bit risky
to mess with these, but they’re also very important to have a working knowledge
of. FYI, r13 is also called sp (stack pointer), r14 is also called lr (link
register), and r15 is also called pc (program counter). They’re all super
important in more complex hacks. For now, what this does is “branches and exchanges” to r14. Since r14 contains the address of where the game
was at its last branch, what it does in this case is takes you back to where
you just were before you started running this code.
Think about this from the
game perspective: everything runs through ASM, correct? So before the game ran
this ASM routine, what was it doing?
…Wasn’t it running ASM
related to the event codes right before it?
I think it was.
So what will it do?
It will return to that point
and start running from right after the ASM call you did with ASMC. In other
words, it’ll run the next event code.
IN OTHER WORDS, it ends the ASM routine. It says “we’re done here—go back to whatever
you were doing before you were running me”.
IN OTHER WORDS, we’re done here.
Part 3: Second Example – More Codes, More Fun
Before we go onto more examples, I suggest doing some experimenting. Take that simple ASM hack I gave you that makes the mode Hector Hard Mode and change some of the values. Change the 0x40 to something else. Change the offset to something else. Be careful you don’t choose an offset that breaks the game though—if you’ve memory hacked before, which you should have, you should know how to edit characters stats through memory. Well, find the address of say, the level of some unit, and type that in instead. Make their level 99 because no one’s level in Fire Emblem has ever gone that high and it’d be interesting. (I shouldn’t be saying this because it’s such a fundamental, but use MS Calculator or something if you need to convert from hexadecimal to decimal, decimal to binary, or anything like that.)
Once you feel comfortable enough making small edits how you like, let’s continue on to learn more opcodes. Also, I’m going to expect you to experiment and play around on your own from here on out. I might not say so explicitly but it’ll take good practice to really know these codes. Your hacks don’t have to make some awesome change or even be useful—it’s all for learning purposes. However, you CAN make useful hacks with what knowledge you have right now—after all, making the game use Hector Hard Mode allows one to use the bonus levels feature, which autolevels enemies according to a value you can set using the Chapter Data Editor, which is a nice feature to have handy.
The next example is a huge step up from the last one, but whatever, you can study and perfect things on your own time—let’s get to it.
https://dl.dropbox.com/u/8875056/hacking/asm/Character%20Data%20Clearer%202.zip – This hack is known as the Character Data Clearer hack and is capable of clearing unit data by a table. I used it in TLP to clear all the character data for use in the post-game, because everyone’s levels are reset. Furthermore, I *think* that it is also used in Elibian Nights to reset the character data after a tale has been completed. The manual way is to spam the KILL code on every possible unit which is not only a stupid copy/paste job but is also time-consuming in game as the player has to wait for characters to be killed in the background (with the worst part being that you can hear the death sound -_-).
So we know what it does—let’s open it up and see what it’s all about. Keep in mind that I am not always the best note-taker myself because I tend to be lazy and some of these codes are so common/simple for me that I didn’t always feel the need to document them if I already knew what they did. However, other times I write a LOT of notes, mainly when I’m using new codes or combinations of codes or am trying to fix bugs. In general, if you have the time, write notes—aside from taking up time, it doesn’t hurt, and it might ultimately save you more time than it took to write them.

These first four lines are just notes. Okay, so we DON’T need spaces after the “@” symbol. Seems I just forgot about that detail. :P Anyhow, I don’t note every register here, but I do note some things. As for what it means, you’ll figure it out later.
We know what the first two lines do. However, the third line is new. However, don’t be alarmed: it’s just like the Event Assembler. “Initial” is a label. We can reference it. Whatever offset we are at, that is what “Initial” is equal to. Right now, that means offset 0x00. However, when writing code, that offset isn’t always obvious. If you want to jump between parts of the code, you create labels and reference them.
HOWEVER (you’ll be reading me “however” you a lot), you won’t see this when disassembling the game’s assembly. These disappear. The assembler uses them, but in terms of actual code, they aren’t there. It’s just like the .thumb codes—they’re used to write the code, but the output will ultimately all be nonsensical numbers.
Let’s move on.
push {r0-r6, lr}
This is an important code and a difficult concept to teach. What it does is it “pushes” registers. The basic idea is that it stores the values in the registers for later use—you can bring them back later. It stores them in what’s called a “stack”. It puts them on the top. When you use the opposite of the push command, which is pretty much a must, you bring back what’s currently on top of the stack. In this case, we are “pushing” r0 THROUGH r6 (the hyphen means through) as well as lr, or r14 (the comma is used to specify a separate one). You could type push {r0, r1, r2, r3, r4, r5, r6, lr}, but it’d be pretty silly and inefficient.
If you need some analogies as to how this push thing works, here’s a Skype chat with a friend I had (I am “ballin1337”, FYI) where I casually explained the push/pop. FYI, the pop works the same way, except you type “pop” instead of push, and if you “push” lr, you must “pop” pc in return (and of course you must also pop all the other registers that you pushed). Anyhow, here is the conversation—read it if you want, or skip ahead if you get it already.
[1/18/2013 7:14:30 PM] ballin1337: next is a new rather important but complicated code
[1/18/2013 7:14:33 PM] ballin1337: the "push" code
[1/18/2013 7:14:39 PM] ballin1337: it actually kind of does what it says
[1/18/2013 7:14:43 PM] ballin1337: and works with another code, called the "pop" code
[1/18/2013 7:14:46 PM] ballin1337: what they do
[1/18/2013 7:14:54 PM] ballin1337: is they move data into stacks
[1/18/2013 7:14:56 PM] ballin1337: and move them out of stacks
[1/18/2013 7:15:04 PM] ballin1337: so lemme give you an analogy
[1/18/2013 7:15:19 PM] ballin1337: so let's say you're working at your desk.
[1/18/2013 7:15:33 PM] ballin1337: on your desk, you have a bunch of folders
[1/18/2013 7:15:38 PM] ballin1337: because you were working on this stupid history project
[1/18/2013 7:15:57 PM] ballin1337: so now it's all cluttered
[1/18/2013 7:16:01 PM] ballin1337: and you don't have ANY space on your desk
[1/18/2013 7:16:06 PM] ballin1337: annoying, right?
[1/18/2013 7:16:12 PM] Jubbeeh: most defs
[1/18/2013 7:16:21 PM] ballin1337: so you're like
[1/18/2013 7:16:27 PM] ballin1337: "I can procrastinate on my history homework"
[1/18/2013 7:16:31 PM] ballin1337: "but math is due TOMORROW"
[1/18/2013 7:16:38 PM] ballin1337: thing is, you don't have any space to work with
[1/18/2013 7:16:44 PM] ballin1337: so what do you do?
[1/18/2013 7:16:48 PM] ballin1337: you push everything off the desk
[1/18/2013 7:16:55 PM] ballin1337: and make room for your math homework.
[1/18/2013 7:17:08 PM] ballin1337: now everything's on the floor
[1/18/2013 7:17:16 PM] ballin1337: you roughly know where it was on the table though
[1/18/2013 7:17:18 PM] ballin1337: so you can put it back easily
[1/18/2013 7:17:25 PM] ballin1337: but right now, you're doing math
[1/18/2013 7:17:32 PM] ballin1337: not only that
[1/18/2013 7:17:38 PM] ballin1337: but you made a note of where you were in your history project
[1/18/2013 7:17:46 PM] ballin1337: to make sure you could start it back up at any time
[1/18/2013 7:17:52 PM] ballin1337: without having to figure out what the hell you were doing
[1/18/2013 7:17:58 PM] ballin1337: now
[1/18/2013 7:18:00 PM] ballin1337: you do your math homework
[1/18/2013 7:18:05 PM] ballin1337: while screaming in agony
[1/18/2013 7:18:14 PM] ballin1337: eventually though
[1/18/2013 7:18:15 PM] ballin1337: you finish
[1/18/2013 7:18:23 PM] ballin1337: and the next day, you decide it's time to get back to that history work
[1/18/2013 7:18:26 PM] ballin1337: so what do you do?
[1/18/2013 7:18:40 PM] ballin1337: you take the folders
[1/18/2013 7:18:45 PM] ballin1337: "pop"'m on the desk
[1/18/2013 7:18:48 PM] ballin1337: and pop'm open
[1/18/2013 7:18:52 PM] ballin1337: ready to use
[1/18/2013 7:18:58 PM] ballin1337: ready to get straight back to work, right where you left off.
[1/18/2013 7:19:02 PM] ballin1337: and that's push/pop.
[1/18/2013 7:19:06 PM] Jubbeeh: XD
[1/18/2013 7:19:16 PM] Jubbeeh: pop'm back
[1/18/2013 7:19:18 PM] Jubbeeh: winning
[1/18/2013 7:19:22 PM] ballin1337: XD
[1/18/2013 7:19:27 PM] ballin1337: a little bit of a stretch but eh
[1/18/2013 7:19:41 PM] ballin1337: as for how this applies
[1/18/2013 7:19:42 PM] ballin1337: easy
[1/18/2013 7:19:47 PM] ballin1337: registers often have values in them already
[1/18/2013 7:19:49 PM] ballin1337: and said values are important
[1/18/2013 7:19:55 PM] ballin1337: you don't want to just screw up whatever is in there!
[1/18/2013 7:20:00 PM] ballin1337: the game might need it!
[1/18/2013 7:20:05 PM] ballin1337: so what you do is
[1/18/2013 7:20:09 PM] ballin1337: you "push" them
[1/18/2013 7:20:11 PM] ballin1337: to save them
[1/18/2013 7:20:20 PM] ballin1337: then, you can use them freely
[1/18/2013 7:20:22 PM] ballin1337: and once you're done inserting your own code
[1/18/2013 7:20:25 PM] ballin1337: you "pop" them back
[1/18/2013 7:20:35 PM] ballin1337: so that the game is right back where it left-off
[1/18/2013 7:20:46 PM] ballin1337: how it's done is
[1/18/2013 7:20:52 PM] ballin1337: push {r0} for instance
[1/18/2013 7:20:56 PM] ballin1337: anything in these curly brackets
[1/18/2013 7:20:57 PM] ballin1337: is pushed
[1/18/2013 7:20:59 PM] ballin1337: remember though
[1/18/2013 7:21:01 PM] ballin1337: ANYTHING you push
[1/18/2013 7:21:04 PM] ballin1337: MUST be popped back
[1/18/2013 7:21:06 PM] ballin1337: the game will freak out otherwise
[1/18/2013 7:21:11 PM] ballin1337: it's like pushing it off your desk
[1/18/2013 7:21:18 PM] ballin1337: and losing the project information
[1/18/2013 7:21:27 PM] ballin1337: now you have no idea what the **** to do anymore
[1/18/2013 7:21:32 PM] Jubbeeh: right
[1/18/2013 7:21:37 PM] ballin1337: [s]and you were sleeping during class and you don't have any friends[/s]
[1/18/2013 7:21:52 PM] Jubbeeh: seems close enough to irl XP
[1/18/2013 7:21:57 PM] ballin1337: you can also do push {r0, r1, r2}
[1/18/2013 7:21:58 PM] ballin1337: LOLOL
[1/18/2013 7:22:08 PM] ballin1337: I was totally kidding, just for the record xD
[1/18/2013 7:22:15 PM] Jubbeeh: (jk i have a couple friends XP)
[1/18/2013 7:22:15 PM] ballin1337: so you can separate them by comma's
[1/18/2013 7:22:18 PM] ballin1337: but often it's easier to do
[1/18/2013 7:22:25 PM] ballin1337: something like push {r0-r6}
[1/18/2013 7:22:31 PM] ballin1337: which pushes ALL the registers between r0-r6
[1/18/2013 7:22:33 PM] ballin1337: also, "lr"
[1/18/2013 7:22:41 PM] ballin1337: is like a special name for "r14"
[1/18/2013 7:22:46 PM] ballin1337: it stands for "last register", IIRC
[1/18/2013 7:22:57 PM] ballin1337: just make sure you pop'm back accordingly.
[1/18/2013 7:23:01 PM] ballin1337: I've had glitches cuz of forgetting to do that
[1/18/2013 7:23:06 PM] ballin1337: or typing "push" both times and stuff
[1/18/2013 7:23:07 PM] ballin1337: XD
[1/18/2013 7:23:14 PM] ballin1337: it's the worst because like
[1/18/2013 7:23:17 PM] ballin1337: even when debugging
[1/18/2013 7:23:19 PM] ballin1337: you might not realize
[1/18/2013 7:23:21 PM] ballin1337: until the VERY end of the code
[1/18/2013 7:23:23 PM] ballin1337: lol
Now that that text pillar is done with (or your scrolling down is done with, whichever suited your fancy), let’s cover the next code.
mov r2, #0x00 @ Starts off memory table check counter at 0
You should already know what this does—it stores the value 0x00 into r2. Remember, there might already be a value in r2 because we’re just interrupting the game with our ASM routine. For that reason, we used the push {} opcode to make sure we stored the values safely for registers r0 through r6 (and the mysterious “lr”). Now we can put whatever we want in the registers r0-r6 without worry because we can bring back the old values once we’re done using the pop {} command. See how useful those are?
Now, the comment says we’re making some memory table check counter. What’s that?
It is a method of making a loop. We are setting the loop counter to “0x00”. Every time we go through the loop, r2 will increase by 1, meaning the loop counter will increase by 1. Thus we can keep track of how many times we go through the loop, and we can also use r2 in other ways, like to say “let’s check entry #r2”, where r2 corresponds to which run we’re on. If we’re on run #3, then it will check entry #3. If you’ve programmed in other languages, this idea of a loop is probably pretty basic, but if not, make sure you pay close attention and practice this once I’m done explaining.

Main: specifies that this part of the code is called “Main”. I did this because it is the main loop. Now if I need the code to jump back to this part, I can reference it as “Main”.
Add r2, #0x01 is a simple code. It just adds values and/or registers together. If you look at thumbref, you can see all the variants. This one says “ADD Rd, # Rd = Rd + #”, meaning that since Rd = R2 and the # is 0x01, R2 = R2 + 0x01. In other words, we’re adding 1 to R2, or increasing the loop counter by one. Subtraction works very similarly.
Cmp r2, #0x2A introduces another major concept: conditional branching. What it does is compares two values and looks for some condition—if they’re equal, not equal, if one is greater than the other, less than or equal to the other, etc., according to what you choose, and then if it means the condition, it branches you off to somewhere else, and if it doesn’t, then it continues reading from where you left off.
In this case, it is comparing the value in r2 to 0x2A. If this is the first loop, then r2 is 0x01 right now. So what’s the condition? We can tell by the next code, “beq”. “b” stands for branch and what comes after is the part of the mnemonic that decides what condition it’s looking for.
It’s the first one on the list here, “EQ”, meaning “Equal”. In other words, if checking to see if the two values in the “cmp” code above are equal to each other, and if it is, it goes to the offset after it, called “End”. Before I explain that, let me quickly mention the other two columns above: the “Opcode” column refers to the bits that control what opcode it is (you probably won’t ever need to worry about this), and I have no idea what the status flags do, sorry. I never had to use them so I never learned them. XP
Okay, so we had
So “cmp” is compare and it’s comparing r2 to 0x2A (42) and if they are EQUAL, it goes to the end; if not, it just keeps going to the line after. Now, what is “End”? “End” is a label, just like “Initial” and “Main”. I specify the location of the label “End” by putting it at a certain part in the code some time down below. The assembler will find the offset of “End” and jump to it. Fun times.
Now, what is the significance of this? It says that “if the loop counter has reached 0x2A, or if this is the 42nd time it is going through, then go to the end”. It’s letting the routine quit, or stop. There has to be some way for a loop to stop, after all. This one will stop after 42 checks. The significance of 42 is that the game starts to get glitchy (at least in my experience) after about 42 characters are deployed. In fact, I had to limit the player to only 40 characters in the post-game, I think, due to some silly glitches I couldn’t figure out that only happened to characters 42 and on or something, forcing them to make some choices (though they can re-recruit any character if they so wish, so it’s tolerable).
 We’re going to
tackle this next part a lot faster than we have the last few parts—we’re
learning more and more codes and you’ve already seen variations of some of
these. Practice and/or use thumbref if you need to!
We’re going to
tackle this next part a lot faster than we have the last few parts—we’re
learning more and more codes and you’ve already seen variations of some of
these. Practice and/or use thumbref if you need to!
First, we load the word 0x0202BD08 into r5. We intend for this to be an offset. It’s actually one entry before the first character slot in the memory, as the note mentions. Character data in FE7 starts at 0x0202BD50—each entry is 0x48 bytes. 0x0202BD50 – 0x48 = 0x0202BD08. As for why we choose this offset, it has to do with the math, which we’ll see ahead.
Then we load the value 0x48 into r3. Next, we use the “mul” opcode to multiply two registers together. The “mul” opcode is pretty cool, but it’s limited in that it can ONLY multiply two registers together, which means you have to waste a register “mov”ing the value to multiply by beforehand (as I did with mov r3, #0x48). The first register is the destination register, or the register whose value changes, as per almost every code except the confusing str code. So mul r3, r2 says that r3 = r3 * r2. On our first loop, r3 = 0x48 (this is actually for every loop because it gets set to 0x48 right before the multiplication) and r2 = 0x01 (the loop counter is set to 1 on our first loop). In THIS case, r3 is STILL 0x48, but on every subsequent loop, r3 will be some other multiple of 0x48.
Next, we add the two registers r3 and r5 together. What this does is adds the value in r3 to r5 and stores it in r3. Since r5 contains the base address 0x0202BD08, if we add 0x48 to that, we get 0x0202BD50. That’s the address of the first character in the memory. On the 2nd loop, we’ll add another 0x48 to that, getting the offset of the second character in the memory. So on and so forth: we just made the game calculate the offset of the character in the memory respective to our loop counter.
Next, we use ldr r4, [r3] which instead of loading a word that we specify, loads a word at the offset r3. R3 is currently 0x0202BD50. The first word in a unit’s memory is a pointer to their character data, though the GBA Codebreakers Code on gamefaqs calls it something like “portrait” (it DOES change the portrait, but it changes like, a lot of other things as well). By doing ldr r4, [r3] we are loading the word AT r3, because that’s what the brackets [] mean. The destination register Rd is r4, so we’re loading it into r4. Now, this offset will vary, but for this example’s sake let’s say it is 0x08BDCE4C. Thus r4 = 0x08BDCE4C.
The next command loads a byte into r4. What it loads is what’s in the brackets: it says [r4, #0x04]. A look at thumbref says that what it’s loading here is the byte (ldrb) at the offset of (r4 + 0x04). In other words, it’s loading the 4th byte in the character data. If you’re experienced enough, you should be able to look at the character editor Nightmare Module and see the base offset is 0x08BDCE4C and that the 4th byte in a hex editor is the character ID. The character ID is significant because it is an index that is like a shortcut as to what character we’re referring to. In FE7, 0x01 is Eliwood, 0x02 is Hector, 0x03 is Lyn, etc.
The code after starts another counter, though this time it stores it in r6. And so once we find our character ID, we continue on to the next part:
 From a
practical standpoint, we haven’t really done anything yet, but in actuality
we’re making good progress. Next is this “TableCheck” part of the code. I
wouldn’t label it “TableCheck” if I wasn’t going to reference it later—keep
that in mind. (Otherwise I could just use a comment like @ Table Check,
right?—on a side note, I don’t think labels can have spaces and certain other
characters, so be careful.)
From a
practical standpoint, we haven’t really done anything yet, but in actuality
we’re making good progress. Next is this “TableCheck” part of the code. I
wouldn’t label it “TableCheck” if I wasn’t going to reference it later—keep
that in mind. (Otherwise I could just use a comment like @ Table Check,
right?—on a side note, I don’t think labels can have spaces and certain other
characters, so be careful.)
We have add r6, #0x01 which works just like the last time, which is why I didn’t even make a comment for it—we’re adding 1 to the counter.
Next, we load the value 0x08DDFFFF into r5. You should know this without me telling you, but I’m noting it because 0x08DDFFFF is an odd offset. As it turns out, it’s 1 before 0x08DE0000. I chose it for a reason, and while in retrospect (it’s been a while) I probably could have coded this better to avoid choosing weird offsets, you’ll see why I did soon.
The next code does something like the ldrb opcode we saw before, but now it takes the byte at the offset (r5 + r6) and loads that into r5. A look at thumbref will once again tell you this. On our first run, r6 is 0x01, so it loads the byte at 0x08DDFFFF + 0x01, or 0x08DE0000. Aha! We set the offset to be one before 0x08DE0000 before because we knew that on our first loop, we’d be adding one, because we’re using the loop counter like that.
Now, we have this byte from 0x08DE0000, a place in our ROM (because the ROM is stored in the memory at 0x08000000), stored in r5. What is this value? It is, in fact, data that the user of the hack is defining. We are dealing with a user-created array or table. What it expects here is a value of a character ID—a character ID of a character whose data we want to remove. In other words, this hack expects the user to put their list of characters they want removed at 0xDE0000 in a hex editor. Then, when the hack is used, it will load the byte at this offset. Thus, r5 now contains the character ID of the character we want to remove.
Keep in mind that before, we got the character ID of the first character in the memory, and we stored it in r4. That was the first loop.
Next, we’ve got some fancy conditional branching.

We’re going to start by comparing the character ID we got from the table at 0x08DE0000 to 0x00. If it is, then that’s supposed to mean it’s the end of the table, and we return to “Main”, or the beginning of the first loop. You’ll see why this is important in a short bit.
Then, it it’s NOT 0x00, it checks to see if r4 and r5 are equal, i.e. if they have the same value. If they are, then that means the character ID of the current character in the memory is EQUAL TO (beq) the character ID in the table, and that we should thus remove the character from the data. To do so, it jumps to some code under the label “MakeChange”, which we’ll get to later. If NOT, then it’s supposed to keep reading after the beq code—and what’s after that is the “b TableCheck”, which is a direct branch to the code under the label “TableCheck”. TableCheck is what we’re in right now. Let’s say the first character ID we got from the table wasn’t a match—it was 0x0A, and our character ID was 0x15.
It jumps back to “TableCheck”, where it adds one to the loop counter, r6. Then it does the SAME THING, but this time it will check 0x08DDFFFF + 0x02, or 0x08DE0001. It will load the byte there, by virtue of
ldrb r5, [r5,r6] @ Loads the byte/char # there
and check to see if THAT matches.
And if THAT doesn’t, it will continue on until it hits a 0x00, meaning “you can stop checking the table now—there are no more entries”, or a match. If it hits a 0x00, it will go back to the MAIN loop and check the NEXT character in the memory—and go through the code ALL over again. That’s quite a bit of looping and checking for it to do, but the processor will be fine—it can do all of this in a fraction of a second. You probably won’t even be able to notice it in-game.
Let’s say it finally finds a match in the table—then it goes to “MakeChange”. I wonder what’s that…
We FINALLY get to the part where we actually DO something. This ain’t called “MakeChange” for nothing. It’s a simple but effective code that stores 0x00 into r0 and then stores the value of r0 into the address of r3 via str r0, [r3]. First, note that when I move 0x00 into r0, it will replace all the other “digits” in the register with 0 as well, meaning r0 = 0x00000000 (a register is technically a word long).
Thus when we store r0 into r3, we are actually storing the WORD 0x00000000 into the offset r3. What is r3? Well, way back when, we calculated the offset of a character in the memory. So what r3 is, is the offset of the current character in the memory we are checking—checking to see if they should be removed. Funny thing with Fire Emblem is that when you change the character data pointer, the first word in a unit’s/character’s memory data, to 4 00’s (0x00000000), the game will end up deleting it and moving up all the entries below. In other words, it’s an easy way of getting rid of the character. That’s exactly what we’re doing here—we’re replacing the first 4 bytes of the character’s data in the memory with 00’s, and once this routine is done, the game will do the hard work and shift everything up for us.
…Sadly, it’s not done. It then uses the basic branch command to go back to the first loop—that’s what “b Main” is for. It will NOT end until it reaches that code near the very beginning:
cmp r2, #0x2A @ If its entry 0x2A
beq End @ Go to the end
In other words, until it has checked 41 characters/reached its 42nd check, it will not stop checking to see if any of the characters in the party should be removed. After all, we have to be thorough!
Once it IS finished though, it will go to “End”.
What is “End”?
I said it a while ago, but that doesn’t change how important it is. We pushed some registers at the beginning, so we’d better push them back, or the game’s going to fuss. Remember also that the opposite of pushing “lr” is popping “pc”.
My final explanation for this example: what it does is pushes the offset of where we were before the code starts. Then, when we pop it, we are popping it into r15, meaning we are making the game GO to the offset where we were, because pc/r15 is the offset of where we are. So if we change r15, we are in fact changing where we are in the game’s ASM. Again: we are changing pc/r15 to where we were BEFORE we started running this code. This is our way of ending this routine and returning back to whatever we were doing before it.
…Wooh.
With that knowledge, go ahead and make a table at 0xDE0000 for characters to remove, add the ASMC code to an event, and try magically removing characters from oblivion. You know a LOT about ASM hacking now—practice what you can by making small edits, and…
And actually, you can do a lot more now—however, there is one major problem. To be able to make changes, you have to know offsets to change. How did we know to use 0x0202BD08, and in part 2, 0x0202BC13, etc.?
Well, one way to know is to debug.
Another way to know is to look at other people’s doc.
I am tired of ranting (it may seem impossible but the pain in my left hand is too great), so I will say it clearly now (and I’m sure I’ll remind you because I’m like that and love adding parantheses all the time, like right now).
READ OTHER PEOPLE’S DOC.
In programming in general, it is so important to read documentation. You don’t want to do what other people have done. You want to learn from their work, their mistakes, and their successes. You want to save time by taking knowledge and using it for your own purposes. That’s the whole idea behind “open doc”, “open source”, etc.—it’s seriously, SERIOUSLY helpful. I practically learned assembly and made a lot of my ASM hacks by stealing from other people. Only until MUCH later did I figure out how to obtain offsets myself.
If you read people’s documentation, you can actually go off on your own from here and do some serious work. I’ve taught you that much.
Hextator has one of the largest folders of documentation on Fire Emblem, if not the largest, and a LOT of it is ASM-based. Nintenlord also has some amazing work, some of which I never had any idea existed before I checked, which made me feel somewhat stupid after because I could have had an easier time had I known about all the useful information in there. There’s also other doc spread about on various websites and the such, including mine, though in a way I consider this entire 300+ page tutorial to be a large portion of my hacking career’s “documentation”. :P
That being said, I don’t intend to stop teaching now. I am going to teach you more codes, more examples, and eventually teach you how to use a debugger and some tricks on how to find your own offsets, although I don’t know everything there is and finding locations of ASM routines in the games you are hacking is one of the harder parts of hacking for sure (for me, right now, it is probably in a way harder than the actual ASM-writing itself).
Part 4: More Examples
– “Speed-Analyzing”
Time to run through more hacks.
Here’s your next one - https://dl.dropbox.com/u/8875056/hacking/asm/Revive%20All.zip

It’s thumb. Write to offset 0. Start with label “Initial”. Push 5 registers and the last register, then start a loop counter in r2 with starting value 0x00.
… I think we can go a little faster.
New label HealLoop: add one to the counter. Load the base offset. Note that the base offset works like before and is one entry before the actual 1st entry for player character (0x0202BD50) but also accounts for which byte the turn status byte is (0x0C).
Take 0x48 and multiply it by the loop counter to get a relative offset, then add it to the base offset to get the offset of some character’s turn status in the memory. Then make it 0x00, which will make them “alive” so to speak (a bit combination of ‘0x04’ and ‘0x01’ renders them dead… though this is technically the inappropriate way to relate bits, I’m too lazy to think of it in binary: in short, if a character is dead, they will usually have a turn status value of 0x05, or at least have those bits activated).
Then it loads the max HP byte, which is 6 bytes after the character’s offset in the memory (which is in r0) and stores THAT in the current HP byte, which makes it so that they are fully healed.
Then it checks to see if it’s entry 0x2A and if it is, it continues to “End” which pops the registers we pushed, but if not, it keeps going, forcibly reviving characters.
https://dl.dropbox.com/u/8875056/hacking/asm/Multiple%20Seize%20Hack%20bT.zip – This hack lets you choose who can seize and stuff by using a table. Let’s check it out.
Note that we set the offset to 0x034884 this time. The reason why is because this ASM hack is an actual hack of an existing routine at 0x034884. In this case, the new routine is shorter than the old one, so we lucked out and don’t have to repoint it. Repointing ASM routines is a pain in the butt (definitely harder than repointing tables/arrays) but we’ll get to it eventually.
This time we only push r2-r5. It’s been a while, but I think I did this because I needed some extra registers to work with and only r0 and r1 were free by default, so I pushed r2-r5 so I could use them and will re-pop them later.
Before I continue, how the seize option appears is that it checks for a value 0x00 or 0x01, where 0x01 is true and 0x00 is false (I really hope I didn’t get these confused… >_<’). We don’t have to worry about when it checks that though—we just need to change how it decides to output either 0x00 or 0x01. Before, FE7 used a bunch of checks on the mode to see who can seize. Now, we’re going to use a table.
First, we start our counter. Then we load the offset of the table. In another register, we load the offset of the chapter value in the memory, 0x0202BC06. We use ldrb to load the byte there, which is the actual chapter value.
Next, a new code: lsl—this is a logical shift left, which essentially moves
bits over to the left. I don’t really feel like explaining it, but due to how
bits work this also doubles the value… or rather, it multiplies it by 2^(#),
where the # in this case is 0x02. So lsl r1, r1, #0x02 multiplies r1 by 2^0x02
and stores that in r1, effectively multiplying it by 4. This saves us a
register as we don’t have to use the mul code, and is thus more efficient.
People don’t like the mul code in general and try to switch to this and its
opposite, which is lsr, which shifts to the right, and divides by a power of 2.
To divide by a power of non-2 though, things get a bit more complicated, which
is why you either have to use some special bios function (not preferred) or do
some fancy multiplication/division combinations… *sigh*
Anyhow, the point of this is that the table has 4 bytes for every chapter, and those 4 bytes are actually a pointer. So this user-created table has one pointer for every chapter, and the game finds what chapter it is and then calculates which pointer to use.
To do that it does a little math and loads the word, which you should be familiar with, and then it loads the first byte there into r3, because in this line:
ldrb r3, [r2,r4] @ Loads the byte there (based on loop/counter #) into r3
r2 + r4 on the first loop is r2 + 0x00 or just r2.
What it’s doing is trying to load a “list” of characters who can seize on that chapter. Thus it first checks to see if the byte is 0x00, and if it is, then it’s the end of the list (if it’s on our first run then that means there’s no entries and no one can seize!) and it marks the true/false marker as false, which is under “E3”, and I’ll briefly go into a little bit more later.
Otherwise, it loads the current character ID, which so magically can be done with the code
ldr r5, [r0, #0x00] @ Otherwise, load current character ID
ldrb r5, [r5, #0x04]
You can’t tell just by looking, but r0 contained the offset of the current character in the memory. Remember that the first word there is the character data pointer, and that the 4th byte in the character data pointer Is the character ID—so that’s what those two codes do. Get familiar with them, I know I at least used them plenty (and similar things with like classes and items).

Next, we see if they’re the same (organization is important here so that you know to check r5 with r3). If they are, we go to “E4”, which is my oddly named label which has code for setting the “can this unit seize?” value to true. Otherwise, we add one to the loop counter and go again, checking the next entry in the table, until we find a match or the table ends. :P
As for those ending codes:
First, we pop back those registers so they have their original values.
Then, for the false one, I’m not sure why, but we load the character ID yet again, and then set r0 equal to 00 for some reason. I really don’t know why but for some obscure reason I was encountering some problems with the code when I removed these lines, so I kept them. That’s one of the potential issues with hacking existing routines: you have to really understand the code to minimize your chance for breaking things.
Lastly, we do bx lr, which I believe we’ve seen before, though it may have said “bx r14”. This is our way of going back to where we started. I’m guessing the original code also used this, since I based my hack off the original code.
The E4 one is similar but just moves 0x01 into r0 so that when the game checks r0 to see if it’s “true” (0x01) or “false” (0x00), it knows it’s true (meaning the character can seize).
https://dl.dropbox.com/u/8875056/hacking/asm/Gold%20Requirement%20Code.zip – Next up, we’ll be looking at this rather old “Gold Requirement Code”.
We can do this. We’re writing thumb code to 0x00, starting by loading the location of the funds address, which happens to be 0x0202BC00 in FE7. Then we load the entire word there, because the funds value (how much money you have) is a word.
Next, we load something called “GoldAmount” into r1. What I did here was specify GoldAmount below using a label, just like how we do with branching codes (e.g. “beq End”). However, at the end, I used .long to write a “long” word, 0x000BDE31. IIRC, .short writes a half-word, .byte writes a byte, and .align can align the data to make sure that it is word-aligned (which can be important for “relative offsets”, something I will sadly eventually have to explain to you).
Next, it compares the amount needed (“Gold Amount”) with the amount of current funds, and if the amount needed is greater, it goes to end one and marks it as false, which has apparently changed to be the value 0x01 now (I really get confused by this myself, as you can see—idk, just try switching them until it works >_>’, I really don’t know if 0x01 is true or false or what), and then uses bx r14 to return back to whatever it was doing (cough, events). Otherwise, it uses the “sub” command to subtract the needed gold amount from the current funds and then stores it at the funds address. It then marks the result as “true” (which is apparently 0x00 now… I don’t even know).
Now, you might be wondering, what do we do with this 0x00/0x01 result now?
The trick is the code IFAT/IFAF BLA… Here’s a copy/paste from the EA doc:
FE7:
IFAT *Conditional ID* *ASM routine pointer*
You can type in the offset of your ASM routine (don’t forget the +1 for thumb, lol) and whatever comes after is what happens if it’s true and whatever comes after the “else” is what happens if it’s false. Or something. I’m tired right now and can’t be bothered to check since this is one of those things I just use trial and error with until it works. Look, I seriously am NOT qualified to be teaching this, didn’t we establish this near the beginning? XD
https://dl.dropbox.com/u/8875056/hacking/asm/Tile%20Text%20Change%20Hack.zip – This hack changes the list of text names used for tiles in a certain map in TLP where you are in a “constellation” and so if the tile said “floor” it’d be awkward and yet I don’t know enough about tilesets (surprisingly enough) to really make my own proper tileset and stuff… so I came up with something that would just use an entirely different set of names for a specific chapter.
…
I may have mentioned this before, but finding where to hack routines is difficult. And I’m sure I mentioned that finding space for them is difficult.
One of the issues is that when you repoint, you can’t magically repoint to anywhere in the ROM. Basic branching codes use relative offsets, which to put simply, means they have like, one byte, and that one byte is a “pointer” to where to branch to. That’s a problem because if you’ve worked with pointers, you’ll know they’re usually 4 bytes. Yeah, well, in ASM, they save space by saying “this thing is X bytes ahead of or before me”. The thing is with only 1 byte for this value, it limits how far you can branch from one instruction to another.
Thus you have the bl command, which is better, but still not perfect. The bl command is an opcode that uses 4 bytes: it has… I believe 3 bytes (it might actually be like 20 bits, I don’t know and I don’t feel checking—thumref or GBATek could tell you exactly how it works but I’m more about the practicality of all) and can link to much farther locations, but still not anywhere in the ROM. So now the issue is getting a location close enough to the original routines, which are usually at the beginning of the ROM.
What I did is use the fact that weapon icons in FE7 start at about 0xC5EA4 or something (this is off the top of my head) and expanded them elsewhere. Because of that, I now had a bunch of free space from where the icons used to be. I could use this to put ASM codes. The issue is that for other people to use my codes, they would also have to expand their weapon icons, or else repoint the ASM on their own, both of which could be troubling since it isn’t exactly user-friendly, though you shouldn’t have too much of a problem with repointing weapon icons if you’re this far into my ASM tutorial. :P
So another thing with bl commands is that for it to work right, you have to pretend the file you are making uses the actual offsets the ROM would use. Actually, you could probably technically write directly to a ROM, and there are programs which make this process easier. However, I am uncultured and taught myself this, so I am going to teach you my barbaric ways of copying and pasting ASM codes from offsets (at least until I make a program that I like and can use to make this easier OR figure out some other method that already exists that I like).
With that, I will now post the ASM hack:
It’s not super long, but it’s got some new things we need to learn. Let’s get started.
First, we write the first part to 0x019B0A. As it turns out, this is the location of an existing ASM routine, and for us to write to this offset, we will be replacing codes there. As for how to find this offset, I’ll be writing a section on how to do that soon, or else I’ll just slowly integrate it into our teachings.
Now, when we overwrite those codes, we have to make sure we ultimately use them or else the output at the end will be different and things will go awry. Just like with the Seize hack, we have an ultimate goal, and we’re just sort of changing one or two values on our way or else just changing the conditions with which to output those values.
In this case, the ultimate lines we use (and replaced) are:
ldr r1, =0x08BE50E8
lsl r0, r0, #0x01
or
ldr r1, =0x09461900
lsl r0, r0, #0x01
depending on how the conditional check goes. Now, those are 2 opcodes we replaced, and they’re both 2 bytes, and 2*2 = 4 bytes, and a bl (branch with link) is 4 bytes, so we replaced 4 bytes with 4 bytes: sounds great.
Now with the actual code, we have
bl Event
Initial:
.org 0x0C6048
Event:
We start by branching the normal routine to the routine we’re writing. This is our way of “repointing”. However, we also note where we left off using the label “Initial”. The assembler doesn’t like when you use offsets, it prefers using label. So if we need to reference the offset after our branch instruction—since ultimately, we will want to continue where we left off, we need to give it a name.
Next, we set the offset for our hack—I used 0x0C6048 probably because that’s in the middle of where the weapon icons used to be, and was the next chunk of free space I had for ASM hacks. We call this part “Event”, as we referenced with the bl above.
The rest is comparatively trivial:
ldr r1, =0x0202BC06
ldrb r1, [r1]
cmp r1, #0x44
beq StarTiles
cmp r1, #0x45
beq StarTiles
We load the offset of the chapter value at 0x0202BC06, which you should have seen before, and then load the value. We check if it’s 0x44—if it is, we go to “StarTiles”. If not, we check 0x45, and if the chapter is 0x45, we also go to StarTiles. If it’s neither of those, we continue reading the code, and…
ldr r1, =0x08BE50E8
lsl r0, r0, #0x01
bl Initial
we end up loading the default list of text IDs at 0x08BE50E8 into r1, EXACTLY as the original code does, and then multiply r0 by 2 and store it in r0, which I don’t know what it does, but all I did was copy the code I replaced from earlier to make sure we still had it. (As for how I knew where that code was and what it was, we’ll figure that out later.)
Lastly, I branch to “Initial” to make the game go back to where I was before I left off. Note that the only register I used before loading the offset of tile text IDs was r1, and that ultimately we replaced r1 with the “ldr” opcode so it didn’t matter that we did it. If we needed to use other registers, we’d have had to push them, like I did in another example, and pop them back later.
The “alternate ending” though, if you will, has it load a NEW list of text tile IDs. This is only if the special conditions were met as shown before.
StarTiles:
ldr r1, =0x09461900
lsl r0, r0, #0x01
bl Initial
This time it loads a list at 0x09461900, a somewhat obscure offset that you could check at 0x01461900 in a hex editor, and then I use the lsl code again because I want to keep things the same, and then return back with the bl. As you can see, the only different there was the offset—everything else was just doing checks to see which offset I’d load. But the effect is pretty nifty, I think.
https://dl.dropbox.com/u/8875056/hacking/asm/Custom%20Map%20Sprite%20Palette%20for%20AR.zip this is just another short and similar example since branch links are important.
You branch from one offset to the next (this seems to be the first routine I wrote in the new space actually, since it uses 0x0C5EA4, which is exactly where weapon icons start, I believe…) and then I check the chapter to see if it’s less than 0x43—if it is, I laod the normal palette, but if not I load a new palette at some offset 0x09BB4200 that doesn’t really matter (all we need to know is that it holds the palette). Mov r1, #0xe0 is some code that I replaced and so I put it back.
https://dl.dropbox.com/u/8875056/hacking/asm/1.5x%20Critical%20Damage%20Hack.zip – This turns the critical damage to only 1.5x. I made it 2.5x in a hack of mine and someone requested 1.5x so I did that too.
I actually stuck this right in the middle of the critical damage routine or something. I branch to the hack and pop r2—not sure why I popped it but it probably had something to do with the original code… anyhow, I move 0x03 into r2 and multiply it by r1, which presumably contained the damage. Then I pushed r2 for some reason and used lsr, the opposite of lsl, to divide by 2^0x01, or 2, which means I multiplied the damage by 3 and divided it by 2… 3/2 = 1.5, I made it to 1.5x damage. bl Return makes it return back to where it was.
By the way guys, this might sound shocking, but I used to write a lot longer codes. Check this one out -- https://dl.dropbox.com/u/8875056/hacking/asm/Gradual%20Stat%20Increaser.zip I think it’s like 300 some lines. Why? Because I only knew a few codes so I just copied and pasted them to get my desired effect instead of using a loop: I manually edited each value of the enemies’ stats. Yeah, I was a serious noob back then; it also makes me look GOOD now, even though I’m really not. FYI, that’s only part 1—I had to split it into 2 parts because the assembler got mad after writing so many lines. People didn’t even know that could happen. >_>’
To end this part of the tutorial (I know my parts are super long, sorry, there’s a lot to teach and I want this to be thorough), let’s do a long script that could probably be more efficient but isn’t as bad as the last one, I don’t think.
https://dl.dropbox.com/u/8875056/hacking/asm/Stat%20Maxer.zip – This hack is used in TLP to allow the player to max their stats if they had the money. It had a “cost” for each stat and calculated how much the player needed, then subtracted it. Fun times.
“Oh man Blazer, you really hate us, don’t you?”
Nah, this is actually not so bad. We’ve done a lot of practice: hardly any of it really needs explaining. Just some more practice with some different circumstances, really.
We push registers for use, including the last register, so you can expect us to return using pop {pc}. We set 3 registers to 0x00, where r2 is a counter and r7 is another check and r3 we just set to 0 because we’ll want it to be empty later.
In “Main”, we add one to the counter, load the memory table one entry back as usual, and do a little multiplication and addition to get the character memory address in r3. Then we load the byte there, and see if it’s 0x00: if it is, we go to the end, because we’re done checking (this might be risky in retrospect: what if the byte happens to be a 00 because the character data pointer happens to end in 00? I’m not sure what I was thinking since I’ve used other methods besides this but oh well).
If it’s not 0, we check the turn status byte and see if it’s active. 0x01 and 0x41 are the two values you’ll ever see for active, though a more proper solution would probably be to check the actual turn status bit that says “this character is active”… also, 0x01 has other uses besides the bit for “active”, which is kind of weird, but whatever, details don’t matter too much.
Anyhow, if it IS the active character, then we’ve found the character we’re trying to max. Why? Because how this hack works is that the character talks to another character who asks if they want to max their stats. While talking to a character, the character who initiates the talk is active—so we find which character it is by checking for the active character. Clever, no?
By the way, if it doesn’t find a match, it goes back and loops until it either finds an active character or doesn’t find anyone (which would be awkward given the nature of the ASM hack, but I have to let it end somehow).
Now we set r6 to 0x00. This will serve as the register that contains how much money we need to max all the stats. We will keep adding to r6 until we calculate how much money is needed, then check with our funds to see if we have that much money.
Under “StatChecks” we load the pointer to the class data from the memory into r0 (it says r1, that’s a typo or something—trust the code more than the notes, haha). If you don’t know, a unit’s/character’s memory data has the character pointer (1 word) and then the class pointer (1 word) which is why we used [r3,#0x04], it loads the memory address of the current character from r3 and adds 0x04 to it and then loads the word there into r0… meaning the pointer.
Next what it does is it goes through every stat and does some math to calculate how much money is needed. We’ll go through Strength and the rest are just copies but with slightly different numbers due to different offsets and other small details. We load the max strength from the class data, which we can tell using Nightmare + a hex editor is the 14th byte. Then we load the current strength from the memory, which also happens to be the 14th byte, into r2 (we don’t want to overwrite r3 as we want to keep that handy so we can keep working with it).
Then we subtract r2 from r1 (r1 – r2) and store that in r4. This tells us the difference between the max strength and current strength. If it’s 00, then r1 = r2 or max strength = current strength. Otherwise it should be some positive #.
Then we move 0xFA into r5 and multiply it by 2 to get 500, because this is how much gold is required to up strength one time.
Then we multiply it by how much we need to (r4) and find how much it costs to totally max strength, and add that to r6, our total cost for EVERYTHING. Then we have this seemingly odd check where we check if this is the “first time”. What the hack does is the first time it goes through, it just calculates it—if it turns out it can go do the change, it goes back AGAIN, but this time makes the change. To know whether or not it can make the change or not, r7 contains either 0x00 (false) or 0x01 (true). I actually wrote the code to check if r7 is true or false here, by the same logic as in other times or like with the IFAT command which checks the result for you and lets you do events based on it.
In the case that it’s the second time, it just uses:
strb r1, [r3,#0x14] @ Otherwise, store the max stat into the offset of the current stat
to store the max strength into the offset of the current strength in the memory. The actual gold subtraction will be done at the end.
It goes through all the other stats similarly, except for HP, the max is 60, and for luck, the max is 30, as those do not vary between classes in this hack.
At the end of the check for the luck stat, we have
cmp r7, #0x00 @ If r7 is 0x00, i.e. this hasn't been done before
beq MoneyCheck @ Then see if there's enough money to actually make the change
On our first time, this will be true, so we go to “MoneyCheck”. On our second time, it’ll go to End1, which marks the result as true (so that I can use an event to have a different text output depending on whether or not it was successful) and pop registers accordingly. (End2 is the same thing but marks the output as false and occurs if you don’t have enough money to max all stats.)
Here, we do something like the gold requirement code before, where the gold required is in r6. We check to see if we have enough and if not, we go to End2, marking the result as false/a failure, and if we do, we go ahead and subtract the money and then set r7 to 0x01, so that this time when we go back through the checks, it will actually make the stat changes.
Again, this isn’t the most efficient code, and it’s not even the most complex or fancy—I mean, you can’t choose what stats to max, you can’t choose how many of them to max, the gold cost for east stat is a constant, etc.—it’s simple, but for my intents and purposes, it works, and is fun enough for me. :P
With that, you are FINALLY freaking done with this part. Next up I will cover how to find routines and how to debug. After that, I will have taught you practically everything I know, so we will be done!
Part 5: Finding ASM
Routines & Basics of Using a Debugger
First, no$GBA debugger is essential to this section. Find it, download it, and use it. The password is “veta” which it should say either on the download site or in the zip or something.
Now, this section will be much shorter than the others. Aside from my hand hurting a lot, I’m going to be vague and just give general tips for some things.
There are a few tricks to finding routines. First is looking at doc. Most ASM hackers have doc and will use offsets in them. Look at the offsets. For instance somewhere above I have a hack having to deal with the critical damage. You could look around that offset in a debugger to see what’s around it and what’s happening. That’s one way to find one. FYI, -I-found the offset by looking in Hextator’s doc, I believe. I already mentioned the doc earlier, so I’ll stop here.
Next is using some hex editor tricks. Certain pointers can often be found embedded in the ASM. This is nice because they’re things you can know/predict/find by other means. For example, you know the text shown in the support conversation room in the extras menu of FE7 says “Select whose conversation you want to read”, so you search part of that text as a string in FEditor Adv and find the text slot—0x0FC4. Fun. Now search 0xC4 0x0F 0x00 0x00, the text ID as a word in little endian. You’ll find a match at 0x9B9B0 in a hex editor (keep in mind this would be referenced in ASM etc. as “0x0809B9B0”). As it turns out, this is a somewhat simple case as no other instance of this string occurs in vanilla FE7 (though technically I searched on a hacked ROM but it was only slightly hacked so… DETAILS). If you look at this offset in a debugger, which I’ll explain how to do shortly, you can search for where exactly it loads that word, 0x0000FC4, and then look around for clues as to what’s what. It helps give you a general idea of where to look, at the very least.
Similarly, you can do such things with graphics offsets, palette offsets, and TSA offsets, which are often embedded in ASM if they aren’t in tables. If they ARE in tables, you can sure as heck go search up the tables, and the pointers for those will also be in the ASM. In general though, the less common something is, the easier it is to find the routine you’re looking for—if you’re looking to hack character abilities and go searching using the character table, you’ll probably have a harder search than normal because the character table is referenced several times throughout the ASM, being a major data table and all.
I used this to find some routines such as the ones that loaded certain palettes—then I expanded them so that they only loaded certain palettes in certain chapters. Thus is the idea behind my “custom palette for the post-game” hack which changes the general color scheme of the post-game to be purple and some slightly obscure shade of blue as opposed to blue and red.
Now you need to know how to actually figure out what’s happening in the routines and how to decipher them. Having practiced ASM as much as you have, you should have a good idea as to what most codes do, and should even be familiar with some memory offsets. It’s also nice to keep lists of hex values in store—if you’re trying to change the Nils portrait that appears in the support conversation room, which is hardcoded via ASM, you’ll want to know his portrait is 0x41, so that you can look for something like mov r1, #0x41, and then change that 41. (Just searching “41” in a hex editor probably won’t do you much good since there will be too many instances of that, FYI.)
As it turns out I explained this before to somebody on an instant messenger (*glances towards that one conversation I ACTUALLY dared to use in this tutorial*) so I have a poorly labeled image to help explain things:
WARNING: TERMS MAY NOT BE ACCURATE. IN FACT, THEY ALMOST DEFINITELY AREN’T ACCURATE, AS YOU’VE PROBABLY FIGURED OUT BY NOW.
- A is the assembly window, it has all the codes and will update to whatever offset it is running if you play the game and then pause and check it out. More specifically, A is actually referencing the offsets here, but it’s in the assembly window, so yeah…
- B is the opcode column. Right now it’s set to arm, so… yeah…
- To the left of C is the column of parameters. Again, it’ll be more obvious once we go into Thumb mode, hopefully.
- D is no$GBA’s version of the memory viewer. It works practically the same—you can edit values as you like. If you right-click it you can switch between the “data window” (memory viewer) and the break/watch window (contains a list of breakpoints, which shall be explained later).
- E is the stack. If you remember the push/pop explanation, it like, stores stuff here… yeah, it’s another one of those things I really don't understand it all too well but it IS useful sometimes. Essentially, code sometimes pushes offsets while going through routines, so if you check the stack, you can sometimes find useful offsets of pointers, and thus "trace" the routine to find out where it loaded from (real hackers will probably say this is complete and utter bogus and nothing like true “tracing”.)
- F contains all the registers and their values. Sadly, I don’t know what cpsr and spsr are though, since I never had to learn… XP
- I don’t know what the flags do either, but they’re there, right next to the window. That’s G.
- H is the game window. The game can also pop-up on a separate window.
- For the buttons above I, the only ones I feel like explaining are Trace, Run Next, and Reload. The rest are either self-explanatory, not very useful, you can figre out on your own, or a combination of the above, AFAIK. Trace is very useful in that it lets you trace the routine. To me knowledge, it’s almost exactly like Run Next, except if you encounter a “sub-routine” (a bl opcode which branches elsewhere) it will actually follow to that code and keep going, whereas “run next” will just run through the entire sub-routine automatically and then keep going from there, without actually seeing what the sub-routine does. “Reload” just reloads the ROM, which is useful, and can also be done with Ctrl+R.
Next, for the main menus to the top:
- Files – you can open files via filename or a special list file that I don’t bother to use, and also reload recent ROMs. Snapshots are no$GBA’s versions of savestates, they’re slightly less convenient I think, but they work alright. There’s a couple other things near the bottom idk about and you can also quit (lulz).
- The search menu lets you search for strings, set bookmarks, find the next breakpoint, and some other stuff, but the only thing I use and thus the only thing I can really tell you about is the Goto option—click on the assembly window or memory viewer/data window and hit ctrl+G, then type in an offset in hex (remembering the “+0x08000000” if you’re trying to access the ROM!) and hit “Ok” (or enter) to go there.
- Run – it’ll let you run around the code. Seriously I don’t know much about it except that there are some shortcuts for the buttons. Maybe you can play around and update this tutorial once you figure out what everything does.
- The debug menu is pretty useful, it’ll let you make, clear, and toggle breakpoints, and some other stuff. I only ever really use it to clear all breakpoints though.
- The “window” menu has a lot of stuff like the VBA “tools” menu—it’s too much to go into but if you’re familiar with VBA you should be able to figure most of it out on your own.
- “Utility” has more things I don’t use though taking screenshots is useful. I’m sure it CAN be useful, I just don’t use it…
- “Options” menu has way too many options—fiddle around and get it to how you like. You may want to turn the brightness up and check out some other stuff like the controls to start with. Be sure to hit “Save Options” after your changes so that they save for the next time.
- “Help” menu just contains some basic help stuff, the typical stuff you’d expect from a help menu in a program like this. XP
Okay. Now, the basic idea behind debugging is that you say “this area is suspicious: let’s stop the game in this code and see what it does”. To stop it, you make a breakpoint: what I do is just click on the code I want to set a breakpoint on and it turns red. To get rid of it, click on it again or use the debug menu to clear all breakpoints.
As for where to set breakpoints—suspicious places, of course! I covered some tips on how to find routines before.
Now, once you stop the game, you need to figure out what the heck it’s doing. If there are notes on the routine already, it’s pretty helpful, but otherwise you need to use all your knowledge thus far on figuring out what the numbers might mean. Knowing offsets and other such values can be REALLY useful—just recognizing one byte can help you identify what one register holds, e.g. a character ID, and then you can be like “oh, it’s multiplying the character ID by this to get this offset, and… oh!!!” or something like that.
Yeah, it’s very… difficult to explain as a science. It takes intuition. Thought. Trial and error. Playing around. Research. Such skills are important to have and if you have them, you’ll get pretty far.
Anyhow, what you want to do once you find a routine is go through each code and see how each opcode affects the registers. See what the heck it’s doing to not only the registers, but also the values in the memory. If you see some offset in the memory that you don’t know about, try changing its values—it might break the game, but you might also find out something interesting.
Of course, don’t neglect to use this on your own codes. I taught you the hard way first, but now that you can debug your own code by going to the offset you put it at, you can check to see exactly what it’s doing—and when it does something you don’t expect, you know exactly what opcode to blame. Check it out, see how to fix it, fix it, re-insert it, and try again. Then you’ll really be using a “debugger” by, well, getting rid of the bugs in your codes. It’s a pretty fitting name to call this thing a debugger, huh?
…
Wooh.
This may be my longest section in the tutorial.
With that, the ASM hacking tutorial is done.
I’ve more or less taught you everything I know. Okay, I haven’t taught you every little offset, every little doc, or every little code. But that’s where YOUR work, YOUR effort comes in. If you’ve gotten this far, you have the potential to succeed and do great things. Surpass me, to start—it’s not hard. I am not very smart and I managed to get this far. Someone who IS smart can do much better. Hey, you can even write a better tutorial than this long, confusing, vague one when you’re done.
Lastly, I have a little special request of you. I can’t force you to do anything, but I’d appreciate if you shared the ASM hacks you made and any documentation you have. Sharing information and knowledge with others, including hacks, will help the community grow. It will help other people learn and prevent people from having to do the same work. Would you be able to make ASM hacks if others hadn’t shared their doc? I learned almost purely by looking at others’ works and trial & error, so I know I almost definitely wouldn’t. That’s why I took the time out to write this huge tutorial—so that the information is out there for people to take and make their own.
Again, it’s just a request—you don’t have to, but it’s nice. It’d be nice to have a chain of sharing, where I share my knowledge with some people, and they share their knowledge with some people, etc., because if nothing else, some day it might come back that someone shares something with you again. =)
You have learned the most obscure and feared aspect of ROM Hacking for many people—something many people wish they could learn, and something many others shudder to even think about or discuss. You have something to be proud of, if nothing else.
Congratulations and best of luck in all your hacking endeavors, especially ASM hacking!
I hope to hear of your achievements in the near future!
Final Chapter: Credits, Thanks, and
the Epilogue
This tutorial took quite a bit, but so did Fire Emblem hacking. Thus I’d like to thank people for all their work and effort. Please note that my memory is vague as well as not all-inclusive. If you feel you contributed a lot to the Fire Emblem hacking community and deserve to be here, just kindly contact me (don’t flame and get pissed). If I said something incorrect, please do the same. And if I forgot you, as I am quite forgetful, please do alert me as I want this to be a thorough list of people who deserve to be here. However, I’m not going to include everything everyone has done (or this list would be at least a dozen pages), but for major people, I will post their general accomplishments.
Major,
Veteran Hackers:
Lute/Iggy – One of the original FE hackers who posted a page of data on FE hacking that got Pukachi/SpyroDi to make Nightmare modules.
Pukachi/SpyroDi – One of the original FE hackers. She created the original set of modules and has contributed in hacking games from FE4 to FE8, IIRC. An inspiration to others and the instigator of Fire Emblem hacking.
Xeld/Zeld/Hextator – One of the original FE hackers. He started with assembly hacks and miscellaneous stuff but eventually created FEditor Adv, one of the most used and best Fire Emblem hacking programs out there, which is capable of editing text and portraits better than any other program, and is also capable of importing battle animations in seconds, and making custom battle animations and spell animations (the former would be really difficult without him—the latter would pretty much be impossible without him). He’s also made several patches and in general has had a lot of accomplishments throughout his hacking career.
Blazer/Fire Blazer/Keriku/Luffy/FireShrine – One of the original FE hackers. I’ve been doing it for a long, long time, and I’ve helped lots of people with their questions and hacking. Whenever a new innovation came out, I’d almost always be there to test it out, help find bugs/glitches, or expand on information, write tutorials, etc… I helped Xeld and Nintenlord in the few ways I could (testing programs and reporting glitches) and have done my best to make use of everyone’s programs and finds by making hacks like Prince of Durand and Tactics Universe. I have a site dedicated to Fire Emblem with lots of hacking information, as well as forums with many hackers who can help out, and I am a member on most Fire Emblem forums. With this tutorial I hope that I have left hackers with most everything they need to make a hack on par with or better than my own hacks—not to be arrogant, but people have a hard time making use of things unless they know how, and I was often times one of the few people who knew how to do something (events, insert music, battle and spell animations, etc…). This tutorial is also to remedy that as I shouldn’t be the only one able to make full use of the knowledge out there that simply hasn’t been put in an easy-enough fashion for people who can’t figure everything out on their own. The reason why this paragraph is so long is because I made this tutorial, so of course I have to say a lot about myself. And there’s no way this paragraph could not sound egotistical and narcissistic no matter how I phrased it, if you ask me. =D
Flyingace24 – an inspirational hacker who has helped the community in ways most people don’t know. Has made nightmare modules and helped other hackers with their projects. He’s also one of the original FE hackers and one of my long time friends.
Arch – a veteran hacker who has lived through a lot of the changes in the FE hacking community. He was the driving force of the forums that were once renowned as the best Fire Emblem hacking forums, Fire Emblem Universe. Arch is also the creator of extremely popular hacks such as Elibian Nights and Fire Emblem 4 Advance (now discontinued).
Raydonn – a hacker whose name was a bit lost. He made use of information given by people to make Nightmare Modules and do other stuff. If you’ve hacked with Nightmare, you’ve most likely used one of his Nightmare Modules.
Icy Toast – he helped re-spark the FE hacking community, to some extent. Icy Toast made a revolutionary tutorial on how to insert custom maps and make your own events, amongst other stuff. This inspired me to try it out and I made a hack that I think got Nintenlord into Fire Emblem hacking—the reason why I say this is because I still have a PM from Nintenlord on youtube from years ago. Anyway, he has also contributed Nightmare Modules and his tutorials are still referenced today, even though there are programs that have made the things done in his tutorials much easier. I still miss Icy Toast to this day. L
Nintenlord – One of my favorite Fire Emblem hackers. Even if you aren’t too into meeting nice people, if you like smart, helpful, and unselfish people, Nintenlord is the guy. He’s made many programs like GBA Graphics Editor and the MAR Array Inserter that have helped tremendously with Fire Emblem hacking. He also has many Nightmare Modules he has made and many ASM hacks that give cool effects (like the move-after-attacking skill in FE10, for instance). He also made the Event Assembler, which is just another one of his awesome creations. I consider Nintenlord a good friend. :D
Honorable
Mentions:
Zahlman – has helped a lot with improving FEditor Adv and has also made a Song Editor for music insertion. Is continuously making efforts to improve hacking amongst other stuff.
Shadowofchaos – although not the oldest hacker and doesn’t have a full-fledged hack of his own, he has taken the initiative to make use of programs like FEditor Adv to make battle animations, spell animations, insert music, import music, and has recently even done ASM hacks and other useful fixes for the community. He always likes learning new things, whatever that may be, and is a great help to people and their hacks when they need something done that they themselves cannot do on their own.
FurryYunSeong – a veteran Fire Emblem hacker who has made GhebFE and GhebSaga. Although his hacks are joke hacks, he knows how to hack, and has been one of the (unfortunately few) successful hackers around the community. He appears to have retired from hacking, however.
MageKnight404 – although he has never directly contributed anything to hacking innovation, he has inspired others to try out hacking, and the more people the better. He’s also made some popular hacks—one being called “MK404’s FE7 Hack”, and the other being “Fire Emblem: A Sacred Dawn”.
More
Honorable Mentions:
(In no particular order, as I remember them)
Celice
VincentASM
Ryrumeli
Felover3
Kate
Atrius
CharontheFerryman
Camus the Dark Knight
Twilkitri
Mariobro3828
Mercenary/Rutger
SandwichSage
MageGirl
CrypticGirl
Markyjoe1990
Seph1212
Creators of all the many programs
Creators of all the many patches
Epilogue:
I hope I’ve helped you a lot with your Fire Emblem hacking. I’ve spent a lot of time on this tutorial and it’d be a shame if it wasn’t even used well, right?
With that being said, I have some favors to ask. First of all, there’s a large list of people in the credits. I’m not going to ask you to credit every single one of them just for being a decent part of the Fire Emblem hacking community. However, if you make a hack, you should probably credit the major hackers (and not just because I am there >_>) because it’s almost unavoidable that they have some sort of impact—whether direct or indirect—on your game. Especially people like Pukachi, Xeld, and Nintenlord, who have spent so many hours unselfishly working to help others with their hacking (and you’re bound to use one of their programs or modules). Just saying “thanks” isn’t much, but it’s a good thought.
Also, please don’t upload this tutorial to other sites without permission. If you need to share it, you can always link to my site or the online version of the Ultimate Tutorial so that people can download the latest version and older versions aren’t uploaded and spread about. I simply cannot keep version control of the Ultimate Tutorial everywhere, which is why it’s nice to have one place where people can always find various links to various formats of the latest version, and I’d like to keep it this way. Furthermore, please notify me of where said links (which I do encourage you to post around) are posted so that I can keep things up to date as much as I can regardless and answer anything related to the Ultimate Tutorial.
If this has done you any good, let me know, because I like knowing when I help others. I’m just that kind of guy (and I’m not a narcissist…). I’m looking forward to some epic hacks to play when I myself “retire”, and I really hope that the Ultimate Tutorial will help make those hacks epic, and come fast!
For everything… thank you!

~FIN